Proscenic M8 Pro LDS 8.0 Laser Navigation Smart Robot Vacuum Cleaner Benutzerhandbuch
- Kategorie
- Roboterstaubsauger
- Typ
- Benutzerhandbuch

M8 PRO
Instruction manual
Bedienungsanleitung
Notice d’instructions
Manuale di istruzioni
Manual de instrucciones
ユーザーガイド
Proscenic Technology Co., Ltd.
Service support
Web:www.proscenic.com
E-mail:[email protected]

CONTENTS

EN
Product description . . . . . . . . . . . . . . . . . . . . . . . . . . . . . . . . . . . . . . .1
Installation Notes . . . . . . . . . . . . . . . . . . . . . . . . . . . . . . . . . . . . . . . . .7
Instructions for use . . . . . . . . . . . . . . . . . . . . . . . . . . . . . . . . . . . . . . .8
Routine maintenance . . . . . . . . . . . . . . . . . . . . . . . . . . . . . . . . . . . . .12
Basic parameters . . . . . . . . . . . . . . . . . . . . . . . . . . . . . . . . . . . . . . .19
Common problem . . . . . . . . . . . . . . . . . . . . . . . . . . . . . . . . . . . . . . .20
Troubleshooting . . . . . . . . . . . . . . . . . . . . . . . . . . . . . . . . . . . . . . . .21
DE
Produktbeschreibung . . . . . . . . . . . . . . . . . . . . . . . . . . . . . . . . . . . . .23
Installationshinweise . . . . . . . . . . . . . . . . . . . . . . . . . . . . . . . . . . . . .29
Gebrauchsanweisung . . . . . . . . . . . . . . . . . . . . . . . . . . . . . . . . . . . . .30
Routinewartung . . . . . . . . . . . . . . . . . . . . . . . . . . . . . . . . . . . . . . . . .34
Grundlegende Parameter . . . . . . . . . . . . . . . . . . . . . . . . . . . . . . . . . .41
Häuge Probleme . . . . . . . . . . . . . . . . . . . . . . . . . . . . . . . . . . . . . . .42
Fehlerbehebung . . . . . . . . . . . . . . . . . . . . . . . . . . . . . . . . . . . . . . . . .43
FR
Description du produit . . . . . . . . . . . . . . . . . . . . . . . . . . . . . . . . . . . .45
Instructions d'installation . . . . . . . . . . . . . . . . . . . . . . . . . . . . . . . . . .51
Instructions d’utilisation . . . . . . . . . . . . . . . . . . . . . . . . . . . . . . . . . . .52
Maintenance quotidienne . . . . . . . . . . . . . . . . . . . . . . . . . . . . . . . . . .56
Paramètres de base . . . . . . . . . . . . . . . . . . . . . . . . . . . . . . . . . . . . .63
Problèmes courants . . . . . . . . . . . . . . . . . . . . . . . . . . . . . . . . . . . . . .64
Dépannage . . . . . . . . . . . . . . . . . . . . . . . . . . . . . . . . . . . . . . . . . . . .65
IT
Descrizione del Prodotto . . . . . . . . . . . . . . . . . . . . . . . . . . . . . . . . . .67
Istruzioni dell’Installazione . . . . . . . . . . . . . . . . . . . . . . . . . . . . . . . . .73
Istruzioni per Uso . . . . . . . . . . . . . . . . . . . . . . . . . . . . . . . . . . . . . . .74
Routinewartung . . . . . . . . . . . . . . . . . . . . . . . . . . . . . . . . . . . . . . . . .78
Paramètres de base . . . . . . . . . . . . . . . . . . . . . . . . . . . . . . . . . . . . .85
Problemi & Soluzioni . . . . . . . . . . . . . . . . . . . . . . . . . . . . . . . . . . . . .86
Soluzione del malfuzionante . . . . . . . . . . . . . . . . . . . . . . . . . . . . . . .87
ES
Descripción del producto . . . . . . . . . . . . . . . . . . . . . . . . . . . . . . . . . .89
Instrucciones de Instalación . . . . . . . . . . . . . . . . . . . . . . . . . . . . . . . .95
Instrucciones de uso . . . . . . . . . . . . . . . . . . . . . . . . . . . . . . . . . . . . .96
Mantenimiento de rutina . . . . . . . . . . . . . . . . . . . . . . . . . . . . . . . . 100
Parámetros básicos . . . . . . . . . . . . . . . . . . . . . . . . . . . . . . . . . . . . 107
Problema común . . . . . . . . . . . . . . . . . . . . . . . . . . . . . . . . . . . . . . 108
Solución de problemas . . . . . . . . . . . . . . . . . . . . . . . . . . . . . . . . . 109
JP
製品紹介 . . . . . . . . . . . . . . . . . . . . . . . . . . . . . . . . . . . . . . . . . . . . 111
インストールガイド . . . . . . . . . . . . . . . . . . . . . . . . . . . . . . . . . . . . 117
使用説明 . . . . . . . . . . . . . . . . . . . . . . . . . . . . . . . . . . . . . . . . . . . . 118
日常のメンテナンス . . . . . . . . . . . . . . . . . . . . . . . . . . . . . . . . . . . . 122
基本的なパラメーター . . . . . . . . . . . . . . . . . . . . . . . . . . . . . . . . . . 129
一般的な問題 . . . . . . . . . . . . . . . . . . . . . . . . . . . . . . . . . . . . . . . . . 130
トラブルシューティング . . . . . . . . . . . . . . . . . . . . . . . . . . . . . . . . 131
CONTENTS


1
Product description
Robot
EN
Laser ranging sensor
Speaker Button
Infrared recharge/anticollision sensor
Anti-collision sensor
Charging pole piece
Dust box release button
Dust collection port
Wall-mounted TOF sensor / infrared
auxiliary recharge sensor
Laser head cover pressure sensor
Infrared auxiliary recharge sensor
Air outlet 2-in-1 Dust bin & water tank

2
• In the power-on state, press and hold the button for 5
seconds
Robot
Start/Stop Button
Recharge button
Network Conguration
Forced shutdown button
Dust collector pairing mode
• Extended press to turn on / o
• Short press to start / pause cleaning
• Short press to start/pause recharging
• Solid blue light: Normal working/pause/standby
• Blue light ash: Is powering on/conguring network/
upgrading rmware
• Yellow light ash: Low battery/recharging
• Green light ash: Charging
• Solid green light: Fully charged
• Red light ash quickly: Abnormal/Error
• Light o: O/sleep
• While the power is on, press and hold the and keys
simultaneously for 5 seconds
• Short press to turn o

3
Host and sensor
Universal wheel
Cli sensor
Charging pole piece
Right drive wheel
Middle sweep cover
Side brush
Left drive wheel
Rolling-Brush

4
2-in-1 Dust bin & water tank
Dust box release button
Dust bin buckle
Dust box
Filter mesh bracket
Primary lter
Filter sponge
HEPA lter
Charging pole piece
Dust box ip
Dust collection port
Paste area
Mop cloth
Dust collection port
Release button
Water inlet
Dust bin buckle
Mop cloth holder
Buckle

5
Dust collector unit
Paste area Dust bag handle
Fan lter
Mop cloth Flip cover sealing ring
Dust collection port
Release button Power interface
Infrared lens
Charging/Dust collection clips
Dust collector port
Water inlet
Air outlet
Control panel
Dust bin buckle Dust collection duct cover
Flip cover
Buckle Dust bag

6
Dust collector unit
Start/Stop Button
Home button
Fan indicator
Charging indicator
Dust bag indicator
• Short press: Start auto cleaning / pause cleaning
• Press and hold for 3s: Start spot cleaning
• Short press: Return to collect dust and charge
• Press and hold for 3 seconds: Return to collect dust and then
continue to clean from the place where it left o last time
• Solid green light: Collecting dust
• Red light ashes quickly: Fan overheating / fan error / cover not
closed
• Green light breathing ashing: Charging
• Solid green light: Fully charged
• Solid green light: The dust bag is full / the dust duct is blocked
• Red light flashes quickly: The dust bag is not installed / not
installed in place

7
Installation Notes
Install dust collector
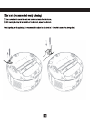
1. The dust collector should be placed on at ground more than 6cm away from the wall.
2. Ensure there is a space of more than 1.2m at the front, and more than 0.5m on both sides of the dust collector.
The dust collector unit is designed to collect dust and charge the robot cleaner. When the cleaning is completed, the robot
vacuum automatically returns to the dust collector, which collects all the dirt and dust and recharges the robot vacuum
automatically.
A new bag is required to install in the dust collector once it is lled with dust and dirt.
About your Dust Collector
6cm from the wall

8
1. Press and hold the both buttons and on the dust collector for 5 seconds simultaneously: The dust collector goes into pairing mode, the three indicators of
the dust collector ash green;
2. Press and hold the button for 5 seconds on the robot: The robot goes into pairing mode, the indicators of the robot ash green;
3. Place the robot at the dust collector to charge, and the voice prompts that the pairing is successful.
Instructions for use
Instructions for robot
Instructions for dust collector
Pairing of dust collector and robot (Factory paired in default)
Power on / o
Start/Stop Button Home button
Start / pause Sleep
Charging
Press and hold the “ ” button to power on, and the host enters the standby
state. After booting, press and hold the “ ” button to shut down.
Note: When the host is charging on the dust collector, it will automatically turn
on, and it cannot be turned o during charging.
Short press: Start auto cleaning / pause cleaning
Press and hold for 3s: Start spot cleaning
Under the power on state, short press the “ ” button to start the whole house
cleaning.
Press any key to pause while cleaning.
Note: It is recommended that the sweeping robot start cleaning from the dust
collector;
When the battery is too low, the cleaning will not start.
Please charge and then start cleaning.
When the power is insufficient during the cleaning process, the host will
automatically return to the dust collector unit for charging.
After the battery is fully charged, it will automatically return to the interruption to
continue cleaning.
If there is no operation for more than 20 minutes, the host will automatically
enter into sleep state.
Note: The host will not enter the sleep state when charging;
Automatically shuts down after sleeping to no power.
Automatic recharge: The host will automatically return to the dust collector unit
to charge after the cleaning is completed or when the battery is insufficient.
Manual charging: Press the “ ” button to start recharging; after the host is
powered o, you can manually put the host back into the dust collector unit to
charge.
Note: Please make sure the charging pole piece is in good contact.
Short press: Return to collect dust and charge
Press and hold for 3 seconds: Return to collect dust and then continue to clean
from the place where it left o last time


10
Remote control
Recharge button
Arrow key
Start/Pause button
Mute button
Gear plus
Max button
Less than or equal to 3-6 meters
Note:
1. To ensure remote control eectively, it is recommended
to use it in the front area of the host;
2. The eective distance of the remote control is 3-6 meters.
Mopping mode
Spot cleaning
Gear reduction

11
Install 2-in-1 Dust bin & water tank
① Open the rubber cover of the water tank and fill the water
tank with water, then fasten the rubber cover;
② Install the water tank into the robot according to the direction
shown in the gure, and make sure that the buckle is in place;
④ Press the buckles on both sides of the mop cloth holder by
hand, and push it into the bottom of the robot horizontally in the
direction shown.
* It is not recommended to use a mop cloth for the rst cleaning
* If you have carpet in your home, please set up a virtual wall on
the app
③ Put the mop cloth into the holder and paste it on the Velcro;

12
Routine maintenance
2-in-1 Dust bin & water tank (recommended weekly)
① Press the dust box release button and take out the dust box;
③ Take out the primary lter, sponge and HEPA lter, clean the
garbage on the surface with a cleaning brush, rinse the lter and
dust box with water and then dry;
② Open the dust box and dump the garbage in the dust box;
④ Tear o the mop cloth, rinse with water and dry in the sun;

13
⑤ Pour out the remaining water in the water tank and dry the
water tank; 1. Flip the main unit and pull out the universal wheel upwards;
2. Clean the hair and dust on the wheel, axle and support;
3. Reinstall the universal wheel and press it tight.
Note: Wash with water, dry it and put it back.
⑥ After the lter, dust box, mop cloth and water tank are all dry,
put them back together for next use.
Universal wheel
(recommended monthly cleaning)
Wheel body
Axle
Support


16
Wipe the sensor on the main unit with a soft, dry cloth, including:
① 4 cli sensors at the bottom of the main unit
② Wall sensor on the right side of the host
③ Infrared auxiliary recharge sensor
④ Charging pole piece on the back of the robot
Host and sensor (recommended monthly cleaning)
Infrared auxiliary
recharge sensor
Wall-mounted TOF sensor
/ infrared auxiliary recharge sensor
Cli sensor
Charging pole
piece
Seite wird geladen ...
Seite wird geladen ...
Seite wird geladen ...
Seite wird geladen ...
Seite wird geladen ...
Seite wird geladen ...
Seite wird geladen ...
Seite wird geladen ...
Seite wird geladen ...
Seite wird geladen ...
Seite wird geladen ...
Seite wird geladen ...
Seite wird geladen ...
Seite wird geladen ...
Seite wird geladen ...
Seite wird geladen ...
Seite wird geladen ...
Seite wird geladen ...
Seite wird geladen ...
Seite wird geladen ...
Seite wird geladen ...
Seite wird geladen ...
Seite wird geladen ...
Seite wird geladen ...
Seite wird geladen ...
Seite wird geladen ...
Seite wird geladen ...
Seite wird geladen ...
-
 1
1
-
 2
2
-
 3
3
-
 4
4
-
 5
5
-
 6
6
-
 7
7
-
 8
8
-
 9
9
-
 10
10
-
 11
11
-
 12
12
-
 13
13
-
 14
14
-
 15
15
-
 16
16
-
 17
17
-
 18
18
-
 19
19
-
 20
20
-
 21
21
-
 22
22
-
 23
23
-
 24
24
-
 25
25
-
 26
26
-
 27
27
-
 28
28
-
 29
29
-
 30
30
-
 31
31
-
 32
32
-
 33
33
-
 34
34
-
 35
35
-
 36
36
-
 37
37
-
 38
38
-
 39
39
-
 40
40
-
 41
41
-
 42
42
-
 43
43
-
 44
44
-
 45
45
-
 46
46
-
 47
47
-
 48
48


Proscenic M8 Pro LDS 8.0 Laser Navigation Smart Robot Vacuum Cleaner Benutzerhandbuch
- Kategorie
- Roboterstaubsauger
- Typ
- Benutzerhandbuch
in anderen Sprachen
Andere Dokumente
-
Realme RMH2101 Benutzerhandbuch
-
Wilfa RVC-D4000LIN Benutzerhandbuch
-
Eufy RoboVac G20 Bedienungsanleitung
-
Wilfa RVC-D4000SL Benutzerhandbuch
-
Eufy T2100 Series Bedienungsanleitung
-
Silvercrest SSRA1 Operation and Safety Notes
-
Silvercrest SSR 3000 A1 Operation and Safety Notes
-
Tesla RoboStar iQ400 Plus Robotic Vacuum Cleaner Benutzerhandbuch
-
Fakir Robert RS700 Bedienungsanleitung
-
Rowenta Aspirateur robot RR7675WH X-Plorer Bedienungsanleitung