
Information
Power Parts
www.ktm.com
77203094000
06. 2010 3.211.651
*3211651*

Danke, dass Sie sich für KTM Power Parts entschlossen haben.
Alle unsere Produkte wurden nach den höchsten Standards entwickelt und gefertigt, unter Verwendung der besten verfügbaren
Materialien.
KTM Power Parts sind rennerprobt und gewährleisten ultimative Performance.
KTM KANN NICHT VERANTWORTLICH GEMACHT WERDEN FÜR FALSCHE MONTAGE ODER VERWENDUNG DIESES PRODUKTS. Bitte
befolgen Sie die Montageanleitung. Fachmännische Beratung und korrekte Installation der KTM PowerParts durch einen autorisierten
KTM Händler sind unerlässlich, um das Optimum an Sicherheit und Funktionalität zu gewährleisten.
Danke.
Thank you for choosing KTM Power Parts!
All of our products are designed and built to the highest standards using the finest materials available.
KTM Power Parts are race proven to offer the ultimate in performance.
KTM WILL NOT BE HELD LIABLE FOR IMPROPER INSTALLATION OR USE OF THIS PRODUCT. Please follow all instructions provided.
Professional advice and proper installation of the KTM PowerParts by an authorized KTM dealer are essential to provide maximum
safety and functions.
Thank you.
Grazie per aver deciso di acquistare un prodotto KTM Power Parts.
Tutti i nostri prodotti sono stati sviluppati e realizzati secondo i massimi standard e con l'impiego dei migliori materiali disponibili.
Le KTM Power Parts sono collaudate nelle competizioni ed assicurano altissime prestazioni.
KTM NON PUÒ ESSERE RESA RESPONSABILE PER UN MONTAGGIO O USO IMPROPRIO DI QUESTO PRODOTTO. Per favore osservate le
istruzioni nel manuale d'uso. Al fine di garantire la massima sicurezza e il corretto funzionamento, è indispensabile farsi consigliare
da persone esperte e competenti e far eseguire l'installazione delle KTM PowerPart presso i concessionari KTM autorizzati.
Grazie.
Nous vous remercions d'avoir choisi KTM Power Parts.
Tous nos produits ont été développés et réalisés selon les plus hauts standards et en utilisant les meilleurs matériaux disponibles.
Les Power Parts de KTM ont fait leurs preuves en compétition et garantissent les meilleures performances.
LA RESPONSABILITÉ DE KTM NE SAURAIT ÊTRE ENGAGÉE EN CAS D'ERREUR DANS LE MONTAGE OU L'UTILISATION DE CE PRODUIT.
Il convient de respecter les instructions de montage.
Le conseil spécialisé et l'installation dans les règles de l'art des PowerParts KTM par un concessionnaire KTM agréé sont
indispensables pour assurer un maximum de sécurité et de fonctionnalité.
Merci.
Gracias por haberse decidido por el Power Parts KTM.
Todos nuestros productos han sido desarrollados y producidos según los estándares más altos utilizando los mejores materiales
disponibles.
Las KTM Power Parts están probadas en competencia y garantizan un óptimo rendimiento.
NO SE PUEDE HACER RESPONSABLE A LA KTM POR UN MONTAJE O UN USO INCORRECTO DE ESTE PRODUCTO.
Le rogamos seguir las instrucciones para el montaje.
A fin de garantizar la máxima seguridad y un funcionamiento correcto es imprescindible acudir a un concesionario autorizado de KTM
para obtener el mejor asesoramiento técnico e instalar correctamente las KTM PowerParts.
Gracias.
DEUTSCH
2
ENGLISH
2
ESPANOL
2
ITALIANO
2
FRANCAIS
2

DEUTSCH
3
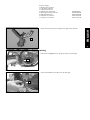
Lieferumfang
1x Rahmenschutz rechts
1x Rahmenschutz links
1x Hitzeschutzfolie
2x Linsenkopfschraube M5x25 0738050250
2x Büchse für Rahmenschutz 54803092060
2x Blindsteckmutter M5 54803092050
3x Kabelband 300/4,8 mm 44011076305
1x Kabelband 140/3,5 mm 44011176140
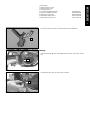
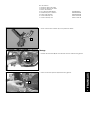
- Blindsteckmutter (3) links und rechts einsetzen.
Montage
- Verschlussstopfen (2) des Schwingarmbolzens (links und rechts) entfer-
nen.
- Die Hitzeschutzfolie (1) am rechten Rahmenschutz aufkleben.
1
2
3

DEUTSCH
4
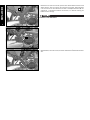
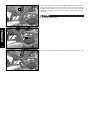
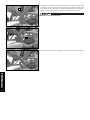
- Kabelbänder (links und rechts) montieren. Kabelband-Überstand abschnei-
den.
- Rahmenschutz (links und rechts) positionieren. Beim Rahmenschutz rechts
darauf achten, dass die Lasche (1) unter das Heck greift. Rahmenschutz
links und rechts mit den Büchsen und den Linsenkopfschrauben (2) ver-
schrauben. Linsenkopfschrauben festziehen, bis Büchse bündig am
Rahmenschutz anliegt.
Schrauben nicht überziehen!
1
2

ENGLISH
5
1
2
3
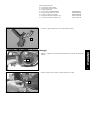
Scope of supply
1x Right frame protector
1x Left frame protector
1x Heat protection film
2x M5x25 oval head screw 0738050250
2x Bushing for frame protector 54803092060
2x M5 threaded insert 54803092050
3x 300/4.8 mm cable tie 44011076305
1x 140/3,5 mm cable tie 44011176140
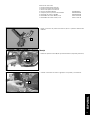
- Insert the threaded insert (3) on the left and right.
Mounting
- Remove the plug (2) from the swing arm pivot (left and right).
- Attach the heat protection film (1) to the right frame protector.

ENGLISH
6
1
2
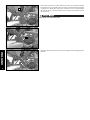
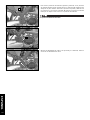
- Mount the cable ties (left and right). Cut off any protruding cable tie ends.
- Position the frame protector (left and right). Make sure the tab (1) on the
right frame protector fits under the rear end. Screw on the left and right
frame protector together with the bushings and the flat head screws (2).
Tighten the flat head screws until the bushing is flush against the frame
protector.
Do not overtighten the screws.

ITALIANO
7
1
2
3
Volume della fornitura
N. 1 protezione telaio destra
N. 1 protezione telaio sinistra
N. 1 foglio paracalore
N. 2 viti a testa bombata M5x25 0738050250
N. 2 bussole per protezioni telaio 54803092060
N. 2 inserti filettati ciechi M5 54803092050
N. 3 fascette serracavi 300/4,8 mm 44011076305
N. 1 fascette serracavi 140/3,5 mm 44011176140
- Inserire a destra ed a sinistra l'inserto filettato cieco (3).
Montaggio
- Togliere il tappino di chiusura (2) (a destra ed a sinistra) del perno for-
cellone.
- Incollare il foglio paracalore (1) sulla protezione destra.

ITALIANO
8
1
2
- Montare le fascette (a destra ed a sinistra). Tagliare la parte sporgente delle
fascette.
- Posizionare le protezioni telaio (destra e sinistra). Alla protezione destra
far attenzione che la linguetta (1) s'infili sotto la carena posteriore. Avvitare
le protezioni a destra ed a sinistra con le bussole e le viti a testa bombata
(2). Serrare le viti a testa bombata finché le bussole non aderiscono bene
alla protezione.
Non serrare eccessivamente le viti!

FRANCAIS
9
1
2
3
Kit de livraison
1 protection droite de cadre
1 protection gauche de cadre
1 feuille anti-chaleur
2 vis à tête bombée M5x25 0738050250
2 entretoises pour la fixation 54803092060
2 écrous spéciaux M5 54803092050
3 colliers 300/4,8 mm 44011076305
1 colliers 140/3,5 mm 44011176140
- Enfiler les écrous spéciaux (3) à droite et à gauche.
Montage
- Enlever les bouchons (2) de l'axe de bras oscillant à droite et à gauche.
- Coller la feuille anti-chaleur (1) sur la protection droite.

FRANCAIS
10
1
2
- Mettre les colliers à droite et à gauche et couper le morceau qui dépasse.
- Présenter les protections à droite et à gauche. Pour celle de droite, faire
attention à ce que la patte (1) prenne bien sous l'arrière de cadre. Fixer
les protections au moyen des vis à tête bombée (2) avec les entretoises.
Serrer les vis jusqu'à ce que les entretoises affleurent la protection.
Attention: ne pas trop serrer les vis !

ESPANOL
11
1
2
3
Volumen de suministro
1 protector derecho del bastidor
1 protector izquierdo del bastidor
1 laminilla de protección térmica
2 tornillos alomados M5x25 0738050250
2 casquillos para el protector del bastidor 54803092060
2 remaches de tuerca ciega M5 54803092050
3 abrazaderas de cable 300/4,8 mm 44011076305
1 abrazaderas de cable 140/3,5 mm 44011176140
- Insertar el remache de tuerca ciega (3) a la izquierda y a la derecha.
Montaje
- Retirar el tapón de cierre (2) del eje del basculante (izquierdo y derecho).
- Pegar la laminilla de protección térmica (1) en el protector derecho del
bastidor.

ESPANOL
12
1
2
- Montar las abrazaderas de cable (a la izquierda y a la derecha). Cortar el
exceso de la abrazadera del cable.
- Posicionar el protector del bastidor (izquierdo y derecho). En el protector
del bastidor derecho tener cuidado de que el cubrejunta (1) enganche por
debajo de la parte trasera. Atornillar el protector izquierdo y derecho con
los casquillos y los tornillos alomados (2). Apretar los tornillos alomados
hasta que el casquillo esté a ras con el protector del bastidor.
¡no apretar demasiado los tornillos!
-
 1
1
-
 2
2
-
 3
3
-
 4
4
-
 5
5
-
 6
6
-
 7
7
-
 8
8
-
 9
9
-
 10
10
-
 11
11
-
 12
12


in anderen Sprachen
Verwandte Artikel
-
KTM 7503004505049 Bedienungsanleitung
-
-
-
-
-
-
-
-
-