Parkside PBK 4 B3 Benutzerhandbuch
- Kategorie
- Power Heckenscheren
- Typ
- Benutzerhandbuch

4-IN-1 PETROL MULTI TOOL - PBK 4 B3
IAN 383517_2107
CHAT
BENZIN-KOMBIGERÄT 4-IN-1
Bedienungs- und Sicherheitshinweise
Originalbetriebsanleitung
Vor dem Gebrauch der Maschine sorgfältig lesen! Für Ihre Unterlagen aufbewahren!
DE
OUTIL MODULABLE À ESSENCE 4 EN 1
Consignes d‘utilisation et de sécurité
Traduction des instructions d’origine
À lire attentivement avant d’utiliser la machine! À conserver pour vos dossiers!
FR BEIE NI
4-in-1 Petrol Multi Tool
Operating and Safety Instructions
Translation of Original Operating Manual
Read carefully before using the machine! Keep for your records!
GB
BE
BENZINE-COMBIAPPARAAT 4-IN-1
Bedienings- en veiligheidsinstructies
Vertaling van de originele handleiding
Voor het gebruik van de machine zorgvuldig lezen! Voor eigen gebruik bewaren!
NL
NLBE
IEGB NI

GB / IE / NI Operating and Safety Instructions Page 01
FR / BE Consignes d‘utilisation et de sécurité Page 24
NL / BE Bedienings- en veiligheidsinstructies Pagina 49
DE / AT / CH Bedienungs- und Sicherheitshinweise Seite 74
Klappen Sie vor dem Lesen die Seite mit den Abbildungen aus und machen Sie sich anschließend mit allen Funktionen des Gerätes vertraut.
DE AT CH
Before reading, unfold the page containing the illustrations and familiarise yourself with all functions of the device.
GB IE
Avant de lire le mode d‘emploi, ouvrez la page contenant les illustrations et familiarisez-vous ensuite avec toutes les fonctions de l‘appareil.
FR BE
Vouw vóór het lezen de pagina met de afbeeldingen open en maak u vertrouwd met alle functies van het apparaat.
NL BE
NI

1
1 2 3 4 6
7
8
910
12
14
15
16
17
20 19
21
22
23
25
24
11
13
18
26
27
28
3031323334
35
36
37
38
39
40
41
29
5
15a

312
14
47
41
4
4948 50 51 52
12
6
41
48
82653303231
7
16
14
14a
11
57
58
13
11
18 23 27
5
49
51 5250 15
3941
926
3231 55a 54
25
59
2110 10a
42
45
43
44
46
46
1
2 mm
10
55
56
29
64

12 13
35
14
b
16 17
18
90000
20
450
19
62
63
15
60
61
7
push
primer
7 times
19
2
16a16
a

23
WIND CORD
26
25
16
65
66
67
68
c
67
27
12
69
21
6 70
22
72
71
73
28
74
17
24
65
67
75
29
26

1GB/IE/NI
Table of contents: Page:
1. Explanation of the symbols on the device .........................................................................................................................................................2
2. Introduction ..........................................................................................................................................................................................................6
3. Device description ...............................................................................................................................................................................................6
4. Scope of delivery ................................................................................................................................................................................................7
5. Proper use ............................................................................................................................................................................................................7
6. Safety information ...............................................................................................................................................................................................7
7. Technical data ...................................................................................................................................................................................................12
8. Before commissioning .......................................................................................................................................................................................13
9. Assembly ............................................................................................................................................................................................................13
10. Before commissioning .......................................................................................................................................................................................14
11. Operation ..........................................................................................................................................................................................................15
12. Working instructions..........................................................................................................................................................................................16
13. Transport (Fig. 2/3) ..........................................................................................................................................................................................18
14. Maintenance .....................................................................................................................................................................................................18
15. Cleaning and storage .......................................................................................................................................................................................21
16. Disposal and recycling .....................................................................................................................................................................................21
17. Troubleshooting .................................................................................................................................................................................................22
18. Warranty certificate ..........................................................................................................................................................................................23
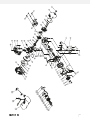
19. Exploded view ...................................................................................................................................................................................................99
20. Declaration of conformity .............................................................................................................................................................................. 106

2GB/IE/NI
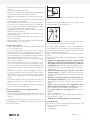
1. Explanation of the symbols on the device
GB IE NI Read the operating and safety instructions before start-up and follow them!
GB IE NI Wear safety goggles!
GB IE NI Wear hearing protection!
GB IE NI Wear a safety helmet when working overhead.
GB IE NI Wear gloves.
GB IE NI Wear stable footwear.
GB IE NI Attention! Petrol is very easily flammable. Avoid smoking, naked flames or flying sparks
near fuel.
GB IE NI Protect the device from rain and do not leave outdoors in the rain!
GB IE NI Attention, do not use saw blades or multi-part metallic cutting tools.

3GB/IE/NI
GB IE NI Warning! Disregard results in a risk of death or injury, or damage to the tool!
GB IE NI Attention! Falling objects. Especially when cutting above head height.
GB IE NI Attention! Risk of injury from running knives.
GB IE NI Caution - recoil may occur!
GB IE NI Attention! Danger of injury due to objects being flung away!
GB IE NI
Attention! Risk of suffocation!
The exhaust gases are toxic. Do not operate the engine in areas that are not venti-
lated.
GB IE NI Before maintenance, switch the device off and remove the spark plug connector!
GB IE NI Caution! Risk of injury from rotating cutting knife!
Keep hands and feet away!
GB IE NI Keep distance!
GB IE NI Keep children, onlookers and helpers 15 m away from the brush cutter / grass trimmer.

4GB/IE/NI
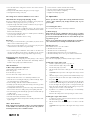
GB IE NI Pay attention to electrical connection cables! Keep a distance of at least 10 m.
116
GB IE NI Specification of the guaranteed sound power level LWA in dB.
GB IE NI Attention! The exhaust pipe and other parts of the engine become very hot during
operation, do not touch!
GB IE NI Attention! Hot parts. Keep distance.
GB IE NI Important. Always switch off the engine before refuelling.
Do not refill during operation.
GB IE NI
Mixing ratio: 40 parts petrol to 1 part oil
Petrol: ROZ 95/ROZ 98
2-stroke engine oil: ISO-L-EGD/JASO FD
Attention! Petrol is very easily flammable. Avoid smoking, naked flames or flying sparks
near fuel.
Do not fill with E10 fuel!
GB IE NI Tank content 1200cm³.
40:1 GB IE NI Mixing ratio: 40 parts petrol to 1 part oil
GB IE NI Press the fuel pump (primer) 7x.
GB IE NI Turn the choke lever.

5GB/IE/NI
GB IE NI Pull the start pull cord.
GB IE NI Grass trimmer: Cutting diameter 430 mm
GB IE NI Hedge trimmer: Max. cutting length 480 mm
GB IE NI Brushcutter: Cutting diameter 255 mm
GB IE NI Pole pruner: Max. cutting length 300 mm
GB IE NI The product complies with the applicable European directives.
GB IE NI Chain lubrication setting (pole pruner attachment).

6GB/IE/NI
2. Introduction
Manufacturer:
Scheppach GmbH
Günzburger Straße 69
D-89335 Ichenhausen
Dear customer,
We hope your new tool brings you much enjoyment and success.
Note:
In accordance with the applicable product liability laws, the manufactur-
er of this device assumes no liability for damage to the device or caused
by the device arising from:
• Improper handling,
• Failure to comply with the operating instructions.
• Repairs carried out by third parties, unauthorised specialists.
• Installing and replacing non-original spare parts,
• Application other than specified,
Please consider:
Read through the complete text in the operating manual before installing
and commissioning the device.
The operating manual is intended to help the user to become familiar
with the machine and take advantage of its application possibilities in
accordance with the recommendations.
The operating instructions include important instructions for the safe,
proper and economic operation of the machine, for avoiding danger, for
minimising repair costs and downtimes and for increasing the reliability
and extending the service life of the machine.
In addition to the safety instructions in this operating manual, you must
also observe the regulations applicable to the operation of the machine
in your country.
Keep the operating manual package with the machine at all times and
store it in a plastic cover to protect it from dirt and moisture. They must be
read and carefully observed by all operating personnel before starting
the work. The machine may only be used by personnel who have been
trained to use it and who have been instructed with respect to the associ-
ated hazards. The required minimum age must be observed.
In addition to the safety instructions in this operating manual and the
separate regulations of your country, the generally recognised technical
rules relating to the operation of such machines must also be observed.
We accept no liability for accidents or damage that occur due to a fail-
ure to observe this manual and the safety instructions.
Familiarise yourself with the operating manual before attempting to oper-
ate the device.
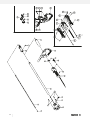
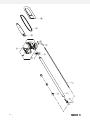
3. Device description
1. Motor drive unit
2. Lifting eye
3. On/Off switch
4. Switch lock
5. Rear handle
6. Spark plug connector
7. Starter cable
8. Fuel tank
9. Throttle
10. Front handle
10a. Pins
11. Locking screw engine drive unit
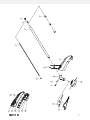
Scythe attachment (PBK 4 B3-2)
12. Brush cutter / grass trimmer
13. Brush cutter / grass trimmer locking pin
14. Brush cutter / grass trimmer shield
14a. Brush cutter / grass trimmer cutting blade shield
15. Cutting blade
15a. Cutting blade protection
16. Thread coil
16a. Trigger
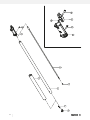
Hedge trimmer attachment (PBK 4 B3-3)
17. Hedge trimmer
18. Hedge trimmer locking pin
19. Adjustment lever
20. Cutting unit
21. Hedge trimmer protection
22. Extension attachment
23. Extension attachment locking pin
24. Drive shaft
25. Extension attachment locking screw
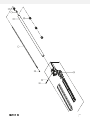
Pole pruner attachment (PBK 4 B3-4)
26. Pole pruner
27. Pole pruner locking pin
28. Protective ring
29. Oil tank
30. Blade fixing nut
31. Saw chain
32. Blade
33. Bench grinder aid
34. Pole pruner protection
35. Carrying strap
36. Oil-petrol mixing bottle
37. Replacement thread
38. Tool bag
39. Spark plug wrench
40. Allen key size 4
41. Allen key size 5
42. Rubber ring
43. Retaining clip
44. Threaded pins
45. Wing nut
46. Positioning hole
47. Screw (pre-mounted)
48. Internal flange
49. Threaded mandrel
50. External flange
51. Cover
52. Nut
53. Chain cover
54. Chain wheel
55. Chain tensioning screw
55a. Chain tensioning bolt
56. Oil tank cover
57. Protection screw engine drive unit
58. Cutting device protective cover
59. Protection screw extension attachment
60. Choke lever

7GB/IE/NI
61. Fuel pump
62. Blade head
63. Unlocking lever
64. Adjusting screw
65. Thread cover
66. Retaining lugs
67. Thread holders
68. Eyelets
69. Lubricating point screw
70. Spark plug
71. Air filter cover
72. Air filter retaining screw
73. Air filter foam insert
74. Maintenance screw
75. Grease nipple
a. Carabiner hook
b. Safety tab
c. Retaining lugs
4. Scope of delivery
• Engine drive unit (1)
• Front handle (10)
• Scythe attachment (PBK 4 B3-2)
Brush cutter / grass trimmer (12)
• Brush cutter / grass trimmer shield (14)
• Cutting blade (15)
• Thread coil (16)
• Hedge trimmer attachment (PBK 4 B3-3)
Hedge trimmer (17)
• Hedge trimmer protection (21)
• Extension attachment (22)
• Pole pruner attachment (PBK 4 B3-4)
Pole pruner (26)
• Saw chain (31)
• Blade (32)
• Pole pruner protection (34)
• Carrying strap (35)
• Oil-petrol mixing bottle (36)
• Replacement thread (37)
• Tool bag (38)
• Spark plug wrench (39)
• Allen key size 4 (40)
• Allen key size 5 (41)
• Bio chain oil
• Funnel
5. Proper use
The strimmer (using the cutting knife) is suitable for cutting shrubs, strong
weed and undergrowth.
The grass trimmer (using thread coil with trimming line) is suitable for cut-
ting lawns, grass areas and light weed.
The hedge trimmer is suitable for cutting hedges, bushes and shrubs.
The pole pruner is intended for branch removal work. It is not suitable
for extensive sawing work and felling trees as well as sawing materials
other than wood.
The observance of the manufacturer’s usage instructions included is a
prerequisite for the proper use of the device. Any other use not expressly
permitted in these instructions may result in damage to the device and
pose a serious danger to the user. Be sure to observe the restrictions in
the safety instructions.
Please observe that our equipment was not designed with the intention
of use for commercial or industrial purposes. We assume no guarantee
if the equipment is used in commercial or industrial applications, or for
equivalent work.
Attention!
Due to physical hazards to the user, the petrol combination device must
not be used for the following work: cleaning pavements and as a shred-
der for shredding tree and hedge cuttings. Furthermore, the petrol com-
bination device must not be used for levelling ground elevations, such
as molehills. For safety reasons, the petrol combination device must not
be used as a drive unit for other working tools and tool sets of any type.
The petrol combination device may only be used in the intended manner.
Any use beyond this is improper. The user/operator, not the manufac-
turer, is responsible for damages or injuries of any type resulting from this.
Who is not permitted to use the device:
People who are not familiar with the operating manual, children under
the age of 16, people under the influence of alcohol, drugs or medica-
tion, and people who are tired or unwell.
6. Safety information
IMPORTANT!
READ CAREFULLY BEFORE USE!
KEEP FOR YOUR RECORDS!
6.1 General
m Attention! Danger of poisoning!
• Exhaust, fuel and lubricants are poisonous. Exhaust may not be in-
haled.
6.1.1 Fuel
m Warning!
• Petrol is highly flammable. Only store petrol in the designated contain-
ers.
• Only fuel the unit outdoors and do not smoke when filling.
• While the engine runs or if the device is hot, the tank cap must not be
opened and petrol must not be filled.
• If petrol overflows, no attempts should be made to start the engine.
Instead, the device must be removed from the area contaminated
with petrol. Do not try to start the engine until the petrol vapours have
evaporated.
• For safety reasons, petrol tank and tank caps must be replaced if dam-
aged.
6.1.2 Before commissioning
m Attention!
• Always wear non-slip safety shoes and appropriate safety clothing
such as protective gloves, hard hats, protective masks, protective gog-
gles and hearing protection while mowing.
• Check the area in which the device is to be used and remove any
objects that could be caught and ejected.

8GB/IE/NI
• Before use and after dropping or other impacts, a visual inspection
must always be carried out to ensure that the cutting tools, fastening
bolts and the entire cutting unit are not damaged. Worn or damaged
cutting tools and mounting bolts must be replaced.
• Prior to use, always perform a visual inspection to check whether the
cutting tools are worn out or damaged. To prevent an imbalance, worn
out or damaged cutting tools and bolts may only be replaced in sets.
6.2 Working safety instructions for strimmers / grass trim-
mers
6.2.1 Safety equipment
When working with the device, the appropriate plastic protective cover
for strimmers or grass trimmers must be fitted to prevent objects from be-
ing thrown away.
m Warning!
• Never mow while people, especially children or animals are nearby.
• Maintain a safety distance of 15 m. When approaching, switch off the
device immediately.
6.2 Working safety instructions for grass trimmers
6.2.2.1 Preparing
• Wear close-fitting work clothing that offers protection, such as long
trousers, safe work shoes, hard-wearing protective gloves, a hard hat,
a protective face mask or protective goggles to protect the eyes and
good ear pads or other hearing protection against the noise.
• Always use the carrying strap supplied.
• Make sure that the handles are dry and clean and that no petrol mix-
ture sticks to them.
• Before starting work, check the site for objects such as metal parts,
bottles, stones, etc. that could be thrown away and cause injuries to
the user.
• Before starting the engine, make sure that the grass trimmer is not in
contact with any obstacle.
• Do not use the device until you are familiar with it.
6.2.2.2 Electrical safety
• Never use the device in the vicinity of highly flammable liquids or
gases, neither in closed rooms nor outdoors. This may result in explo-
sions or fire.
• Do not work with a damaged, incomplete or modified device without
manufacturer‘s consent. Never use the device with defective protective
equipment. Do not use the device if the on/off switch is defective. After
dropping the device, check for significant damage or defects.
6.2.2.3 Safety of persons
• Only adequately trained persons and adults are allowed to operate,
adjust and maintain the device.
• If you are not familiar with the device, practice using it while the engine
is not running.
• Do not touch the exhaust pipe.
• Do not operate the device under the influence of alcohol or drugs.
• Always hold the device firmly with both hands. The thumb and fingers
should enclose the handles.
• Working position: Do not operate the device in uncomfortable posi-
tions, when lacking balance, with arms outstretched or only with one
hand.
• Always ensure a stable footing.
• Do not use the device when onlookers or animals are in the immedi-
ate vicinity. Maintain a minimum distance of 15 meters between the
user and other people or animals while mowing. Maintain a minimum
distance of 30 meters between the user and other people or animals
while mowing down to the ground.
• When mowing on a slope, please always stand below the cutting tool.
Never cut or trim on a smooth, slippery hill or slope.
• Any changes to the product can endanger personal safety and invali-
date the manufacturer‘s guarantee.
• Children should not be left unattended, to ensure they do not play
with the device.
• Do not use the device if it is damaged or worn out.
6.2.2.4 Use and treatment
• Use the device only for its intended purpose, such as trimming grass,
mowing, removing branches, cutting and trimming hedges and bushes.
• Take regular breaks when using the device for a long period of time.
• Make sure that the screws and fasteners are properly tightened. Never
operate the device if it is not correctly adjusted, not completely or
safely assembled.
• Open the fuel tank slowly to relieve any pressure that may have built
up in the fuel tank. To reduce the risk of fire, move at least 3 meters
from the refueling area before starting the device.
• Guide the grass trimmer to the desired height. Avoid touching small
objects (e.g. stones) with the grass trimmer.
• Always keep the grass trimmer on the ground when the device is in
operation.
• Only use the device if the appropriate protective cover is installed and
in good condition.
• Do not use any other cutting tools. For your own safety, only use ac-
cessories and additional equipment that are indicated in the operating
manual. Use of other tools or accessories that those recommended in
the operating manual could represent a personal danger to you.
• Always trim and cut in the upper speed range. Do not run the engine
at low speed when starting to mow or while trimming.
• Make sure that the machine does not come into contact with the
ground, stones, wires or other foreign objects during start-up and while
working.
• Always switch the device off before putting it down.
• Always switch off the engine before working on the cutting tool.
6.2 Working safety instructions for strimmers
6.2.3.1 Preparation
• The strimmer throws objects and earth away. This can cause blindness
or injury. Wear eye, face and leg protection. Always remove objects
from the work area before using the strimmer.
• The strimmer will stop when the throttle is released. A running down
strimmer can cause cuts to you or to people standing around. Before
doing any work on the strimmer, switch off the engine and make sure
that the strimmer has come to a standstill.
6.2.3.2 Safety of personnel
• Bystanders can become blind or injured. Maintain a minimum distance
of 15 meters between the user and other people or animals while
mowing.

9GB/IE/NI
6.2.3.3 Use and handling
• Do not use the device if all cutting attachments are not properly in-
stalled.
• The cutting blade can be jerked off objects (kickback). This can lead
to injuries to arms and legs. If the device hits a foreign object, stop the
motor immediately and wait until the cutting unit has come to a stand-
still. Check the cutting unit for damage. Always replace the cutting unit
if it is bent or cracked.
• Switch the motor off and remove the spark plug connector if carrying
out work on the cutting blade (e.g. removal of a blockage, checking
of the cutting unit).
• Warning! Sharp edges on the brush cutter. It is necessary
to wear gloves.
• Check whether the cutting attachment has stopped while the engine
is idling.
• Check the machine for loose fastenings, fuel leaks, and damaged
parts such as cracks in the cutting attachment.
• Remark! National regulations may restrict the use of the machine.
• It is necessary to carry out a daily visual inspection before use and
after dropping the device or other impacts in order to discover signifi-
cant defects.
• Wear both non-slip foot protection and protective clothing.
• Never use the machine if the user is tired, ill or under the influence of
alcohol or other drugs before working with the machine.
• When using the machine, it is necessary to take a break and change
work positions.
• Take a firm footing and keep your balance during operation. It is also
necessary to use the carrying strap provided.
• It is necessary to keep the machine in good working order.
6.3 Working safety instructions for hedge trimmers
Note:
• The hedge trimmer is delivered fully assembled.
• Instructions and illustrations for adjusting, using the hedge trimmer or
its actuators, maintenance, and lubrication by the user can be found in
this instruction manual and on the fold-out page.
• Notes on the working position (see fold-out page).
• Notes on the actuators (see fold-out page).
• Notes about safe use of fuel (see chapter “Before commissioning”).
• Instructions for the recommended replacement or repair of parts or
for customer service and specifications of spare parts to be used, if
these affect the user’s health and safety, can be found in this instruc-
tion manual.
• Explanation of all graphic symbols, information, features and technical
data used on the hedge trimmer as well as the procedure in the event
of accidents and malfunctions can be found in this instruction manual.
• Blocked tool: Remove the clamped material from the cutting unit (20).
m Warning!
• Children are never permitted to use the hedge trimmer.
• Always remain attentive, pay attention to what you are
doing and be sensible when working with the device. Do
not use the device while ill, tired or under the influence
of drugs, alcohol or medication. A moment of inattention while
operating power tools may result in serious personal injury.
• Avoid misuse, use the machine only as described under “Intended
use”.
Familiarise yourself with the operating manual before at-
tempting to operate the device.
6.3.1 Preparation
• THIS HEDGE TRIMMER CAN CAUSE SERIOUS INJURIES! Read the
instructions for correct handling, preparation, maintenance, starting
and shutting down the hedge trimmer carefully. Familiarise yourself
with all actuators and with using the hedge trimmer properly.
• Children are never permitted to use the hedge trimmer.
• Children, adolescents and people with reduced physical, sensory or
mental capabilities must not use the hedge trimmer. Exceptions exist
only for young people over 16 years of age in the context of training
under the supervision of a professional.
• Beware of overhead power lines
• Avoid using the hedge trimmer if people, and especially children, are
in the vicinity.
• Wear suitable clothing! Do not wear wide clothing or jewellery, which
can become entangled in moving parts. It is recommended to wear
sturdy gloves, non-slip shoes and safety goggles.
• If the cutting unit touches a foreign object, the operating noises get
louder or the hedge trimmer vibrates unusually excessively, stop the en-
gine and allow the hedge trimmer to come to a standstill. Disconnect
the spark plug connector from the spark plug and take the following
measures:
-check for damage;
-check for loose parts and fasten all parts;
-replace damaged parts with equivalent parts or have them re-
paired.
• Wear hearing protection!
• Wear safety goggles!
• Handle fuel carefully, it is highly flammable and the vapours are explo-
sive. The following points should be followed:
-Only use specially designed tanks.
-Never remove the fuel filler cap or top up with petrol when the
engine is running or hot. Allow the engine and exhaust parts to
cool before refilling.
-Do not smoke.
-Only refuel outdoors.
-Never store the hedge trimmer or fuel tank in a room where there
is an open flame, e.g. surface as in a water heater.
-If petrol has overflowed try not to start the engine but remove the
machine from the petrol contaminated surface before starting.
-Always replace the tank plug after filling and close it securely.
-If the tank is emptied, this should be done outdoors.
• Familiarise yourself with the operation of the hedge trimmer so that you
can stop immediately in an emergency.
6.3.2 Operation
a) Switch off the engine before:
-Cleaning or removing a blockage.
-Inspection, maintenance or work on the hedge trimmer,
-Adjusting the working position of the cutting unit,
-if the hedge trimmer is left unattended.
b) Always ensure that the hedge trimmer is properly in one of the pre-
scribed working positions before starting the engine.
c) Keep proper footing when operating the hedge trimmer.
d) Do not use the hedge trimmer with a faulty or heavily worn cutting
unit.
e) To reduce the risk of fire, make sure that the engine and silencer are
free of debris, leaves or leaking lubricant.
f) Ensure that all handles and safety equipment are installed when us-
ing the hedge trimmer. Never attempt to use an incomplete hedge
trimmer or one with an impermissible modification.

10 GB/IE/NI
g) Always use both hands when the hedge trimmer is equipped with
two handles.
h) Always familiarise yourself with your environment and pay attention
to possible hazards that you may not hear due to the noise from the
hedge trimmer.
6.3.3 Maintenance and storage
a) If the hedge trimmer is shut down for maintenance, inspection or stor-
age, turn off the engine, disconnect the spark plug connector from
the spark plug and ensure that all rotating parts have stopped. Allow
the machine to cool down before checking, adjusting, etc.
b) Store the hedge trimmer where petrol vapours cannot come into con-
tact with open fire or sparks. Allow the hedge trimmer to cool down
before storing it.
c) When transporting or storing the hedge trimmer, cover the cutting
unit with the protective cover for the cutting unit.
6.3.4 Supplementary safety information for hedge trim-
mers
6.3.4.1 Environmental security
• Only cut hedges in daylight or in good artificial light.
• When cutting, be careful not to touch any objects such as wire fences
or plant supports. This may cause damaged to the cutting unit (20).
Carefully inspect the hedge to be cut and remove all wires and other
foreign objects.
• Be aware of your surroundings and be prepared for potential hazards
that you may not hear while you are cutting the hedge.
m Danger
In the event of imminent danger or in an emergency, switch off the engine
immediately.
6.3.4.2 Electrical safety
• Only hold the power tool by the insulated gripping surfaces, because
the cutting blade can come into contact with concealed power lines.
If the cutting blade comes into contact with an energised line, device
parts can become energised and cause an electric shock.
6.3.4.3 Safety of personnel
• During operation, no other people or animals are allowed within a
radius of 15 meters. The operator is responsible for third parties in the
area of operations.
• When operating the hedge trimmer, always make sure you have a
secure footing and always keep your balance.
• Never touch the hedge trimmer by the cutting unit (20).
• Keep all body parts away from the cutting blade. Do
not attempt to remove cuttings or hold material to be
cut while the blade is running. Remove trapped cuttings
only when the device is switched off. A moment of careless-
ness when using the hedge trimmer can result in serious injury.
• Wait until the tool has come to a standstill before setting it down.
6.3.4.4 Use and handling
m Attention!
• The cutting unit (20) must not be placed on the tip between the work
processes or after completion of a particular work process, in order to
avoid possible damage to the cutting unit (20).
a) Before use, always check that the knives, screws and other parts of
the cutting unit are not worn or damaged. Never work with a dam-
aged or badly worn cutting unit.
b) After setting the working angle, check whether both adjustment le-
vers are securely engaged. If an adjustment lever remains open, the
second locking device can be unintentionally released by a branch
and the cutting unit (20) can clap down.
c) Do not use the hedge trimmer with a faulty or not mounted protec-
tion devices.
d) Never touch the hedge trimmer by the protective device.
e) When it is switched off, carry the hedge trimmer by
the front handle with the cutting unit facing away from
your body. Always put the protective cover on when
transporting or storing the hedge trimmer. Careful han-
dling of the device reduces probable accidental contact with the
moving blades.
f) Store the hedge trimmer in a dry, high location, or locked up, out of
the reach of children.
g) Do not try to repair the device unless you have been trained.
h) To be on the safe side, replace worn or damaged parts.
m Danger
In the event of imminent danger or in an emergency, switch off the engine
immediately.
6.4 Operational safety instructions for pole-mounted pruners
m Caution! Risk of injury!
• Never touch the device above the protective ring (28) while it is in
operation, in order to avoid injuries!
6.4.1 Preparation
• Always wear a hard hat, hearing protection and safety gloves. Also
wear eye protection to avoid splashing oil or saw dust in your eyes.
Wear a dust mask against dust.
• Wear sturdy, non-slip boots.
• Do not use the device in rain or moisture.
• Before use, check the safety status of the device, especially the sword
and the saw chain.
• Do not use the device in the vicinity of power lines. Maintain a safety
distance of 10 m to overhead power lines.
6.4.2 Electrical safety
• Do not use the device in explosive environments, in the vicinity of flam-
mable fluids, gases or vapours. The sparks produced by the machine
can ignite these vapours or gases.
• Devices with a defective switch must be repaired immediately to avoid
damage and injuries.
• Danger! Do not use the machine nearby high-voltage power lines.
6.4.3 Personal safety
• Never use the device standing on a ladder.
• Do not lean too far forward when using the device. Always make sure
you have a secure footing and keep your balance at all times. Use the
included carrying strap to distribute the weight evenly over the body.
• Do not stand under the branches that you are about to cut to avoid
injury from fallen branches. Also watch out for branches that spring
back to avoid injuries. Work at an angle of approx. 60 °.
• Be careful that device kickback can occur.
• Not only watch the branches being cut, but also any fallen material
to avoid stumbling.

11GB/IE/NI
• Cover the guide rail and the chain with the cover during transport and
storage.
• Avoid unintentional starting of the device.
• Store the device out of the reach of children. Only people familiar with
the operating instructions and the device may operate it.
• Check that the cutting attachment stops rotating when the engine is
idling.
• Check the machine for loosened fastening elements and damaged
parts (e.g. cracks in the cutting blade).
• National regulations may restrict the use of the pole-mounted pruner.
• It is necessary to conduct daily inspections before use and after drop-
ping or other impacts to determine any significant damage or defects.
• Use non-slip foot protection and close-fitting clothing.
• Warning! Never use the machine if the user is tired, sick, or under the
influence of alcohol or other drugs.
• Warning! Danger of injury for third parties. Keep third-parties away
from the working area.
• Take a firm footing and keep your balance during operation. Use the
carrying strap provided.
• Keep the machine as well as the cutting attachment and the cutting
attachment guard in good working order.
6.4.4 Use and treatment
• Never start the machine before the sword, saw chain and chain wheel
cover are correctly mounted.
• Do not cut wood lying on the ground or try to saw roots protruding
from the ground. In any case, avoid digging the saw chain into the
ground, otherwise the saw chain will immediately become blunt
• If you accidentally touch a solid object with the device, switch off the
engine immediately and inspect the device for any damage.
• After 30 minutes of work, take a break of at least an hour. Change
your work position regularly.
• If the pole-mounted pruner is to shut down for maintenance, inspec-
tion, or storage, switch off the engine, remove the spark plug connec-
tor from the spark plug, and make sure that all rotating parts have
stopped. Allow the machine to cool down before checking, adjusting,
etc.
• Maintain the device carefully. Check for misalignment or binding of
moving parts, breakage of parts and any other condition that may
affect the device’s operation. Have damaged parts repaired before
using the device. Many accidents are caused by poorly maintained
devices.
• Keep cutting tools sharp and clean. Properly maintained cutting tools
with sharp cutting edges are less likely to bind and are easier to con-
trol.
• Have the device serviced by qualified personnel. Only use manufac-
turer’s recommended original spare parts.
6.4.4.1 Precautionary measures against kickback
m Caution kickback!
• Watch out for kick-back when working with the device. There is a dan-
ger of injury. Avoid kick-backs through caution and correct sawing
technique.
Touching with the tip of the guide bar can sometimes lead to an unex-
pected backward reaction, whereby the guide bar whips up and in the
direction of the operator.
Sawing in the marked area of the sword should be avoided to prevent
kickback.
Kickback can arise if the tip of the guide rail touches an object or if the
wood bends and the saw chain jams in the cut.
The jamming of the saw chain on the upper edge of the guide rail can
force the bar backwards in the direction of the operator.
Each of these reactions can lead to you losing control of the saw and
possibly suffering a serious injury. Never rely solely on the safety equip-
ment integrated in the chainsaw. As a chainsaw user, take various meas-
ures to work without accidents and injuries.
Kickback is the result misuse and/or incorrect operating procedures or
conditions.
It can be prevented by suitable precautionary measures, as described
in the following:
• Hold the saw firmly with both hands, with the thumbs
and fingers enclosing the chainsaw handles. Bring your
body and arms into a position in which you can absorb
the kickback forces. If suitable measures are implemented, the
operator will be able to withstand the kickback forces. Never let go
of the chainsaw.
• Avoid an unusual body stance and never saw above
shoulder height. This will help to avoid unintentional contact with
the rail tip, and enable improved control of the chainsaw in unexpect-
ed situations.
• Always use replacement guide rails and saw chains pre-
scribed by the manufacturer. Incorrect replacement guide bars
and saw chains may cause the saw chain to break and/or lead to
kickback.
• Adhere to the instructions of the manufacturer when
sharpening and maintaining the saw chain. If the depth lim-
iter is too low, this increases the tendency towards kickback.
• Do not saw with the tip of the guide bar. There is a risk of
kickback.
• There is a risk of kickback.
• Make sure that there are no objects on the floor that you can trip over.
• Remove branches in sections.
• Warning! Be careful with hazardous work positions.
6.5 Residual risks
Even with correct use and compliance with all safety regulations, some
non-obvious residual risks may still remain.
• Cutting injuries
• Hearing damage

12 GB/IE/NI
• Staying in the immediate vicinity of the running device for a longer
period of time may cause hearing damage. Wear hearing protection!
• Damage to health resulting from hand/arm vibration if the device is
used over an extended period of time or if it is not properly operated
and maintained.
• Vibration dampening systems do not guarantee protection against
Raynaud syndrome or carpal tunnel syndrome. For this reason, the
condition of the fingers and the wrist must be thoroughly monitored
in case of regular, continuous use of the device. If symptoms of the
illnesses indicated above occur, contact a doctor immediately. To re-
duce the risk of “Raynaud syndrome”, keep your hands warm while
working and take breaks at regular intervals.
• Despite observing the operating manual, there may also be residual
risks that are not obvious.
• In the event of a saw chain blockage, switch the device off immediately
and pull out the spark plug connector. Remove the object afterwards.
7. Technical data
Drive
Displacement ................................................................................51.7 cm³
Rated engine power ......................................................................1.45 kW
Idle speed ....................................................................... 3000 ±300 min-1
Fuel tank volume ..........................................................................1200 cm³
Type of engine ..................................................2-stroke engine, air-cooled
Motor unit weight ........................................................................... 6.04 kg
Weight of motor unit with grass trimmer ....................................... 7.35 kg
Weight of motor unit with brushcutter ........................................... 7.35 kg
Weight of motor unit with pole pruner .......................................... 7.29 kg
Weight of motor unit with hedge trimmer ..................................... 8.29 kg
Extension attachment weight ......................................................... 0.85 kg
Grass trimmer cutting data
Grass trimmer attachment weight .................................................. 1.70 kg
Cutting diameter .............................................................................430 mm
Thread count .........................................................................2 x Ø 2.4 mm
Thread length ......................................................................................... 6 m
Max. grass trimmer speed ........................................................ 6700 min-1
Maximum motor speed with grass trimmer nmax ...................... 9000 min-1
Brush cutter cutting data
Brushcutter attachment weight ....................................................... 1.66 kg
Cutting diameter .............................................................................255 mm
Cutting blade thickness ...................................................................1.4 mm
Mounting hole diameter ...............................................................25.4 mm
Number of teeth ........................................................................................ 3
Max. brush cutter speed ............................................................... 7300 rpm
Maximum motor speed with brushcutter nmax .......................... 9800 min-1
Hedge trimmer cutting data
Hedge trimmer attachment weight ................................................ 2.47 kg
Cutting diameter ...............................................................................27 mm
Blade angle adjustment ° ....................................+90°/0°/-75° (165°)
Cutting length .................................................................................480 mm
Hedge trimmer cutting speed ................................................... 1550 min-1
Maximum motor speed with hedge trimmer nmax .................... 9500 min-1
Pole-mounted pruner cutting data
Pole pruner attachment weight ...................................................... 1.78 kg
Guide rail length ............................................................................345 mm
Cutting length .................................................................................300 mm
Guide rail type .....................................................................120SDEA218
Saw chain pitch ...................................................................................3/8”
Saw chain type ..................................................................3/8LP.050-44E
Drive link thickness ........................................................................1.27 mm
Oil tank volume .............................................................................125 cm3
Cutting speed pole pruner .............................................................. 20 m/s
Maximum motor speed with pole pruner nmax ......................... 9800 min-1
Technical changes reserved!
Noise
Information about noise level measured in accordance with ISO 22868;
EN ISO 3744:1995:
Sound pressure level LpA ......................................................... 102.3 dB(A)
Uncertainty KpA ................................................................................. 1.8 dB
Sound power level LWA ........................................................... 113.9 dB(A)
Guaranteed sound power level LWA ..........................................116 dB(A)
Uncertainty KWA ................................................................................ 1.8 dB
Wear hearing protection.
Excessive noise can result in a loss of hearing.
Vibration:
Vibration value in accordance with ISO 22867:
Grass trimmer: Ahv = front 4.15 m/s2 rear 7.26 m/s2
Brush cutter: Ahv = front 4.63 m/s2 rear 6.35 m/s2
Hedge trimmer: Ahv = front 5.82 m/s2 rear 7.14 m/s2
Pole pruner: Ahv = front 4.89 m/s2 rear 6.24 m/s2
Measurement uncertainty KPA = 1,5 m/s2
Keep the noise level and vibration to a minimum!
• Only use devices which are free of defects.
• Maintain and clean the device at regular intervals.
• Adapt your working methods to the device.
• Do not overload the device.
• Have the device checked if necessary.
• Switch the device off if it is not in use.
• Wear gloves.
Warning!
In case of extended working periods, the operating personnel may suf-
fer circulatory disturbances in their hands (vibration white finger) due to
vibrations.
Raynaud‘s syndrome is a vascular disease that causes the small blood
vessels on the fingers and toes to cramp in spasms. The affected areas
are no longer supplied with sufficient blood and therefore appear ex-
tremely pale. The frequent use of vibrating devices can cause nerve dam-
age in people whose circulation is impaired (e.g. smokers, diabetics).
If you notice unusual adverse effects, stop working immediately and seek
medical advice.
Observe the following information to reduce hazards:
• Keep your body and especially your hands warm in cold weather.
• Take regular breaks and move your hands to promote circulation.
• Ensure as little vibration as possible at the machine via regular mainte-
nance and stable parts on the device.

13GB/IE/NI
8. Before commissioning
• Open the packaging and carefully remove the device.
• Remove the packaging material, as well as the packaging and trans-
port safety devices (if present).
• Check whether the scope of delivery is complete.
• Check the device and accessory parts for transport damage.
• If possible, keep the packaging until the expiry of the warranty period.
m DANGER
The device and the packaging are not children‘s toys! Do
not let children play with plastic bags, films or small parts!
There is a danger of choking or suffocating!
Before each commissioning, check the device for the following:
• Check the fuel system for leakage.
• Faultless condition and completeness of the guards and the cutting
device.
• Tight fit of all screw connections.
• Smooth running of all moving parts.
Fuel and oil
• Recommended fuels
-Use only a mixture of unleaded petrol and special 2-stroke engine
oil. Mix the fuel mixture as per the fuel mixing table.
-Do not use E10 fuel.
Attention:
Do not use a fuel mixture that has been stored for more than 90 days.
Attention:
Do not use 2-stroke oil that recommends a mixing ratio of 100:1. The
engine guarantee of the manufacturer becomes invalid in the event of
damage to the engine due to insufficient lubrication.
Attention:
Use only designated and approved vessels for the transport and storage
of fuel. Put the correct amount of petrol and 2-stroke oil into the enclosed
oil-petrol mixing bottle (36). Then shake the vessel well.
Never use oil for 4-stroke engines or water-cooled 2-stroke engines. This
can cause the spark plug to become fouled, the exhaust part to become
blocked or the piston ring to become stuck. Fuel mixtures that have not
been used for one month or longer can clog the carburettor or impair
engine operation. Put unused fuel in an airtight vessel and store it in a
dark, cool room.
Fuel mixing table
Mixing process: 40 parts petrol to 1 part oil
Example:
1 l petrol: 0.025 l 2-stroke oil
5 l petrol: 0.125 l 2-stroke oil
Warning! Pay attention to the exhaust gases.
Always switch off the engine before refuelling.
Never add petrol to the device while the engine is running or it is hot.
There is a risk of fire!
Only fuel the unit outdoors or in well-ventilated rooms. Make sure that no
fuel gets into the soil (environmental protection). Use a suitable surface.
Only use bio chain oil.
9. Assembly
When assembling this machine, please follow the specified assembly
instructions.
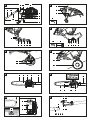
9.1 Mounting the front handle (10) (Fig. 2)
Note:
The front handle (10) can be mounted in two different positions. Select
one of the two specified positioning holes (46) on the shaft of the motor
drive unit (1).
Mount the front handle (10) to the shaft of the motor drive unit (1):
• Remove the wing nut (45), the retaining clip (43) and the rubber ring
(42) from the pre-assembled handle (10).
• Place the rubber ring (42) on the shaft of the motor drive unit (1).
• Make sure that the recess of the rubber ring (42) corresponds to the
desired handle (10) positioning holes (46).
• Place the handle (10) on the rubber ring (42). Guide the pin (10a)
into the desired positioning hole (46). Make sure that the hood guard
on the handle (10) is mounted to the left (towards the user).
• Re-attach the retaining clip (43) to the handle (10) and close it by pull-
ing the retaining clip (43) over the threaded pin (44).
• Now refasten the retaining clip (43) with the wing nut (45).
9.2 Mounting the brush cutter / grass trimmer (12)
Attention!
If the brush cutter / grass trimmer (12) is mounted on the engine drive
unit (1), always pull off the spark plug connector (6) before checking
and making adjustments.
9.2.1 Mounting the brush cutter / grass trimmer shield (14)
(Fig. 3)
• Place the shield (14) onto the premounted screw (47) on the brush
cutter / grass trimmer (12).
• Tighten the premounted screws (47).
• For mounting the shield (14), use the Allen key size 5 (41).
m Warning!
Never use the brush cutter / grass trimmer without the shield (14) mount-
ed!
9.2.2 Fitting/removing the brush cutter (Fig.4, 5)
The brush cutter / grass trimmer (12) attachment can be used as a brush
cutter with the cutting blade (15).
• Remove the nut (52), cover (51) and the external flange (50) from the
threaded mandrel (49).
• The internal flange (48) remains on the threaded mandrel (49).
• Place the cutting blade (15) on the internal flange (48). Note that
the direction of rotation of the cutting blade (15) must match with the
direction of the arrow on the shield (14).
• Then slide the external flange (50) and the cover (51) onto the thread-
ed mandrel (49).
• Fasten the cutting blade (15) with the nut (52).
• Pull the nut (52) firmly in place with the spark plug wrench (39). To do
this, hold the internal flange (48) using the Allen key (41) (see Fig. 5)
• Removal of the cutting blade (15) takes place in reverse order.
m Warning!
Please ensure that the trimmer is mounted correctly before use!

14 GB/IE/NI
9.2.3 Fitting/removing the grass trimmer (Fig.4, 6, 7)
The brush cutter / grass trimmer (12) attachment can be used as a grass
trimmer with the thread coil (16).
• Remove the nut (52), cover (51) and the external flange (50) from the
threaded mandrel (49). Attention - Left-handed thread!
• The nut (52), cover (51) and the external flange (50) are not required
for fitting the thread coil (16) and can be stored in the tool bag (38).
• Hold the internal flange (48) using the Allen key (41) (see Fig. 6)
• Turn the thread coil (16) anti-clockwise on the threaded mandrel (49)
and attach the thread coil (16) hand-tight onto the threaded mandrel
(49).
• Removal of the thread coil (16) takes place in reverse order.
Note that the direction of rotation of the thread coil (16) must match with
the direction of the arrow on the shield (14).
9.3 Assembling the hedge trimmer (17)
The hedge trimmer (17) is already fully assembled.
Attention!
If the hedge trimmer (17) is mounted on the engine drive unit (1), always pull
off the spark plug connector (6) before checking and making adjustments.
9.4 Assembling the pole pruner (26)
Attention!
If the pole pruner (26) is mounted on the engine drive unit (1), always
pull off the spark plug connector (6) before checking and making adjust-
ments.
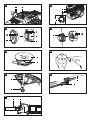
9.4.1 Installing the blade (32) and the saw chain (31)
(Fig. 8, 9, 10)
• Remove the chain cover (53) by loosening the blade fixing nut (30).
• Screw the chain tensioning screw (55) carefully up to the stop to the
left. This makes it easier to insert the blade (32).
• The saw chain (31) is placed in the circumferential groove of the blade
(32).
• Place the blade (32) with the inserted saw chain (32) into the holder
for the pole-mounted pruner (26). (Fig. 9)
• Pay attention to the alignment of the chain teeth (Fig. 9).
• Guide the saw chain (31) around the chain wheel (54). Make sure that
the teeth of the saw chain (31) grip securely into the chain wheel (54).
• Insert the cutter bar (32) as shown in fig. 9 into the mount at the gear
unit. The cutter bar (32) must be hooked into the chain tensioning bolt
(55a).
• Refit the chain cover (53) and the blade fixing nut (30).
Attention!
Only fully tighten the blade fixing nut (30) after the chain tension has
been adjusted (see section 9.4.2 “Tensioning the saw chain”).
9.4.2 Tensioning the saw chain (31) (Fig. 10)
• Loosen the blade fixing nut (30) for the chain cover (53) a few turns.
• Adjust the chain tension with the chain tensioning screw (55). Turn-
ing the screw clockwise increases the chain tension, turning it coun-
terclockwise decreases the chain tension. The saw chain (31) is ten-
sioned correctly when it can be lifted approx. 2 mm in the centre of
the blade (32).
• Retighten the blade fixing nut (30) for the chain cover (53).
• Attention! All chain links of the saw chain (31) must sit properly in the
guide nut of the blade (32).
Notes about tensioning the saw chain (31):
The saw chain (31) must be tensioned correctly in order to guarantee
safe operation. You can identify the optimal tension when the saw chain
(31) can be lifted approx. 2 mm in the centre of the blade (32).
During cutting, the temperature of the chain (31) rises and its length
changes. It is therefore important to check the chain tension at least every
10 minutes and to adjust it again as required. This particularly applies
to new saw chains. Slacken the saw chain (31) after work is complete
because it shortens after cooling down. This prevents the saw chain (31)
from getting damaged.
9.4.3 Filling the automatic saw chain lubrication (Fig. 10)
It is recommended to use standard bio saw chain oil.
• Remove the oil tank cover (56) from the oil tank (29).
• Fill the oil tank (Fig. 29) up to the MAX marking with saw chain oil.
• Close the oil tank cover (56).
9.5 Assembling the extension attachment (22) (31)
• Fit the extension attachment (22) between the motor unit and the
hedge trimmer or the pole pruner. Assembly takes place in the same
way as previously described with the attachments.
Attention!
Do not use the extension attachment (22) in combination
with the brushcutter / grass trimmer (12)!
Note:
Use the extension attachment (22) in order to carry out work at greater
heights.
10. Before commissioning
Never operate the engine drive unit (1) without the brush
cutter / grass trimmer (12), hedge trimmer (17) or pole
pruner (26).
In order to carry out work at height, the hedge trimmer (17) or the pole
pruner (26) in combination with the extension attachment (22) can be
used.
Using the extension attachment (22) in combination with
the brush cutter / grass trimmer (12) is not permitted.
10.1 Attaching the trimmer / grass trimmer (12), hedge
trimmer (17) or pole pruner (26) (following cutting
device) to the engine drive unit (1) (Fig. 11)
• Remove the protective plug (57) to the engine drive unit (1).
• Remove the protective cover (58) from the shaft of the cutting device.
• Slide the shaft of the cutting device into the motor drive unit sleeve (1).
• Gently turn the shaft until the locking pin (13 or 18, 23 or 27) en-
gages.
• Now tighten the locking screw (11 with motor drive unit or 25 with
extension attachment).
Assembly of the extension attachment (22) takes place in
the same way as assembling a cutting device. (Fig. 11)
Hedge trimmer (17) or pole pruner (26) can be mounted on
the extension attachment (22).
• Remove the protection screw (59) from the extension attachment (22).
• Remove the protective cover (58) from the shaft of the cutting device.
Seite wird geladen ...
Seite wird geladen ...
Seite wird geladen ...
Seite wird geladen ...
Seite wird geladen ...
Seite wird geladen ...
Seite wird geladen ...
Seite wird geladen ...
Seite wird geladen ...
Seite wird geladen ...
Seite wird geladen ...
Seite wird geladen ...
Seite wird geladen ...
Seite wird geladen ...
Seite wird geladen ...
Seite wird geladen ...
Seite wird geladen ...
Seite wird geladen ...
Seite wird geladen ...
Seite wird geladen ...
Seite wird geladen ...
Seite wird geladen ...
Seite wird geladen ...
Seite wird geladen ...
Seite wird geladen ...
Seite wird geladen ...
Seite wird geladen ...
Seite wird geladen ...
Seite wird geladen ...
Seite wird geladen ...
Seite wird geladen ...
Seite wird geladen ...
Seite wird geladen ...
Seite wird geladen ...
Seite wird geladen ...
Seite wird geladen ...
Seite wird geladen ...
Seite wird geladen ...
Seite wird geladen ...
Seite wird geladen ...
Seite wird geladen ...
Seite wird geladen ...
Seite wird geladen ...
Seite wird geladen ...
Seite wird geladen ...
Seite wird geladen ...
Seite wird geladen ...
Seite wird geladen ...
Seite wird geladen ...
Seite wird geladen ...
Seite wird geladen ...
Seite wird geladen ...
Seite wird geladen ...
Seite wird geladen ...
Seite wird geladen ...
Seite wird geladen ...
Seite wird geladen ...
Seite wird geladen ...
Seite wird geladen ...
Seite wird geladen ...
Seite wird geladen ...
Seite wird geladen ...
Seite wird geladen ...
Seite wird geladen ...
Seite wird geladen ...
Seite wird geladen ...
Seite wird geladen ...
Seite wird geladen ...
Seite wird geladen ...
Seite wird geladen ...
Seite wird geladen ...
Seite wird geladen ...
Seite wird geladen ...
Seite wird geladen ...
Seite wird geladen ...
Seite wird geladen ...
Seite wird geladen ...
Seite wird geladen ...
Seite wird geladen ...
Seite wird geladen ...
Seite wird geladen ...
Seite wird geladen ...
Seite wird geladen ...
Seite wird geladen ...
Seite wird geladen ...
Seite wird geladen ...
Seite wird geladen ...
Seite wird geladen ...
Seite wird geladen ...
Seite wird geladen ...
Seite wird geladen ...
Seite wird geladen ...
Seite wird geladen ...
Seite wird geladen ...
Seite wird geladen ...
Seite wird geladen ...
Seite wird geladen ...
Seite wird geladen ...
Seite wird geladen ...
Seite wird geladen ...
Seite wird geladen ...
Seite wird geladen ...
Seite wird geladen ...
Seite wird geladen ...
Seite wird geladen ...
Seite wird geladen ...
Seite wird geladen ...
Seite wird geladen ...
Seite wird geladen ...
Seite wird geladen ...
Seite wird geladen ...
Seite wird geladen ...
Seite wird geladen ...
Seite wird geladen ...
Seite wird geladen ...
Seite wird geladen ...
Seite wird geladen ...
Seite wird geladen ...
Seite wird geladen ...
Seite wird geladen ...
-
 1
1
-
 2
2
-
 3
3
-
 4
4
-
 5
5
-
 6
6
-
 7
7
-
 8
8
-
 9
9
-
 10
10
-
 11
11
-
 12
12
-
 13
13
-
 14
14
-
 15
15
-
 16
16
-
 17
17
-
 18
18
-
 19
19
-
 20
20
-
 21
21
-
 22
22
-
 23
23
-
 24
24
-
 25
25
-
 26
26
-
 27
27
-
 28
28
-
 29
29
-
 30
30
-
 31
31
-
 32
32
-
 33
33
-
 34
34
-
 35
35
-
 36
36
-
 37
37
-
 38
38
-
 39
39
-
 40
40
-
 41
41
-
 42
42
-
 43
43
-
 44
44
-
 45
45
-
 46
46
-
 47
47
-
 48
48
-
 49
49
-
 50
50
-
 51
51
-
 52
52
-
 53
53
-
 54
54
-
 55
55
-
 56
56
-
 57
57
-
 58
58
-
 59
59
-
 60
60
-
 61
61
-
 62
62
-
 63
63
-
 64
64
-
 65
65
-
 66
66
-
 67
67
-
 68
68
-
 69
69
-
 70
70
-
 71
71
-
 72
72
-
 73
73
-
 74
74
-
 75
75
-
 76
76
-
 77
77
-
 78
78
-
 79
79
-
 80
80
-
 81
81
-
 82
82
-
 83
83
-
 84
84
-
 85
85
-
 86
86
-
 87
87
-
 88
88
-
 89
89
-
 90
90
-
 91
91
-
 92
92
-
 93
93
-
 94
94
-
 95
95
-
 96
96
-
 97
97
-
 98
98
-
 99
99
-
 100
100
-
 101
101
-
 102
102
-
 103
103
-
 104
104
-
 105
105
-
 106
106
-
 107
107
-
 108
108
-
 109
109
-
 110
110
-
 111
111
-
 112
112
-
 113
113
-
 114
114
-
 115
115
-
 116
116
-
 117
117
-
 118
118
-
 119
119
-
 120
120
-
 121
121
-
 122
122
-
 123
123
-
 124
124
-
 125
125
-
 126
126
-
 127
127
-
 128
128
-
 129
129
-
 130
130
-
 131
131
-
 132
132
-
 133
133
-
 134
134
-
 135
135
-
 136
136
-
 137
137
-
 138
138
-
 139
139
-
 140
140


Parkside PBK 4 B3 Benutzerhandbuch
- Kategorie
- Power Heckenscheren
- Typ
- Benutzerhandbuch
in anderen Sprachen
- English: Parkside PBK 4 B3 User manual
- français: Parkside PBK 4 B3 Manuel utilisateur
- Nederlands: Parkside PBK 4 B3 Handleiding
Verwandte Artikel
Andere Dokumente
-
FLORABEST 273489 Bedienungsanleitung
-
FLORABEST FBK 4 A1 Translation Of Original Operation Manual
-
Scheppach ZGONIC Yellow Garden Line NEW GENERATION MFH3300-4P Benutzerhandbuch
-
Zipper 9120039233215 Benutzerhandbuch
-
Stanley STR-4 in 1 Bedienungsanleitung
-
 Central Park CPT33-4_1_EL Bedienungsanleitung
-
-
-
Texas BCU33M 4in1 Benutzerhandbuch
