
or
GPU MOUNTING KIT
KRAKEN G12
X5
JCable tie
x8
GWasher
x2
HFoam
X4
IFan screw – M5x10
x2
CNvidia retention bracket (Note: Indicated with "N")
x2
DAMD retention bracket (Note: Indicated with "A")
x4
EGPU screws – M3x5
x4
FThumbscrew with spring
x1
AGPU bracket
x1
BFan
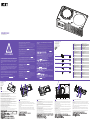
COMPONENT LIST
LISTA DE COMPONENTES
LISTE DES COMPOSANTS
KOMPONENTENLISTE
СПИСОК КОМПОНЕНТОВ
ELENCO DEI COMPONENTI
LISTA DE COMPONENTES
구성품 목록
部品リスト
零件表
零件表
STEP 1-PREPARE THE GRAPHICS CARD
Remove the original cooling module from your graphics card.
Caution: Thermal paste not included. Please use the pre-applied thermal paste on your liquid cooler or
prepare additional thermal paste before installation.
Extraiga el módulo de refrigeración original de la tarjeta gráfica.
Precaución: Pasta térmica no incluida. Utilice la pasta térmica preaplicada en el refrigerador líquido o
prepare pasta térmica adicional antes de la instalación.
Retirez la solution de refroidissement livrée avec votre carte graphique.
Attention : la pâte thermique n'est pas fournie. Servez-vous de la pâte thermique pré-enduite sur votre
système de refroidissement liquide ou munissez-vous de pâte thermique avant installation.
Entfernen Sie das ursprüngliche Kühlsystem von der Grafikkarte.
Achtung: Wärmeleitpaste nicht im Lieferumfang enthalten. Bitte die bereits auf dem Wasserkühler
aufgetragene Wärmeleitpaste oder nach entsprechender Vorbereitung eigene Wärmeleitpaste verwenden.
Rimuovere il modulo di raffreddamento originale dalla scheda grafica.
Attenzione: pasta termica non inclusa. Utilizzare la pasta termica preapplicata sul dissipatore a liquido o
preparare dell'altra pasta termica prima dell'installazione.
Retire o módulo de resfriamento original da sua placa gráfica.
Cuidado: Pasta térmica não inclusa. Utilize a pasta térmica pré-aplicada em seu resfriador líquido ou
prepare mais pasta térmica antes da instalação.
STEP 2-PREPARE THE GPU BRACKET (I)
Install the fan with the label facing the GPU bracket using the fan screws.
Instale el ventilador con la etiqueta mirando hacia el soporte de la GPU y fíjelo con los tornillos del
ventilador.
Installez le ventilateur à l'aide des vis prévues à cet effet, en veillant à ce que l'étiquette soit orientée vers le
support de montage.
Befestigen Sie den Lüfter mithilfe der Lüfterschrauben. Die Beschriftung zeigt dabei in Richtung
GPU-Halterung.
Installare la ventola con l'etichetta orientata verso la staffa della GPU utilizzando le viti della ventola.
Instale o ventilador com a etiqueta voltada para o suporte da GPU usando os parafusos do ventilador.
STEP 3-PREPARE THE GPU BRACKET (II)
Attach the two foam pieces at the corners as indicated while making sure the foams will not interfere with
components on the graphics card.
Coloque las dos piezas de espuma en las esquinas tal como se indica, asegurándose de que no interfieran
con los componentes de la tarjeta gráfica.
Fixez les deux embouts en mousse sur les coins du support, comme indiqué. Attention à bien positionner
les embouts en mousse là où ils ne risquent pas d'entrer en contact avec les composants de la carte
graphique.
Bringen Sie die zwei Schaumstoffteile an den Ecken an (siehe Abbildung). Die Teile dürfen die
Grafikkartenkomponenten nicht behindern.
Collocare i due spessori in materiale espanso sugli angoli come indicato, verificando che non interferiscano
con i componenti della scheda grafica.
Coloque os dois pedaços de espuma nos cantos, conforme indicado, verificando se as espumas não
interferem nos componentes da placa gráfica.
STEP 4-IDENTIFY THE MOUNTING HOLES AND RETENTION BRACKETS
HOLES ON GPU BRACKET GRAPHICS CARD REQUIRED RETENTION BRACKET
Using the chart, identify the holes on the GPU bracket and prepare the required retention brackets for your
graphics cards.
Con ayuda del gráfico, identifique los orificios del soporte de la GPU y prepare los soportes de sujeción
necesarios para las tarjetas gráficas.
Legen Sie die zu Ihrer Grafikkarte passenden Schienen bereit und ordnen Sie diesen die Bohrungen auf der
GPU-Halterung zu (siehe Tabelle).
À l'aide du graphique, repérez les trous du support de montage compatibles avec votre carte graphique,
puis préparez le support de fixation requis.
Utilizzando lo schema, identificare i fori sulla staffa della GPU e preparare le staffe di supporto necessarie
per la scheda grafica.
Utilizando o gráfico, identifique os orifícios no suporte da GPU e prepare os suportes de retenção
necessários para as placas gráficas.
Outer 4 holes
Inner 4 holes
Nvidia
AMD
Nvidia retention bracket
AMD retention bracket
C
D
STEP 5-PREPARE THE RETENTION BRACKET
Mount the retention brackets using screws and washers to prevent risk of damage to your graphics card.
Monte los soportes de sujeción utilizando los tornillos y las arandelas para evitar el riesgo de dañar la
tarjeta gráfica.
Pour éviter d'endommager la carte graphique, montez le support de fixation à l'aide des vis et des rondelles
fournies.
Schrauben Sie die Schienen mit den Schrauben fest. Verwenden Sie die Unterlegscheiben, um eine
Beschädigung der Grafikkarte zu vermeiden.
Montare le staffe di supporto utilizzando viti e rondelle per evitare di danneggiare la scheda grafica.
Monte os suportes de retenção usando os parafusos e as arruelas para evitar o risco de danos à placa
gráfica.
I
A
HC D
G
E
B
NZXT KRAKEN G12 사용 전에 읽어주십시오
이 브래킷은 숙련된 DIY 파워 유저를 위해 설계되었습니다. G12 설치 작업을 사고 없이 올바르게 완료하려면 세심한
주의를 기울여야 합니다.
일반적으로 GPU 보증은 카드에 스톡 쿨러를 사용할 경우 적용됩니다. 스톡 쿨러를 제거할 경우 해당 보증이 무효화될
가능성이 높습니다. 그래픽 카드에서 Kraken G12를 사용할 생각이시라면, 그래픽 카드 보증을 받지 못하게 될 수도
있다는 위험을 우선 감안하시기 바랍니다.
NZXT Kraken G12 보증은 G12 자체와 액세서리에만 국한되며 그래픽 카드나 추가 수냉식 쿨러에는 적용되지
않습니다. NZXT는 부적절한 설치로 인해 발생하는 제품 손상을 책임지지 않습니다.
더욱 자세한 내용은 nzxt.com/support를 방문하여 당사 지원팀에 문의하시기 바랍니다.
NZXT KRAKEN G12 のご使用前にお読みください。
本ブラケットは、DIY 上級者のユーザー向けに設計された製品です。G12 の取り付け時には、十分に注意を払い、事故
などのないように正しく作業を行ってください。
GPU の保証には通常、カードをストッククーラーと合わせて使用する場合の保証が含まれています。ストッククーラー
を取り外すと、この保証が無効になる可能性が高くなります。お使いのグラフィックスカードで Kraken G12 を使用す
る場合は、必ずグラフィックスカードの保証を失うリスクについて検討した上でご使用ください。
NZXT Kraken G12 の保証は、Kraken G12 および関連アクセサリに限定され、グラフィックスカードやその他の水冷ク
ーラーには適用されません。また、NZXT は、不適切な取り付けによる損傷に対する責任は負いません。
詳細については、nzxt.com/support から当社のサポートチームにお問い合わせください。
使用 NZXT KRAKEN G12 前,请阅读以下说明
此支架专为 DIY 行家设计。安装 G12 时应尤其小心谨慎,避免发生事故。
GPU 保修一般要求显卡使用专用冷却器。如果拆除专用冷却器,保修极有可能失效。如果您想在显卡上使用 Kraken G12
,请确保您已经知悉显卡保修可能无效的风险。
NZXT Kraken G12 的保修仅限于 G12 本身及其配件,不包括显卡和其他液体冷却器,NZXT 也不为因不当安装造成的任
何损失负责。
请访问 nzxt.com/support 联系我们的支持团队获取更多信息。
請先閱讀再使用 NZXT KRAKEN G12
此支架專為 DIY 進階使用者設計。安裝 G12 需要謹慎細心,才能沒有意外正確完成。
GPU 保固通常要求顯示卡搭配原廠散熱器使用。移除原廠散熱器很可能會導致保固失效。如果您要在顯示卡上使用 Kraken
G12,請確保您已評估喪失顯示卡保固的風險。
NZXT Kraken G12 的保固僅限其本身和配件,不包含顯示卡和其他水冷散熱器;NZXT 亦不負責因不當安裝所導致的損壞。
如需更多資訊,請到 nzxt.com/support 與我們的支援團隊聯絡。
LEER ANTES DE UTILIZAR EL NZXT KRAKEN G12
Este soporte está diseñado para usuarios con experiencia en el montaje de equipos. La instalación del G12 requiere cuidado y
precaución para completarla correctamente y sin incidentes.
Las garantías de las GPU suelen incluir el uso de la tarjeta con el refrigerador de serie. Existe una posibilidad alta de que dicha
garantía quede invalidada al extraer el refrigerador de serie. Si vas a utilizar el Kraken G12 con tu tarjeta gráfica, asegúrate de haber
evaluado el riesgo de perder la garantía de la tarjeta gráfica.
La garantía del NZXT Kraken G12 se limita al mismo y a sus accesorios, lo que no incluye la tarjeta gráfica ni otros refrigeradores
líquidos adicionales. Además, NZXT tampoco será responsable de los daños causados por una instalación incorrecta.
Ponte en contacto con nuestro equipo de atención al cliente en nzxt.com/support para obtener más información.
PLEASE READ BEFORE USING THE NZXT KRAKEN G12
This bracket is designed for DIY power users. The installation of the G12
will require care and caution to be completed correctly and without
incident.
GPU warranties usually include the card’s usage with the stock cooler.
There is a high possibility this warranty will be invalidated by removing
the stock cooler. If you are going to use Kraken G12 on your graphics
card, please make sure you have evaluated the risk of losing the
graphics card's warranty.
The warranty of NZXT Kraken G12 is limited to itself and its accessories
which doesn't include the graphics cards and extra liquid coolers, nor is
NZXT liable for damage due to improper installation.
Please contact our support team at nzxt.com/support for more
information.
À LIRE ATTENTIVEMENT AVANT TOUTE UTILISATION DU KRAKEN G12 DE NZXT
Ce kit de montage est destiné aux utilisateurs avancés, capables d'assembler eux-mêmes leur PC. Pour être effectuée correctement
et sans incident, l'installation du G12 nécessite un soin particulier.
La garantie des cartes graphiques ne couvre en général que leur utilisation avec le matériel de refroidissement d'origine. Il est très
probable que le retrait de ce matériel annule la garantie de votre carte graphique. Avant d'assembler le Kraken G12, veuillez donc peser
les risques que représente cette perte de garantie.
La garantie du Kraken G12 de NZXT ne concerne que le Kraken G12 et ses accessoires. De fait, elle n'inclut ni la carte graphique, ni le
système de refroidissement liquide. De plus, NZXT ne saurait être tenu pour responsable de tout dommage causé par une mauvaise
installation.
Pour obtenir de plus amples informations, veuillez contacter notre équipe d'assistance sur la page nzxt.com/support.
BITTE VOR DER VERWENDUNG DES NZXT KRAKEN G12 LESEN
Diese Halterung ist für Systembauer und Power-User konzipiert. Die korrekte Installation des G12 erfordert Sorgfalt und Vorsicht.
GPU-Garantien sehen in der Regel die Verwendung der Karte mit der Standardkühlung vor. Mit hoher Wahrscheinlichkeit erlischt die
Garantie daher beim Entfernen der Standardkühlung. Wenn Sie für Ihre Grafikkarte den Kraken G12 verwenden möchten, wägen Sie
die Risiken einer Außerkraftsetzung ihrer Garantie bitte sorgfältig ab.
Die Garantie des NZXT Kraken G12 ist auf ihn und sein unmittelbares Zubehör beschränkt. Sie erstreckt sich nicht auf die Grafikkarte
oder auf zusätzliche Flüssigkeitskühler, und NZXT haftet nicht für Schäden, die durch eine unsachgemäße Installation entstehen.
Weitere Informationen erhalten Sie bei unserem Supportteam unter nzxt.com/support.
LEGGERE PRIMA DI UTIIZZARE NZXT KRAKEN G12
Questa staffa è progettata per power user "fai da te". L'installazione di G12 richiede prudenza e cautela affinché sia completata
correttamente e senza incidenti.
Le garanzie GPU di solito includono l'utilizzo della scheda con raffreddatore stock. C'è una forte possibilità che questa garanzia venga
invalidata se viene rimosso il raffreddatore stock. Se si utilizzerà Kraken G12 sulla scheda grafica, prendere in considerazione il rischio
di perdere la garanzia della scheda grafica.
La garanzia di NZXT Kraken G12 è limitata al prodotto stesso e agli accessori che non includono le schede grafiche e i dissipatori a
liquido extra. Inoltre, NZXT non è responsabile dei danni dovuti a un'installazione non corretta.
Per ulteriori informazioni, contattare il team di supporto all'indirizzo nzxt.com/support.
LEIA ANTES DE USAR O NZXT KRAKEN G12
Este suporte foi projetado para usuários avançados autônomos. A instalação do G12 requer cuidado e cuidado para ser concluída
corretamente e sem incidentes.
As garantias da placa de geralmente incluem o uso da placa com o resfriador. Existe uma grande possibilidade de que esta garantia
seja invalidada pela remoção do resfriador. Se você for usar o Kraken G12 na placa gráfica, certifique-se de ter avaliado o risco de
perda da garantia da placa gráfica.
A garantia do NZXT Kraken G12 está limitada ao próprio NZXT Kraken G12 e seus acessórios, o que não inclui as placas gráficas e
resfriadores líquidos adicionais, e a NZXT não se responsabiliza por danos devido a instalação incorreta.
Entre em contato com nossa equipe de suporte em nzxt.com/support para obter mais informações.
DISCLAIMER
A. Support de montage
B. Ventilateur
C. Support de fixation Nvidia (indiqué par un « N »)
D. Support de fixation AMD (indiqué par un « A »)
E. Vis pour carte graphique : M3 x 5
F. Vis à ressort
G. Rondelles
H. Mousse
I. Vis du ventilateur : M5 x 10
J. Serre-câbles
A. Soporte de la GPU
B. Ventilador
C. Soporte de sujeción Nvidia (Nota: indicado con una "N")
D. Soporte de sujeción AMD (Nota: indicado con una "A")
E. Tornillos de la GPU: M3x5
F. Tornillo moleteado con muelle
G. Arandela
H. Espuma
I. Tornillo del ventilador: M5x10
J. Brida para cable
INSTALLATION
INSTALACIÓN
INSTALLATION
INSTALLIEREN
INSTALLAZIONE
INSTALAÇÃO
УСТАНОВКА
설치
設置
安装
安裝
A. GPU-Halterung
B. Lüfter
C. NVIDIA-Befestigungsschienen (Hinweis: mit einem „N“ markiert)
D. AMD-Befestigungsschienen (Hinweis: mit einem „A“ markiert)
E. GPU-Schrauben (M3x5)
F. Rändelschrauben mit Feder
G. Unterlegscheiben
H. Schaumstoffteile
I. Lüfterschrauben (M5x10)
J. Kabelbinder
A. Staffa della GPU
B. Ventola
C. Staffa di supporto Nvidia (Nota: indicata con "N")
D. Staffa di supporto AMD (Nota: indicata con "A")
E. Viti della GPU - M3x5
F. Vite zigrinata con molla
G. Rondella
H. Materiale espanso
I. Viti della ventola - M5x10
J. Fascette
A. GPU 架
B. 風扇
C. Nvidia 固定架 (註︰以「N」表示)
D. AMD 固定架 (註︰以「A」表示)
E. GPU 螺絲 – M3x5
F. 彈簧手轉螺絲
G. 墊圈
H. 泡綿
I. 風扇螺絲 – M5x10
J. 束線帶
A. GPU 支架
B. 风扇
C. Nvidia 固定支架(注意:用“N”标注)
D. AMD 固定支架(注意:用“A”标注)
E. GPU 螺丝 – M3x5
F. 弹簧手转螺丝
G. 垫圈
H. 泡绵
I. 风扇螺丝 – M5x10
J. 束线带
A. GPU ブラケット
B. ファン
C. NVIDIA 保持ブラケット(注:「N」で示されます)
D. AMD 保持ブラケット(注:「A」で示されます)
E. GPU ネジ - M3 x 5
F. スプリング付き蝶ネジ
G. ワッシャー
H. 発泡剤
I. ファンネジ - M5 x 10
J. ケーブルタイ
A. GPU 브래킷
B. 팬
C. Nvidia 고정 브래킷(참고: "N"으로 표시)
D. AMD 고정 브래킷(참고: "A"로 표시)
E. GPU 나사 – M3x5
F. 스프링이 달린 썸스크루
G. 와셔
H. 발포체
I. 팬 나사 – M5x10
J. 케이블 타이
A. КРЕПЛЕНИЕ ГРАФИЧЕСКОГО ПРОЦЕССОРА
B. ВЕНТИЛЯТОР
C. КРЕПЛЕНИЕ NVIDIA (ПРИМЕЧАНИЕ. ОТМЕЧЕНО БУКВОЙ "N")
D. КРЕПЛЕНИЕ AMD (ПРИМЕЧАНИЕ. ОТМЕЧЕНО БУКВОЙ "A")
E. ВИНТЫ ГРАФИЧЕСКОГО ПРОЦЕССОРА: M3X5
F. БАРАШКОВЫЙ ВИНТ С ПРУЖИНОЙ
G. ШАЙБА
H. ПОРОЛОНОВАЯ ПОДКЛАДКА
I. ВИНТ ВЕНТИЛЯТОРА: M5X10
J. СТЯЖКИ ДЛЯ КАБЕЛЕЙ
A. Suporte da GPU
B. Ventilador
C. Suporte de retenção Nvidia (obs.: indicado com um "N")
D. Suporte de retenção AMD (obs.: indicado com um "A")
E. Parafusos GPU - M3x5
F. Parafuso com mola
G. Arruela
H. Espuma
I. Parafuso do ventilador - M5x10
J. Braçadeira de cabos
Это крепление предназначено для опытных пользователей, самостоятельно собирающих свой ПК. Правильная и
безопасная установка G12 требует аккуратности и осторожности.
Как правило, гарантия на графический процессор действует только при использовании графической карты вместе с
оригинальной системой охлаждения. Существует высокая вероятность, что после снятия оригинальной системы
охлаждения гарантия будет аннулирована. Если вы планируете использовать Kraken G12 с графической картой, имейте в
виду, что ваша гарантия на графическую карту может оказаться недействительной.
Гарантия Kraken G12 от NZXT распространяется только на само устройство и его аксессуары, которые не включают в себя
графические карты и дополнительные жидкостные системы охлаждения. Компания NZXT также не несет ответственности
за повреждения, являющиеся результатом неправильной установки.
Для получения дополнительной информации обратитесь в нашу службу поддержки по адресу nzxt.com/support.
ОЗНАКОМЬТЕСЬ С ЭТОЙ ИНФОРМАЦИЕЙ ПЕРЕД ИСПОЛЬЗОВАНИЕМ KRAKEN
G12 ОТ NZXT
Установите крепление с помощью винтов и шайб, чтобы исключить риск повреждения графической карты.
С помощью таблицы определите отверстия на креплении графического процессора и подготовьте необходимые
крепления для ваших графических карт.
Установите две поролоновые подкладки на углах, как указано на схеме, и убедитесь, что подкладки не
соприкасаются с компонентами графической карты.
Установите вентилятор с помощью соответствующих винтов, повернув его этикеткой к креплению графического
процессора.
Снимите оригинальный модуль охлаждения с графической карты.
Внимание! Термопаста приобретается отдельно. Используйте термопасту, предварительно нанесенную на вашу
жидкостную систему охлаждения, или подготовьте дополнительную термопасту перед установкой.
Nvidia
AMD
A
C
D
使用螺絲與墊圈安裝固定架,避免對顯示卡造成損傷。
使用這張表找出 GPU 架上的孔,並為您的顯示卡準備所需的固定架。
如圖所示,將兩塊泡綿放在角落,同時確保泡綿不會碰到顯示卡上的元件。
將風扇標籤面向 GPU 架,使用風扇螺絲進行安裝。
拆下顯示卡上的原裝散熱模組。
注意︰本產品未隨附散熱膏。請使用預先塗在水冷散熱器上的散熱膏,或是在安裝前準備額外的散熱膏。
将原有冷却模块从显卡上拆下。
注意:未提供导热膏。请使用预先涂抹在液体冷却器上的导热膏,或在安装前准备额外的导热膏。
グラフィックスカードから元の冷却モジュールを取り外します。
注意:サーマルペーストは含まれていません。お使いの水冷クーラーにあらかじめ塗布されたサーマルペーストを使用す
るか、取り付け前に追加のサーマルペーストを準備してください。
그래픽 카드에서 순정 냉각 모듈을 분리합니다.
주의: 서멀 페이스트가 포함되어 있지 않습니다. 수냉식 쿨러에 사전 도포된 서멀 페이스트를 사용하거나 설치 전에 서멀
페이스트를 추가로 준비하십시오.
使用风扇螺丝安装风扇时,标签面向 GPU 支架。
ファンネジを使用して、ラベルが GPU ブラケット側に向くようにファンを取り付けます。
라벨이 GPU 브래킷을 향하게 하여 팬 나사로 팬을 설치합니다.
根据指示在角落处贴两块泡沫,并确保泡沫不会影响显卡上的部件。
図のように、2 つの発泡剤を角に取り付けます。この時、発泡剤がグラフィックスカードのコンポーネントの邪魔になら
ないように注意してください。
표시된 대로 2개의 발포체 조각을 모서리에 부착합니다. 이때 발포체가 그래픽 카드의 구성품에 방해가 되지 않도록 합니다.
使用图表确定 GPU 上的孔,然后准备显卡所需的固定支架。
上記の表を参照して、GPU ブラケットの穴を特定し、グラフィックスカードに必要な保持ブラケットを準備します。
차트를 사용하여 GPU 브래킷의 구멍을 확인하고 그래픽 카드에 필요한 고정 브래킷을 준비합니다. 使用螺丝和垫圈安装固定支架,可防止显卡损坏。
グラフィックスカードの損傷を防ぐため、ネジとワッシャーを使用して保持ブラケットを取り付けます。
나사와 와셔를 사용하여 고정 브래킷을 장착해 그래픽 카드가 손상될 위험을 방지합니다.

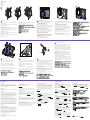
STEP 6-PREPARE THE PUMP
Referring to your liquid cooler’s instructions, remove the Intel or AMD retention bracket if it is already
installed.
Sample diagram is from Kraken series.
Consultando las instrucciones del refrigerador líquido, extraiga el soporte de sujeción Intel o AMD si ya está
instalado.
El diagrama de muestra es de la serie Kraken.
Si un support de fixation Intel ou AMD est pré-installé sur la pompe, reportez-vous au manuel du système de
refroidissement liquide pour le retirer.
Le diagramme représente un système de refroidissement de la gamme Kraken.
Sollte die Intel- bzw. AMD-Halterung bereits eingebaut sein, entfernen Sie sie, wie in der Anleitung des
Wasserkühlers beschrieben.
Die Beispielabbildung gilt für die Kraken-Serie.
Facendo riferimento alle istruzioni del dissipatore a liquido, rimuovere la staffa di supporto Intel o AMD se è
già installata.
Lo schema di esempio appartiene alla serie Kraken.
Consultando as instruções do resfriador líquido, remova o suporte de retenção Intel ou AMD, caso já esteja
instalado.
O modelo de diagrama é para as séries da Kraken.
STEP 8-INSTALL THE GPU BRACKET
Using the thumbscrews with spring, install the GPU bracket onto the graphics card.
Con los tornillos moleteados con muelle, instale el soporte de la GPU en la tarjeta gráfica.
À l'aide des vis à ressort, installez le support de montage sur la carte graphique.
Befestigen Sie die GPU-Halterung mithilfe der gefederten Rändelschrauben an der Grafikkarte.
Utilizzando la vite zigrinata con molla, installare la staffa della GPU sulla scheda grafica.
Utilizando os parafusos com molas, instale o suporte da GPU na placa gráfica.
STEP 9-MANAGE THE TUBES AND CABLES
Use the included cable ties to manage the tubes and cables along the trench with tie points.
Utilice las bridas para cable incluidas para organizar los tubos y los cables a lo largo del hueco con los
puntos de fijación.
À l'aide des serre-câbles fournis, agencez les tuyaux et câbles le long de la tranchée.
Sortieren Sie Schläuche und Kabel mithilfe der im Lieferumfang enthaltenen Kabelbinder im dafür
vorgesehenen Kabelschacht.
Utilizzare le fascette in dotazione per sistemare i tubicini e i cavi lungo la scanalatura con i punti appositi.
Utilize as braçadeiras de cabo inclusas para guiar os tubos e os cabos ao longo da trincheira.
STEP 10-CONNECT THE FAN
Connect the Kraken G12’s 3-pin fan connector to the liquid cooler’s fan power or to an open fan headers on
the motherboard.
Conecte el conector del ventilador de 3 patillas del Kraken G12 a la alimentación del ventilador del
refrigerador líquido o a un cabezal para ventilador abierto de la placa base.
Branchez le connecteur à 3 broches du ventilateur du Kraken G12 à l'alimentation dédiée sur le système de
refroidissement liquide ou effectuez le branchement sur un connecteur pour ventilateur disponible sur la
carte-mère.
Schließen Sie den Kraken G12-Lüfter mit dem 3-Pin-Anschluss an die Stromversorgung des Wasserkühlers
bzw. an einen freien Lüfteranschluss am Mainboard an.
Collegare il connettore a 3 pin della ventola Kraken G12 all'alimentazione della ventola del dissipatore a
liquido o alla basetta libera di una ventola della scheda madre.
Conecte o conector de três pinos do ventilador da Kraken G12 à alimentação do ventilador do resfriador
líquido ou a um conector de ventilador aberto na placa mãe.
STEP 11-INSTALL THE ASSEMBLED GRAPHICS CARD
Follow the liquid coolers instructions and complete all necessary connections to complete the installation
of your graphics cards. This can include pump power, USB, and software installation.
Siga las instrucciones del refrigerador líquido y realice todas las conexiones necesarias para completar la
instalación de las tarjetas gráficas. Pueden incluir la instalación de la alimentación de la bomba, el USB y el
software.
Reportez-vous au manuel du système de refroidissement liquide pour effectuer tous les branchements
restants, y compris l'alimentation de la pompe ou un branchement USB. Il peut également être nécessaire
d'installer un logiciel.
Befolgen Sie die Anleitung für den Wasserkühler und schließen Sie den Einbau mit dem Anschluss aller
übrigen Komponenten ab. Dies kann die Stromversorgung der Pumpe, USB-Anschlüsse und
Softwareinstallationen umfassen.
Seguire le istruzioni del dissipatore a liquido ed effettuare tutti i collegamenti necessari per completare
l'installazione della scheda grafica. Questa operazione può includere il collegamento dell'alimentazione
della pompa e della porta USB, oltre all'installazione del software.
Siga as instruções dos resfriadores líquidos e realize todas as conexões necessárias para a conclusão da
instalação de suas placas gráficas. Isso pode incluir alimentação da bomba, USB e instalação do software.
Завершите установку графической карты, выполнив все необходимые подключения, как указано в инструкциях
по установке жидкостной системы охлаждения. Возможно, потребуется подключение питания насоса, USB или
установка программного обеспечения.
Подключите 3-контактный разъем Kraken G12 к разъему питания вентилятора жидкостной системы охлаждения
или к доступному разъему вентилятора на материнской плате.
Крепление графического процессора имеет ту же систему монтажа, что и крепления Intel или AMD. Установите
крепление графического процессора и насос, следуя инструкциям по установке жидкостной системы
охлаждения.
I. Проложите трубки насоса рядом с точками закрепления стяжками для кабелей, как указано на схеме.
II. Вставьте насос в пазы крепления графического процессора.
III. Поверните насос, чтобы совместить его с креплением графического процессора и зафиксировать.
Следуя инструкциям по установке жидкостной системы охлаждения, снимите крепление Intel или AMD, если
оно уже установлено.
Образец схемы взят из инструкции для серии Kraken.
Зафиксируйте трубки и кабели с помощью стяжек для кабелей в точках закрепления в углублении.
Установите крепление графического процессора на графическую карту с помощью барашковых винтов с пружиной.
STEP 7-INSTALL THE PUMP ONTO THE GPU BRACKET
The GPU bracket is designed using the same mounting mechanism as the Intel or AMD retention brackets.
Follow the steps from your liquid cooler’s instructions to install the GPU bracket and pump.
I. Orient the pump’s tubes along the side with cable tie points as shown.
II. Pass the pump through the GPU bracket's grooves.
III. Rotate the pump until it aligns with the GPU bracket’s and attach.
El soporte de la GPU está diseñado con el mismo mecanismo de montaje que los soportes de sujeción Intel
o AMD. Siga los pasos de las instrucciones del refrigerador líquido para instalar el soporte de la GPU y la
bomba.
I. Oriente los tubos de la bomba a lo largo del lateral, con bridas para cable donde se indica.
II. Pase la bomba a través de las ranuras del soporte de la GPU.
III. Gire la bomba hasta que se alinee con el soporte de la GPU y fíjela
Le support de montage s'installe sur la pompe de la même manière que les supports de fixation Intel ou
AMD. Suivez les consignes du manuel du système de refroidissement liquide pour effectuer cette
installation.
I. Maintenez les tuyaux de la pompe sur le côté grâce aux serre-câbles, comme illustré.
II. Faites passer la pompe dans le trou à encoches du support de montage.
III. Faites pivoter la pompe pour l'empêcher de ressortir, puis fixez-la.
Das Montagesystem für die GPU-Halterung entspricht dem der Intel- bzw. AMD-Halterungen. Befolgen Sie
beim Einbau der GPU-Halterung und der Pumpe bitte die Anleitung des Wasserkühlers.
I. Richten Sie die Pumpschläuche seitlich wie in der Abbildung aus. Die Enden der Kabelbinder sollten in
die angezeigte Richtung zeigen.
II. Führen Sie die Pumpe durch die Aussparung der GPU-Halterung.
III. Drehen Sie die Pumpe, bis sie bündig mit der GPU-Halterung ist und einrastet.
O suporte da GPU foi projetado com base no mesmo mecanismo de montagem dos suportes de retenção
Intel ou AMD. Siga as etapas de instrução do resfriador líquido para instalar o suporte e a bomba da GPU.
I. Guie os tubos da bomba ao longo da lateral, com as pontas da braçadeira de cabo, conforme mostrado.
II. Passe a bomba pelos sulcos do suporte da GPU.
III. Gire a bomba até que ela se alinhe com o suporte da GPU, fixando-a.
La staffa della GPU è stata progettata utilizzando lo stesso meccanismo di montaggio delle staffe di
supporto Intel o AMD. Seguire i passaggi indicati dalle istruzioni del dissipatore a liquido per installare la
staffa della GPU e la pompa.
I. Orientare i tubicini della pompa lungo il lato con i punti per le fascette come mostrato.
II. Far passare la pompa attraverso le scanalature della staffa della GPU.
III. Far ruotare la pompa in modo da allinearla alla staffa della GPU e fissarla.
I. Warranty Length
NZXT computer cases, temperature meters, fans, accessories, and cables carry a 2 year
warranty from the date of purchase for parts and labor. Any replacement product will be
warranted for the remainder of the warranty period or thirty days, whichever is longer. Proof
of purchase is required for warranty service.
II. Who Is Protected
The Warranty covers only NZXT products purchased by the original consumer from authorized
NZXT retailers.
III. What Is Covered
Please note that our warranty is not an unconditional guarantee. If the product, in NZXT's
opinion, malfunctions within the warranty period, NZXT will at its discretion repair or replace
the product that is equal or greater in value depending on supply. The warranty does not
cover any NZXT product that was damaged due to accident, misuse, abuse, improper
installation, usage not in accordance with product specifications and instructions, natural or
personal disaster, or unauthorized alterations, repairs or modifications.
Our warranty does not cover the following:
Any product or serial number/warranty sticker modification applied without permission from
NZXT. Any damage that is not a manufacturing defect. Damage, deterioration or malfunction
resulting from accident, abuse, misuse, neglect, fire, water, lightning, or other acts of nature,
unauthorized product modification or failure to follow instructions included with the product.
Repair or attempted repair by anyone not authorized by NZXT. Shipping or transport damage
(claims must be made with the carrier) Normal wear and tear. NZXT does not warrant that
this product will meet your requirements. It is your responsibility to determine the suitability
of this product for your purpose. Removal or installation charges. Shipping charges. Any
incidental charges.
IV. Exclusion Of Damages (Disclaimer)
NZXT's sole obligation and liability under this warranty is limited to the repair or
replacement of a defective product at our option. NZXT shall not, in any event, be liable for
any incidental or consequential damage, including but not limited to damages resulting from
interruption of service and loss of data, business, or for liability in tort relating to this
product or resulting from its use or possession. V. Limitations Of Implied Warranties There
are no other warranties, expressed or implied, including but not limited to those of
merchantability or fitness for a particular purpose. The duration of implied warranties is
limited to the warranty length specified in Paragraph I.
VI. Local Law And Your Warranty
This warranty gives you specific legal rights. You may also have other rights granted under
local law. These rights may vary.
Warranty terms for all NZXT products sold to Australia:
Our goods come with guarantees that cannot be excluded under the Australian Consumer
Law. You are entitled to a replacement or refund for a major failure and or compensation for
any other reasonably foreseeable loss or damage. You are also entitled to have the goods
repaired or replaced if the goods fail to be of acceptable quality and the failure does not
amount to a major failure' (NZXT Corporation, 13164 E. Temple Ave., City of Industry, CA
91746, USA TEL: +1-800-228-9395) Please contact the shop you purchased from to receive
prompt service. If the dealer refuses to offer the service, please contact us at directly at
support.nzxt.com
VII. To Obtain Technical Support
If you have already referenced your product owner's manual and still need help, please visit
support.nzxt.com for details and contact information.
VIII. For Warranty Service
In the event that warranty repair or replacement is necessary, NZXT will request and you must
provide proof of purchase (store receipt or invoice) in order to receive warranty service. For
North American Customers:
Within the first 60 days after purchase, please return your product (or for power supplies
installed within our enclosures, just the failed power supply) to your dealer or reseller for a
replacement. If the product is still within warranty and you can no longer return it to your
dealer, please contact NZXT Customer Support (support.nzxt.com) for assistance and
instructions. NZXT will not accept returns without prior approval and an RMA number.
In Europe:
Within the first year after purchase, please return your product (or for power supplies installed
within our enclosures, just the failed power supply) to your dealer or reseller for a replacement. If the
product is still within warranty and you can no longer return it to your dealer, please contact NZXT
Customer Support for assistance and instructions. NZXT will not accept returns without prior
approval.
Global Customers (Outside North America and Europe):
If your product needs to be returned or repair within the warranty period, please do so through the
retailer or distributor from whom you purchased the product. If you can no longer return the product
to your dealer, please contact NZXT Customer Support for assistance. Please note, proof of
purchase from an authorized NZXT retailer is required for ALL warranty servicing.
Visit support.nzxt.com for information on warranty coverage and service
Visitare il sito support.nzxt.com per informazioni sulla copertura e sul servizio della garanzia.
보증 범위와 서비스에 대한 자세한 내용은 support.nzxt.com을 참조하십시오
Informationen zu Geltungsbereich und Service der Garantie nden Sie unter support.nzxt.com
Visite el sitio Web support.nzxt.com para obtener información sobre la cobertura y el servicio de la garantía.
Visitez support.nzxt.com pour les informations de la couverture de la garantie et du service.
Visite support.nzxt.com para obter informações sobre a cobertura da garantia e assistência
Подробную информацию об условиях гарантийного обслуживания см. на веб-сайте support.nzxt.com
请造访 support.nzxt.com 了解保修范围和服务的信息
請訪問 support.nzxt.com 了解產品保固範圍和更多服務訊息
保証範囲およびサービスに関する情報については、support.nzxt.com にアクセスしてください。
Kraken G12’s Fan
Liquid cooler's Fan
依照水冷散熱器的說明連接所有必要的連線,以完成顯示卡的安裝。這可能包括泵浦電源、USB以及安裝軟體等。
按照液体冷却器的说明完成所有必要的连接,以便完成显卡的安装。可能包括泵电源、 USB 及软件的安装。
水冷クーラーの取扱説明書に従って、必要な接続をすべて行い、グラフィックスカードの取り付けを完了します。この手
順には、ポンプ電源、USB、およびソフトウェアのインストールが含まれます。
수냉식 쿨러 설명서에 따라 필요한 연결 작업을 모두 완료하여 그래픽 카드 설치 작업을 완료합니다. 이러한 작업에는 펌프
전원, USB, 소프트웨어 설치 등이 있습니다.
將 Kraken G12 的 3 針腳風扇接頭連接至水冷散熱器的風扇電源,或是主機板上可用的風扇接頭。
将 Kraken G12 的三针风扇连接头连接到液体冷却器的风扇电源或主板上的开放风扇接头。
Kraken G12 の 3 ピンファンコネクタを水冷クーラーのファンの電源またはマザーボードのオープンファンヘッダーに接続します。
Kraken G12의 3핀 팬 커넥터를 수냉식 쿨러의 팬 전원이나 마더보드의 개방된 팬 헤더에 연결합니다.
使用隨附的束線帶,沿著溝槽中的固定處以束線帶整理管子與纜線。
使用随附的束线带延槽整理泵管和线缆。
同梱のケーブルタイを使用して、タイポイントの付いたトレンチに沿ってチューブとケーブルを配置します。
포함된 케이블 타이를 사용하여 튜브와 케이블을 타이 지점의 도랑을 따라 정리합니다.
使用彈簧手轉螺絲,將 GPU 架安裝在顯示卡上。
使用弹簧手转螺丝将 GPU 支架安装到显卡上。
スプリング付き蝶ネジを使用して、グラフィックスカードに GPU ブラケットを取り付けます。
스프링이 달린 썸스크루를 사용하여 그래픽 카드에 GPU 브래킷을 설치합니다.
GPU 架所使用的安裝機制與 Intel 或 AMD 固定架相同。依照水冷散熱器說明中的步驟,安裝 GPU 架與泵浦。
I. 將泵浦的管子沿著側邊放置,在圖示的固定處以束線帶固定。
II.將泵浦穿過 GPU 架的溝槽。
III.旋轉泵浦,直到泵浦對齊 GPU 架並固定。
在设计 GPU 支架时,采用了与 Intel 或 AMD 固定支架的相同安装机制。按照液体冷却器说明中的步骤安装 GPU 支架和泵。
I. 沿着侧面找准泵管的方向,束线带朝向如图所示。
II.将泵穿过 GPU 支架槽。
III.旋转泵,直到泵与 GPU 支架对齐,然后连接。
この GPU ブラケットは、インテルまたは AMD 保持ブラケットと同じ取り付け機構を使用して設計されています。水冷
クーラーの取扱説明書の手順に従って、GPU ブラケットとポンプを取り付けます。
I. 図に示すようにポンプのチューブをケーブルタイポイントのある面に沿って配置します。
II.ポンプを GPU ブラケットの溝に通します。
III.GPU ブラケットの位置と合うまでポンプを回転させて取り付けます。
GPU 브래킷은 Intel 또는 AMD 고정 브래킷과 동일한 장착 메커니즘을 사용하여 설계되었습니다. 수냉식 쿨러 설명서의
단계에 따라 GPU 브래킷과 펌프를 설치합니다.
I. 그림과 같이 케이블 타이 지점의 측면을 따라 펌프 튜브를 배치합니다.
II. 펌프를 GPU 브래킷 홈으로 통과시킵니다.
III. GPU 브래킷에 맞춰 부착될 때까지 펌프를 회전합니다.
請參照水冷散熱器的說明。若已安裝 Intel 或 AMD 固定架,請將其移除。
範例圖為 Kraken 系列。
查看水冷散热器说明,拆下 Intel 或 AMD 固定支架(若固定支架已安装)。
Kraken 系列的示意图。
インテルまたは AMD の保持ブラケットがすでに取り付けられている場合は、水冷クーラーの取扱説明書を参照して、そ
れらを取り外します。
サンプルの図は Kraken シリーズです。
Intel 또는 AMD 고정 브래킷이 이미 설치되어 있는 경우 수냉식 쿨러 설명서를 참고하여 이를 분리합니다.
샘플 도표는 Kraken 시리즈의 것입니다.
Soporte y servicio
Si tiene preguntas o problemas con el producto NZXT que usted compró, no dure en ponerse en contacto con
[email protected] y suministrar una explicación detallada de su problema así como su prueba de compra.
Puede hacer consultas sobre piezas de repuesto en support.nzxt.com. Para comentarios y sugerencias, escriba
un mensaje de correo electrónico a nuestro equipo de diseño: [email protected]. Gracias por comprar un
producto NZXT. Para más información acerca de NZXT, visítenos en línea. Página web de NZXT: nzxt.com
サポートおよびサービス
購入されましたNZXTの製品に関するご質問または問題は、問題の詳細および購入の証明を添えて、ご遠慮なく
[email protected]までご連絡ください。 交換部品はsupport.nzxt.comまでお尋ねください。ご意見およびご提案は弊社設
計チーム、[email protected] までメールを送信してください。NZXT製品をご購入いただきましてありがとうございます。
NZXTに関する詳細は、インターネット上のウェブサイトをご覧ください。NZXT ウェブサイト: nzxt.com
Служба поддержки и обслуживания
В случае возникновения вопросов или неисправностей в приобретенных вами продуктах NZXT обращайтесь по
адресу: [email protected] с подробным описанием проблемы и подтверждением покупки. О наличии запчастей можно
узнать, обратившись по адресу: support.nzxt.com. Замечания и предложения отправляйте в адрес нашей группы
разработчиков: [email protected]. Благодарим вас за покупку продукта NZXT. Более подробная информация о
компании NZXT представлена на наших веб-сайтах. Веб-сайт NZXT: nzxt.com
Kundendienst und service
Falls Fragen oder Probleme bezüglich Ihres NZXT-Produktes auftreten, wenden Sie sich bitte mit einer
detaillierten Problembeschreibung und Ihrem Kaufbeleg an [email protected].
Ersatzteile können Sie unter support.nzxt.com anfragen. Kommentare und Anregungen senden Sie bitte
per [email protected] an unser Designteam. Vielen Dank, dass Sie ein NZXT-Produkt erworben haben.
Weitere Informationen über NZXT erhalten Sie im Internet. NZXT-Webseite: nzxt.com
Support et service
Si vous avez des questions ou des problèmes avec le produit NZXT que vous avez acheté, n’hésitez pas à
contacter [email protected] avec une description détaillée de votre problème et votre preuve d’achat. Vous
pouvez aussi commander des pièces de remplacement auprès support.nzxt.com. Pour les commentaires et
les suggestions, envoyez un email à notre équipe de design, [email protected]. Merci d'avoir acheté ce
produit de NZXT. Pour plus d'informations sur NZXT, visitez notre site Web. Site Web de NZXT : nzxt.com
Support and service
If you have any questions or problems with the NZXT product you purchased, please don’t hesitate to
contact us using our support system. support.nzxt.com
Please include a detailed explanation of your problem and your proof of purchase. For comments and
suggestions, you can e-mail our design team, [email protected]. Lastly we would like to thank you for
your support by purchasing this product.
For more information about NZXT, please visit us online. NZXT Website: nzxt.com
Assistenza e servizio
In caso di dubbi o problemi con il prodotto NZXT acquistato, non esitate a contattarci utilizzando il nostro
sistema di assistenza. support.nzxt.com
Includere una spiegazione dettagliata del problema e la prova di acquisto. Per commenti e suggerimenti,
siete pregati di inviare un messaggio al nostro team di progettisti, all'indirizzo: [email protected]. Infine,
vogliamo ringraziarvi del vostro supporto con l'acquisto di questo prodotto. Per altre informazioni su NZXT,
visitate il nostro sito. Sito NZXT: nzxt.com
지원 및 서비스
구입한 NZXT 제품과 관련하여 질문 또는 문제가 있을 경우, 당사의 지원 시스템(support.nzxt.com)을 사용하여
문의하십시오. 문제를 자세히 기술하고 구매 증빙을
제출하십시오. 의견 또는 제안 사항이 잇을 경우 당사 설계
팀에 [email protected]으로 이메일을 보내십시오. 마지막으로 이 제품을 구입하여 당사를
응원해 주셔서 감사합니다. NZXT에 대해 자세히 알려면 온라인으로 방문하십시오.
NZXT 웹사이트: nzxt.com
Assistência e manutenção
Caso tenha questões ou problemas com o produto NZXT adquirido, não hesite em contactar-nos através do
endereço [email protected] fornecendo a explicação detalhada do seu problema e a prova de compra. Poderá
solicitar peças de substituição através do endereço support.nzxt.com. Para comentários e sugestões, contacte
a nossa equipa de design através do endereço de e-mail, [email protected]. Obrigado por ter adquirido um
produto NZXT. Para mais informações acerca da NZXT, visite-nos online. Web site da NZXT: nzxt.com
支持和服务
如果有任何疑问或者在使用 NZXT 产品的过程中遇到任何问题,欢迎联络 [email protected],联络时请提供关于问题的详细
说明及购买凭证。您可以向 support.nzxt.com 查询更换部件。如有任何意见或建议,欢迎致信我们的设计团队,电子邮件地址
是 [email protected]。感谢您购买 NZXT 产品。有关 NZXT 的更多信息,请造访我们的在线网站。
NZXT 网站:nzxt.com
支援和服務
如果在使用NZXT 產品的過程中有遇到任何問題或疑問,歡迎聯繫 [email protected], 並請提供問題的詳細敘述及購買證
明。您可以透過 support.nzxt.com 查詢更換部件。如有任何意見或建議,歡迎來信與設計團隊聯
繫 [email protected]。最後,感謝您購買 NZXT 產品。有關 NZXT 的更多信息,請訪問我們的網站。
NZXT 網站:nzxt.com
nzxt.com
For more building tips and information, visit: blog.nzxt.com
NZXT WARRANTY
1. 2. 3.
F
GJ
1. 2. 3.
SUPPORT AND SERVICE
INSTALLATION
INSTALACIÓN
INSTALLATION
INSTALLIEREN
INSTALLAZIONE
INSTALAÇÃO
УСТАНОВКА
설치
設置
安装
安裝
-
 1
1
-
 2
2


in anderen Sprachen
- English: NZXT Kraken G12 User manual
- français: NZXT Kraken G12 Manuel utilisateur
- español: NZXT Kraken G12 Manual de usuario
- русский: NZXT Kraken G12 Руководство пользователя
- português: NZXT Kraken G12 Manual do usuário
- 日本語: NZXT Kraken G12 ユーザーマニュアル
Verwandte Papiere
-
NZXT Signal HD60 Benutzerhandbuch
-
NZXT Lift Benutzerhandbuch
-
NZXT Capsule Benutzerhandbuch
-
-
-
-
-
-
-
NZXT KRAKEN M120 120MM VÆSKE CPU-KJØLER, SVART Benutzerhandbuch
