
INSTALLATIEHANDLEIDING
INSTALLATION MANUAL
INSTALLATIONSANLEITUNG
PRESCRIPTIONS D’INSTALLATION
Bewaren bij het toestel
Store near tje appliance
Bitte beim Gerät aufbewahren
A conserver près de l'appareil
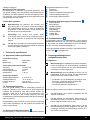
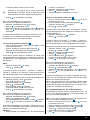
Ubiflux klokregeling
Control unit
Bedienmodul
Contrôle digital

2
Klokregeling / Control unit / Bedienmodul / Contrôle digital
1
2
3
1
2
3
4
5
154
72386
1
2
3

3
4
5
6

4
Klokregeling / Control unit / Bedienmodul / Contrôle digital
8
7
> ± 25 sec

5
9
11
10
A B
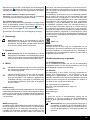
MAIN MENU
MAIN SCREEN
DEVICE INFORMATION
MENU
Filterreset
5 sec.

6
Klokregeling / Control unit / Bedienmodul / Contrôle digital
12
13
BASIC SETTINGS MENU
INSTALLER MENU
AB
±10 sec

7
Table of Contents
User’s manual 7
Introduction
I Description Control unit 7
II Symbols used 8
1 Technical specications 8
1.1 General product specications 8
1.2 Environmental inuences 8
1.3 Overview operational controls 8
1.4 Overview display version main screen 8
1.5 Ventilation modes 8
2 Precautionary measures and safety instructions 8
2.1 General 8
2.2 During placement 8
2.3 During use 9
2.4 During maintenance 9
2.5 For the environment 9
3 Assembly and installation (to be performed by the
installer) 9
3.1 Assembly 9
3.1.1 Disconnecting the operational module from the
wall bracket 9
3.1.2 Electrical connection 9
3.1.3 Mounting the wall bracket 9
3.1.4 Replacing the operational module in the wall
bracket 9
3.2 Installation 9
3.2.1 Setting language 9
3.2.2 Setting time 9
3.2.3 Setting date 10
3.2.4 Selecting a device connected to the
Control unit 10
4 Description of operation; manner of use 10
4.1 Navigation: general description 10
4.2. Selecting a device connected to the
Control unit 10
4.3 Weekly programmes: P1, P2 and P3 10
4.3.1 Standard settings P1, P2 and P3 10
4.3.2 Creating a P1 programme 10
4.3.3 Creating a P2 programme 10
4.3.4 Creating a P3 programme 11
4.4 Activating programme type (P1, P2 or P3) 11
4.5 Temporarily overriding programme 11
4.6 Overriding programme for a longer period of time 11
4.7 Setting ventilation mode values 12
4.8 Retrieving settings 12
4.9 Factory settings connected device 12
5 Maintenance 12
5.1 General maintenance 12
5.2 Cleaning or replacing lter 12
5.2.1 Filter notication 12
5.2.2 Removing, cleaning or replacing lters 12
5.2.3 Re-setting lter notication 12
6 Dismantling 12
7 Repair 12
8 Environment 13
9 Troubleshooting and guarantee 13
9.1 Troubleshooting 13
9.2 Guarantee 13
Appendix 1 Standard settings weekly programmes 13
User’s manual
Dear client,
Thank you for buying the Control unit. This user’s manual con-
tains all required information to quickly become familiar with
the product. We kindly request you to carefully go through this
information before using the product.
This user’s manual is intended for the Control unit’s installer
and end user. You can retrieve the required information from
the user’s manual via the table of contents.
This is an extended user’s manual. A Quick Start Guide is
available, in addition to this user’s manual.
Take good care of this user’s manual!
For more information or ordering manuals, please contact:
Ubbink nv
Jan Samijnstraat 9
9050 Gentbrugge
Belgium
Tel: +32 9.237 11 00
Fax: +32 9.237 11 29
E-mail: [email protected]
www: www.ubbink.be
Introduction
I Description Control unit
Intended and unintended use
The Control unit should be used in combination with products
that have been approved by Ubbink. Ubbink cannot be held
responsible for possible damage caused by improper, incor-
rect or unwise use. It is important that one understands this
user’s manual completely.
Working with other devices
The Control unit is connected to other devices. The HRU is
co-dependent on these devices’ operation for its proper func-
tioning. These devices’ presence and proper functioning are
prerequisites for using the Control unit.
GB

8
Klokregeling / Control unit / Bedienmodul / Contrôle digital
II Symbols used
Warning! The user can (seriously) injure himself or
seriously damage the product.
A warning is indicative of a risk of damage to the user
or product, if the user does not execute the procedures
carefully.
Careful! The product can be endangered. “Careful” is
indicative of a risk of damage to the product, if the user
does not execute the procedures carefully.
Take note! A remark with supplementary information
for the user. A remark draws the user’s attention to
possible problems.
1 Technical specications
1.1 General product specications
Product description
Name: Control unit
Model/Type: Ubbink
Technical product specications
Electricity 15 to 24 Volt
Power consumption: 1,5 Watt
Protection class: IP30
Power reserve: > 48 hours
Ambient conditions
Ambient temperature: 0 °C to 50 °C
Storage temperature: -20 °C to 60 °C
Humidity: 10% to 90%
Other: Exclusively for indoor use
1.2 Environmental inuences
The Control unit should be placed and used in a space with the
correct ambient conditions for proper operation. The Control
unit may only be mounted on the indoors, but not on the vici-
nity of a heat source, a radiator, in a draft or in a humid envi-
ronment. The Control unit may also not be exposed to direct
radiation heat (sun light).
The Control unit may also not be mounted in the vicinity of a
magnetic eld. This could damage internal components.
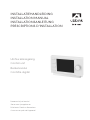
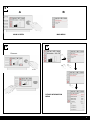
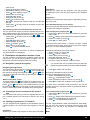
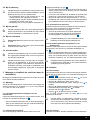
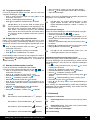
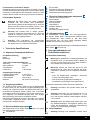
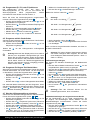
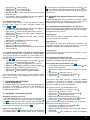
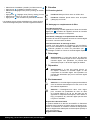
1.3 Overview operational control 1
The Control unit has a number of buttons with which the de-
vice can be operated:
1 Setting knob
2 Return key
3 Setting & activating timer programme
4 Manual control key
5 Bypassing the timer programme
1.4 Overview display version main screen 2
1 Flow rate indicator
2 eBus connection indicator
3 Fan indicator
4 Fault symbol
5 Filter message
6 Current time block
7 Current time
8 Current date (day / month / year)
1.5 Ventilation modes 3
The Control unit has four ventilation modes. You can activate
a ventilation mode yourself (for more information see chapter
4). You can adjust every ventilation mode yourself (for more
information see paragraph 4.7).
You can retrieve the set values at the Device information menu
(see 11 and § 4.8).
2 Precautionary measures and safety
instructions
2.1 General
Warning! The installation and assembly activities
required to commission your Control unit should be
performed by an installer approved by Ubbink.
Warning! Immediately remove the power from your
Control unit by removing the connected device’s plug
from the socket, if:
• Parts of the Control unit lie open, are pierced or had
fallen hard;
• The power cable is damaged;
• The screen is cracked or broken.
Then contact Ubbink or you supplier.
Take note! Never use parts other than original parts.
Take note! Only use the Control unit indoors, at tem-
peratures between 0 °C and 50 °C and with a relative
humidity between 10% and 90%.
Take note! All settings (excluding the lter message)
will be lost if the Control unit breaks down or if the fac-
tory settings are reset. There is no backup available.
2.2 During placement
Take note! Assembly and installation should be per-
formed by an installer approved by Ubbink. The fol-
lowing requirements should be taken into account
during placement:
• The Control unit should be placed at a height of ap-
proximately 1.65 meters above the oor;

9
• The Control unit may not be covered, for example,
by a curtain or a cabinet;
• Consult paragraph 1.2 for environmental
requirements.
2.3 During use
Take note! Settings, which have not been described
in this user’s manual, are intended for installers appro-
ved by Ubbink. Do not change these by yourself.
2.4 During maintenance
Careful! Clean the screen with a soft cloth.
Careful! Never apply water and/or (cleaning) liquid to
the screen.
2.5 For the environment
Take note! The Control unit may not be removed
as unsorted urban waste, but should be treated
separately.
Take note! Make enquiries within your own region,
where the Control unit can be handed in when use has
been terminated. Do not throw away electrical devices
or parts, but check if (parts of) the Control unit cannot
be handed in, recycled or re-used.
3 Assembly and installation (to be performed
by the installer)
Assembly and installation should be performed by an installer
approved by Ubbink.
3.1 Assembly
You should perform the steps, described in paragraph 3.1.1
through paragraph 3.1.4, one by one, to assemble the Control
unit.
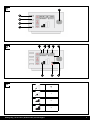
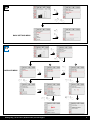
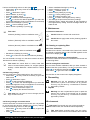
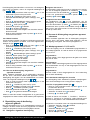
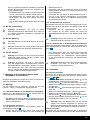
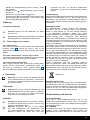
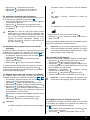
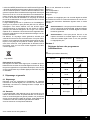
3.1.1 Disconnecting the operational module from the wall
bracket
Disconnect the operational module from the wall bracket.
Perform the following actions 4:
• Slide the Control unit upward over the two guide proles
of the wall bracket until the Control unit can be taken off.
3.1.2 Electrical connection
The following actions should be performed to connect the
Control unit electrically (see 5):
• Feed the two-core wire (from the device to be connected)
through via opening at the back of the wall bracket.
• Check that the cables’ ends have been stripped in the
correct manner. If this is not the case, do so.
• Screw the cable to the terminal No. 1 and No. 2. Consult
the installation instructions of the device to be connected,
for more information on the correct connection.
3.1.3 Mounting the wall bracket
The wall bracket can be attached to a wall box (Ø 55 mm) or
can be directly mounted on the wall with screws and plugs.
• Screw the wall bracket onto the wall in the correct posi-
tion. Here one must use the mounting holes in the wall
bracket (see 6).
Take note! Consult paragraph 2.2 for more informa-
tion on placing the Control unit.
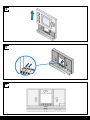
3.1.4
Replacing the operational module in the wall bracket
Place the operational in the wall bracket mounted on the wall.
Perform the following actions for this (see 7):
• Slide the Control unit downward over the two guide pro-
les. Make sure the guide proles of the wall bracket t
snugly in the cutouts of the Control unit provided for that
purpose.
Take note! The operational module should click onto
the wall bracket. Only then is a proper electrical con-
nection established.
3.2 Installation
3.2.1 Setting language
You can set the language in which the menus are presented.
Perform the following actions to set the language(see 1 , 9
& 12 ):
• Press return 2 as many times as necessary to get to the
main screen
• Press 1. ‘Main Menu’ opens
• Select ‘Basic Settings’ by turning 1
• Press 1. ‘Basic Settings’ opens
• Select ‘Language’ by turning 1
• Press 1. ‘Language’ opens
• Select the desired language by turning 1
• Press 1 to set the selected language
• Press return 2 as many times as necessary to get to the
main screen
Take note! The names of the described menu items
will not correspond with this user manual’s menu items
if the Control unit is set to a language other than Dutch.
3.2.2 Setting time
You can set the time. The time is visible on the main screen
The Control unit only has 24 hour representation. Perform the
following actions to set the time (see 1):
• Press return 2 as many times as necessary to get to the
main screen
• Press 1. ‘Main Menu’ opens
• Select ‘Basic Settings’ by turning 1
• Press 1. ‘Basic Settings’ opens
• Select ‘Clock’ by turning 1
• Press 1. ‘Clock’ opens
• Change the time by turning 1
• Press 1 to conrm the time
• Repeat the previous two steps for both the minutes and
seconds
• Press return 2 as many times as necessary to get to the
main screen
3.2.3 Setting date
You can set the date. The date is visible on the main screen.
Perform the following actions to set the date(see 1 , 9 & 12 ):
• Press return 2 as many times as necessary to get to the

10
Klokregeling / Control unit / Bedienmodul / Contrôle digital
main screen
• Press 1. ‘Main Menu’ opens
• Select ‘Basic Settings’ by turning 1
• Press 1. ‘Basic Settings’ opens
• Select ‘Date’ by turning 1
• Press 1. ‘Date’ opens
• Change the day by turning
• Press 1 to conrm the day
• Repeat the previous two steps for both the months and
the year
• Press return 2 as many times as necessary to get to the
main screen
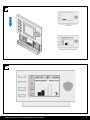
3.2.4 Selecting a device connected to the Control unit
You can choose the device you want to regulate with the con-
trol if multiple devices are connected to Control unit. Proceed
as follows to set the appliance selection (see 1 & 13 ):
• Press return 2 as many times as necessary to get to the
main screen
• Press 1. ‘Main Menu’ opens
• Select ‘Installer’ by turning 1
• Press 1. ‘Installer’ opens
• Select ‘device’ by turning 1
• Press 1. to conrm selected device
If only one appliance is connected, no choice is offered and
only HRU appliance is displayed.
4 Description of operation: manner of use
You can increase or decrease the ventilation mode with the
Control unit. You can do this by setting a program. You can
temporarily override the program while it is running.
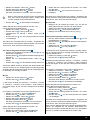
4.1 Navigation: general description
Navigating through menus
The Control unit has menus that you can navigate through. For
this you use navigation button 1 (see 1). You scroll through
the menus by turning the navigation button 1 (see 9 B). You
can open a selected menu-item by pressing the navigation
button(see 9 A).
Return to the main screen
The main screen (see 2) is the Control unit’s start screen. You
can always return to the main screen by pressing on the info
button 2 (see 1) a few times. The number of times you need
to press return depends on how deep you have gone into the
menu. U need not be afraid of pressing return too frequently.
4.2. Selecting a device connected to the Control
unit
You can choose the device you want to regulate with the con-
trol if multiple devices are connected to Control unit. See §
3.2.4.
4.3 Weekly programmes: P1, P2 and P3
You can programme the regulation of the ventilation mode in
a weekly program. You can choose from programs P1, P2 and
P3.
Program P1
With this you create a day program for every day of the week.
Program P2
With this you create two day programs. One day program
for weekdays ‘mo-fri’ and one day program for the weekend
‘sa-su’.
Program P3
With this you create seven day programs. Separately for every
day of the week.
4.3.1 Standard settings P1, P2 and P3
The Control unit has standard set weekly programmes. You
can nd these settings in appendix 1.
4.3.2 Creating a P1 program (see 1)
• Press return 2 as many times as necessary to get to the
main screen
• Press
3 .‘Setting & activating timer programme’ opens
• Select ‘P1: week’ by turning 1
• Press 1, ‘P1: week’ opens
You have a choice from ‘Period 1’, ‘Period 2’, ‘Period 3’, ‘Period
4’, ‘Period 5’ and ‘Period 6’. Every period is a part of the day in
which you can set a ventilation position.
Perform the following actions to set period 1:
• Select ‘Period 1’ by turning 1
• Press 1, ‘Period 1’ opens
• Select ‘Start Time’ by turning 1
• Press 1, ‘Start time’ opens
• Change the start time by turning 1
You have a range of between 3.00u and 2.59u
If in a period the time is turned back so far that lines
appear, that period and the one above it will be deleted.
• Press 1 to conrm the start time
Now set the ventilation mode for period 1.
Perform the following actions for this:
• Select ‘Ventilatiestand’ by turning 1
• Press 1, ‘Ventilatiestand’ opens
• Set the ventilation mode for period 1 by turning 1
• Press 1 to conrm the ventilation mode for period 1
You have set the ventilation mode for period 1 You can set
period 2 through 6 in the same manner. A period ends when a
new one starts.
4.3.3 Creating a P2 program (see 1)
• Press return 2 as many times as necessary to get to the
main screen
• Press
3 .‘Setting & activating timer programme’ opens
• Select ‘P2: week/weekend’ by turning 1
• Press 1, ‘P2: week/weekend’ opens
You can choose between ‘Week’ and ‘Weekend’. With ‘Week’
you can set a day program for Monday through Friday. With
‘Weekend’ you can set a day program for Saturday and
Sunday.
Week

11
• Select ‘Week’ by turning 1
• Press 1. ‘Week’ opens
(*) You have a choice from ‘Period 1’, ‘Period 2’, ‘Period 3’,
‘Period 4’, ‘Period 5’ and ‘Period 6’. Every period is a part of
the day in which you can set a ventilation mode.
Perform the following actions to set period 1:
• Select ‘Period 1’ by turning 1
• Press 1, ‘Period 1’ opens
• Select ‘Start Time’ by turning 1
• Press 1, ‘Start Time’ opens
• Change the start time by turning 1
You have a range of between 3.00 hrs and 2.59 hrs
• Press 1 to conrm the start time
Now set the ventilation mode for period 1.
Perform the following actions for this:
• Select ‘Ventilatiestand’ by turning 1
• Press 1, ‘Ventilatiestand’ opens
• Set the ventilation mode for period 1 by turning 1
• Press 1 to conrm the airow for period 1
You have set the ventilation mode for period 1 You can set
period 2 through 6 in the same manner. A period ends when a
new one starts.
Weekend
• Follow the steps from paragraph 4.3.3, until you have a
choice between ‘Week’ and ‘Weekend’
• Select ‘Weekend’ by turning 1
• Press 1. ‘Weekend’ opens
• Continue the steps from paragraph 4.3.3 at (*)
4.3.4 Creating a P3 program (see 1)
• Press return 2 as many times as necessary to get to the
main screen
• Press
3 .‘Setting & activating timer programme’ opens-
Select ‘P3: day’ by turning 1
• Press 1, ‘P3: day’ opens
(*) You can choose from the days between ‘Monday’ through
‘Sunday’. You perform the following steps to set a day program
for Monday:
• Select ‘Monday’ by turning 1
• Press 1. ‘Monday’ opens
You have a choice from ‘Period 1’, ‘Period 2’, ‘Period 3’, ‘Period
4’, ‘Period 5’ and ‘Period 6’. Every period is a part of the day in
which you can set a ventilation position.
Perform the following actions to set period 1:
• Select ‘Period 1’ by turning 1
• Press 1, ‘Period 1’ opens
• Select ‘Start Time’ by turning 1
• Press 1, ‘Start Time’ opens
• Change the start time by turning 1
You have a range of between 3.00u and 2.59u
• Press 1 to conrm the start time
Now set the ventilation mode for period 1.
Perform the following actions for this:
• Select ‘Ventilatiestand’ by turning 1
• Press 1, ‘Ventilatiestand’ opens
• Set the ventilation mode for period 1 by turning 1
• Press 1 to conrm the ventilation mode for period 1
You have set the ventilation mode for period 1 You can set
period 2 through 6 in the same manner. A period ends when a
new one starts.
If you have created a day program for Monday, you can do the
same for the other days of the week. Then repeat the steps
from paragraph 4.3.4, but, after (*) choose another day inste-
ad of ‘Monday’.
4.4 Activate programme type (P1, P2 or P3)
The Control unit has three types of weekly programs P1, P2
and P3. You can program the weekly programs by yourself, for
more information see paragraph 4.3.
Perform the following actions if you wish to program one of the
weekly programs (see 1):
• Press return 2 as many times as necessary to get to the
main screen
• Press
3 .‘Setting & activating timer programme’ opens
• Select ‘Active Program’ by turning 1
• Press 1. ‘Active Program’ opens
• Select P1, P2 or P3 by turning 1
• Press 1 to activate P1, P2 or P3
4.5 Temporarily overriding program
You can temporarily override the program. You need to per-
form the following actions for this (see 1):
• Press return 2 as many times as necessary to get to the
main screen.
• Press 5 .‘Bypassing the timer programme’ opens
• Turn 1 to temporarily set the ventilation mode.
Take note! It is stated at the top of your screen, how
long the newly set ventilation mode applies. The pro-
gram will be enabled again after this period of time.
The override period will be 30 minutes if you overruled
the device in the maximum position. You can also
undo this by pressing return 2. Return button 2 can
not be operated until some 10 seconds after the latest
setting!
4.6 Overriding the program for a longer period of
time
A set program me can be overriden manually, for example,
during holidays. Perform the following actions to overrule the
program (see 1):
• Press return 2 as many times as necessary to get to the
main screen
• Press 4. ‘Manual’ appears in the display
• Turn 1 to set the ventilation position
The manual position now overrules the programme. Press re-
turn 2 if you wish to undo the manual position. Return button
2 can not be operated until some 10 seconds after the latest
setting!
4.7 Setting ventilation mode’s values
You can set a ventilation mode’s value by yourself.

12
Klokregeling / Control unit / Bedienmodul / Contrôle digital
Perform the following actions for this (see 1 & 13 ):
• Press return 2 as many times as necessary to get to the
main screen
• Press 1. ‘Main Menu’ opens
• Select ‘Installer’ by turning 1
• Press 1. ‘Installer’ opens
• Turn 1 to select the desired appliance 1
• Press 1 to conrm the desired appliance (or select the
choice HRV appliance if only one appliance is connected)
• Select ‘Device settings’ by turning 1
• Press 1. ‘Device settings’ opens
• Select ‘Airow 0 (Holiday)’ by turning 1
Take note!
‘Airow 0 (Holiday)’ refers to ventilation mode .
‘Airow 1 (
Reduced
)’ refers to ventilation mode .
‘Airow 2 (Normal)’ refers to ventilation mode .
‘Airow 3 (High)’ refers to ventilation mode .
• Set Airow 0 (Holiday) by turning 1
• Press 1 to conrm the set value for Airow 0 (Holiday)
You can set debit 1 through 3 in the same manner as descri-
bed above for Airow 0 (Holiday).
Take note! You cannot feed in a value, lower than
value of a lower Airow position, for a higher (Airow
Holiday < Airow Reduced < Airow Normal < Airow
High).
4.8 Retrieving settings
You can retrieve the current settings from the Control unit.
• Press return 2 as many times as necessary to get to the
main screen
• Press 1. ‘Main Menu’ opens
• Turn 1 to select the desired appliance
• Press 1 to conrm the desired appliance (or select the
choice HRV appliance if only one appliance is connected)
• Select ‘Device information’ by turning 1
• Press 1. ‘Device information’ opens
• Turn 1 to display the desired information
Take note! You can look at, but not change, the set-
tings via the info menu.
4.9 Factory settings connected device
A device has been connected to the Control unit. It is possible
to set back all this device’s settings to the factory settings.
Perform the following actions for this (see 1):
• Press return 2 as many times as necessary to get to the
main screen
• Press 1. ‘Main Menu’ opens
• Select ‘Installation Settings’ by turning 1
• Select ‘Installer’ by turning 1
• Press 1. ‘Installer’ opens
• Select ‘Factory setting’ by turning 1
• Press 1. ‘Factory setting’ opens
• Turn 1 to select the option ‘yes’
• Press 1 to conrm restoring the factory setting
• The settings are put back to the factory settings.
• Selecting factory setting will restore all step numbers to
the original factory setting. All fault messages will be de-
leted as well
5 Maintenance
5.1 General maintenance
Careful! Clean the screen with a soft cloth.
Careful! Never apply water and/or (cleaning) liquid to
the screen.
5.2 Cleaning or replacing lter
5.2.1 Filter notication
The lters in the device, connected to the Control unit, should
be cleaned or replaced when the text ‘FILTER’ appears on the
Control unit’s display (see 8).
5.2.2 Removing, cleaning or replacing lters
Consult the manual of the device connected to the Control unit
for removing lters.
5.2.3 Re-setting lter notication
You can reset the lter notication after you have cleaned or
replaced the lter (or the lters). For this you press the return
button 1 for at least ve seconds (see 1 & 10 ).
Press return 2 to get to the main screen.
The text lter on the Control unit’s display disappears.
6 Dismantling
Warning! You are not permitted to dismantle the
Control unit or parts of the Control unit by yourself.
This may only be done by a maintenance mechanic
approved by Ubbink.
7 Repair
Warning! You are not permitted to open or repair the
Control unit or parts of the Control unit by yourself.
This may only be done by a maintenance mechanic
approved by Ubbink.
8 Environment
Take note! The Control unit may not be removed as
unsorted urban waste, but should be treated separately.
Take note! Make enquiries within your own region,
where the Control unit can be handed in when use has

13
been terminated. Do not throw away electrical devices
or parts, but check if (parts of) the Control unit cannot
be handed in, recycled or re-used.
RoHS-compliance
This product meets Directive 2011/65/EU of the European
Parliament and the Council of 27 January 2003 regarding
using certain environmentally hazardous substances in elec-
tronic equipment (RoHS) and the amendments to the directive.
WEEE-notication
The WEEE-directive (Waste Electrical and Electronic
Equipment), which came into force, as European law, on 13
February 2003, has resulted in an important change in trea-
ting electronic equipment at the end of their use cycle. This
directive’s objective is, rstly, preventing electronic equipment
in waste and moreover promoting re-use, recycling and other
forms of recovering such waste in order to limit the amount of
waste.
The WEEE-logo on a product or on the packaging indicates
that this product may not be disposed of or thrown away with
domestic waste. You should dispose of all your old electronic
or electrical equipment via special collection points for such
dangerous waste. Separate collection and correct treatment of
our old electronic and electrical equipment help us to maintain
our natural resources.
Moreover, correct recycling guarantees the safety and health
of humankind and the environment. For more information
on processing electronic and electrical equipment, re-use
and collection points, please contact you municipality, your
local waste disposal company, the supplier from whom you
purchased the device or the device’s manufacturer.
WEEE logo
Handing in and recycling
Make enquiries within your own region, where the Control
unit can be handed in when use has been terminated. Do not
throw away electrical devices or parts, but check if (parts of)
the Control unit cannot be handed in, recycled or re-used.
9 Troubleshooting and guarantee
9.1 Troubleshooting
See the installation instructions of the device connected to the
Control unit for troubleshooting for the error notications indi-
cated on the Control unit.
9.2 Guarantee
The Control unit has been manufactured by Ubbink with care
and in accordance with high quality standards. The Control
unit’s operation is guaranteed for a period of twelve months
from the time of delivery. This guarantee is granted in accor-
dance with Ubbink’ General Terms and Conditions.
These can be found on http://www.ubbink.be.
Do you want to claim under the guarantee?
You then have to make that known, in writing, via:
Ubbink nv.
Jan Samijnstraat 9
9050 Gentbrugget Belgium
The right to guarantee lapses in case of incorrect or improper
use of the Control unit and failure to follow the user indications
in this user’s manual.
Warning! Making changes to the Control unit’s hard-
ware or software is not permitted. This can have an
effect on the Control unit’s proper operation and it that
case all guarantees lapse.
Warning! You are not permitted to open or repair the
Control unit or parts of the Control unit by yourself. In
that case guarantees lapse.
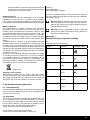
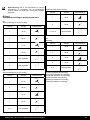
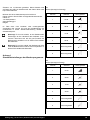
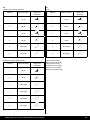
Appendix 1
Standard weekly programme settings
P1
Week (Monday through Sunday)
Period Start time Ventilation mode
1 07:00
2 08:00
3 17:00
4 22:00
5 Not set
6 Not set

14
Klokregeling / Control unit / Bedienmodul / Contrôle digital
P2
Week (Monday to Friday)
Period Start time Ventilation mode
1 07:00
2 08:00
3 17:00
4 22:00
5 Not set
6 Not set
Weekend (Saturday and Sunday)
Period Start time Ventilation mode
1 08:00
2 23:00
3 Not set
4 Not set
5 Not set
6 Not set
P3
Monday
Period Start time Ventilation mode
1 07:00
2 08:00
3 17:00
4 22:00
5 Not set
6 Not set
Tuesday (the same as Monday)
Wednesday (the same as Monday)
Thursday (the same as Monday)
Friday (the same as Monday)
Saturday (the same as Monday)
Sunday (the same as Monday)

15
NL
Inhoudsopgave
Gebruikershandleiding 15
Inleiding 15
I Beschrijving Klokregeling 15
II Gebruikte symbolen 16
1 Technische specicaties 16
1.1 Algemene productspecicaties 16
1.2 Omgevingsinvloeden 16
1.3 Overzicht bedieningsorganen 16
1.4 Overzicht displayweergave hoofdscherm 16
1.5 Ventilatiestanden 16
2 Voorzorgsmaatregelen en veiligheidsinstructies 16
2.1 Algemeen 16
2.2 Bij de plaatsing 17
2.3 Bij het gebruik 17
2.4 Bij het onderhoud 17
2.5 Voor het milieu 17
3 Montage en installatie (te verrichten door de
installateur) 17
3.1 Montage 17
3.1.1 De bedieningsmodule loskoppelen van de
wandconsole 17
3.1.2 Elektrische aansluiting 17
3.1.3 De wandconsole monteren 17
3.1.4 De bedieningsmodule terugplaatsen in de
wandconsole 17
3.2 Installatie 17
3.2.1 Taal instellen 17
3.2.2 Tijd instellen 18
3.2.3 Datum instellen 18
3.2.4 Een aan de Klokregeling aangesloten apparaat
selecteren 18
4 Beschrijving van de bediening; wijze van gebruik 18
4.1 Navigeren: algemene beschrijving 18
4.2 Een aan de Klokregeling aangesloten
apparaat selecteren 18
4.3 Weekprogramma’s: P1, P2 en P3 18
4.3.1 Standaard instellingen P1, P2 en P3 18
4.3.2 Een P1 programma maken 18
4.3.3 Een P2 programma maken 19
4.3.4 Een P3 programma maken 19
4.4 Programmasoort (P1, P2 of P3) activeren 19
4.5 Programma tijdelijk overrulen 20
4.6 Programma voor langere tijd overrulen 20
4.7 Waarde ventilatiestanden instellen 20
4.8 Instellingen opvragen 20
4.9 Fabrieksinstellingen aangesloten toestel 20
5 Onderhoud 20
5.1 Algemeen onderhoud 20
5.2 Filter reinigen of vervangen 21
5.2.1 Filtermelding 21
5.2.2 Filters uitnemen, reinigen of vervangen 21
5.2.3 Filtermelding resetten 21
6 Demontage 21
7 Reparatie 21
8 Milieu 21
9 Probleemoplossing en garantie 21
9.1 Probleemoplossing 21
9.2 Garantie 21
Bijlage 1 Standaard instellingen weekprogramma’s 22
Gebruikershandleiding
Geachte klant,
Bedankt voor de aanschaf van de Klokregeling. Deze gebrui-
kershandleiding bevat alle benodigde informatie om snel ver-
trouwd te raken met het product. Wij verzoeken u vriendelijk
om deze informatie zorgvuldig door te nemen, alvorens met
het product te gaan werken.
Deze gebruikershandleiding is bedoeld voor de installateur
en de eindgebruiker van de Klokregeling. Via de inhoudsop-
gave kunt u de informatie die u nodig heeft terugvinden in de
gebruikershandleiding.
Dit is de uitgebreide gebruikershandleiding. Naast deze ge-
bruikershandleiding is ook een Quick Start Guide beschikbaar.
Bewaar deze gebruikershandleiding goed!
Voor meer informatie of het bestellen van handleidingen,
neem contact op met:
Ubbink nv
Jan Samijnstraat 9
9050 Gentbrugge
Belgium
Tel: +32 9.237 11 00
Fax: +32 9.237 11 29
E-mail: [email protected]
www: www.ubbink.be
Inleiding
I Beschrijving Klokregeling
Bedoeld en onbedoeld gebruik
De Klokregeling dient te worden gebruikt in combinatie met
producten die hiervoor door Ubbink zijn goedgekeurd. Ubbink
kan niet verantwoordelijk worden gesteld voor eventuele
schade veroorzaakt door oneigenlijk, verkeerd of onverstan-
dig gebruik. Het is belangrijk om deze gebruikershandleiding

16
Klokregeling / Control unit / Bedienmodul / Contrôle digital
volledig te begrijpen.
Werking met andere apparaten
De Klokregeling is verbonden met andere apparaten. Voor
een goede werking is de Klokregeling mede afhankelijk van
de werking van deze apparaten. Om de Klokregeling te kun-
nen gebruiken, is de aanwezigheid van deze apparaten en de
goede werking hiervan vereist.
II Gebruikte symbolen
Waarschuwing! De gebruiker kan zichzelf (ern-
stig) verwonden of het product ernstig beschadigen.
Een waarschuwing duidt op de kans op schade aan
de gebruiker of aan het product, als de gebruiker de
procedures niet zorgvuldig uitvoert.
Voorzichtig! Het product kan gevaar lopen.
“Voorzichtig” duidt op de kans op schade aan het pro-
duct, als de gebruiker de procedures niet zorgvuldig
uitvoert.
Let op! Een opmerking met aanvullende informatie
voor de gebruiker. Een opmerking maakt de gebruiker
attent op mogelijke problemen.
1 Technische specicaties
1.1 Algemene product specicaties
Productbeschrijving
Naam: Klokregeling
Model/Type: Ubbink
Technische producspecicaties
Spanning: 15 tot 24 Volt
Stroomverbruik: 1,5 Watt
Beschermingsklasse: IP30
Gangreserve: > 48 uur
Omgevingscondities
Omgevingstemperatuur: 0 °C tot 50 °C
Opslagtemperatuur: -20 °C tot 60 °C
Luchtvochtigheid: 10% tot 90%
Overig: Gebruik uitsluitend binnen
1.2 Omgevingsinvloeden
Voor een goede werking moet de Klokregeling worden ge-
plaatst en gebruikt in een ruimte met de juiste omgevings-
condities. De Klokregeling mag alleen binnen worden op-
gehangen, maar niet in de buurt van een warmtebron, een
radiator, in de tocht of in een vochtige omgeving. Ook mag
de Klokregeling niet blootgesteld worden aan directe stralings-
warmte (zonlicht).
De Klokregeling mag ook niet in de buurt van een magnetisch
veld worden opgehangen. Dit kan schade veroorzaken aan
interne componenten.
1.3 Overzicht bedieningsorganen 1
De Klokregeling is voorzien van een aantal toetsen waarmee
het apparaat bediend kan worden:
1 Instelknop
2 Return toets
3 Instellen & activeren klokprogramma
4 Toets handmatige bediening
5 Overbrugging klokprogramma
1.4 Overzicht displayweergave hoofdscherm 2
1 Debiet indicator
2 Ebus indicator
3 Ventilatie indicator
4 Storingssymbool
5 Filtermelding
6 Actueel tijdsblok
7 Huidige tijd
8 Huidige datum
1.5 Ventilatiestanden 3
De Klokregeling heeft vier ventilatiestanden. U kunt zelf een
ventilatiestand activeren (zie voor meer informatie hoofdstuk
4). De waarde van iedere ventilatiestand kunt u zelf aanpas-
sen (zie voor meer informatie paragraaf 4.7).
U kunt de ingestelde waardes opvragen in het toestel informa-
tie menu (zie 11 en paragraaf 4.8).
2 Voorzorgsmaatregelen en
veiligheidsinstructies
2.1 Algemeen
Waarschuwing! De installatie en montage werkzaam-
heden die nodig zijn om uw Klokregeling in gebruik te
kunnen nemen, dienen door een door Ubbink erkende
installateur te worden uitgevoerd.
Waarschuwing! Haal onmiddellijk de stroom van uw
Klokregeling af door de stekker van het aangesloten
toestel uit het stopcontact te halen, indien:
• Onderdelen van de Klokregeling openliggen, door-
boord zijn, vochtig zijn of hard gevallen zijn;
• De voedingskabel beschadigd is;
• Het scherm gebarsten of gebroken is.
Neem vervolgens contact op met Ubbink of uw leverancier.
Let op! Gebruik nooit andere onderdelen dan de
originele onderdelen.
Let op! Gebruik de Klokregeling alleen binnen, bij
temperaturen tussen 0 °C en 50 °C en bij een relatieve
luchtvochtigheid tussen 10% en 90%.
Let op! Als de Klokregeling kapot gaat of als de
fabrieksinstellingen worden teruggezet, dan gaan alle
instellingen (exclusief de ltermelding) verloren. Er is
geen backup beschikbaar.

17
2.2 Bij de plaatsing
Let op! Montage en installatie dient uitgevoerd te wor-
den door een door Ubbink erkende installateur. Hou bij
plaatsing rekening met de volgende eisen:
• De Klokregeling dient op een hoogte van ca. 1,65
meter boven de vloer geplaatst te worden;
• De Klokregeling mag niet worden afgedekt door bij-
voorbeeld een gordijn of een kast;
• Raadpleeg voor de omgevingseisen paragraaf 1.2.
2.3 Bij het gebruik
Let op! Instellingen die niet in deze gebruikershand-
leiding zijn beschreven, zijn bedoeld voor door Ubbink
erkende installateurs. Verander deze niet zelf.
2.4 Bij het onderhoud
Voorzichtig! Maak het scherm schoon met een zach-
te doek.
Voorzichtig! Breng nooit water en/of (schoonmaak)
vloeistof op het scherm aan.
2.5 Voor het milieu
Let op! De Klokregeling mag niet worden verwijderd
als ongesorteerd stedelijk afval, maar moet geschei-
den worden ingezameld.
Let op! Informeer binnen uw regio naar de mogelijk-
heden om de Klokregeling in te leveren bij beëindi-
ging van het gebruik. Gooi elektrische apparaten en
onderdelen niet weg, maar bekijk of (onderdelen van)
de Klokregeling ingeleverd, gerecycled of hergebruikt
kunnen worden.
3 Montage en installatie (te verrichten door de
installateur)
Montage en installatie dienen uitgevoerd te worden door een
door Ubbink erkende installateur.
3.1 Montage
Om de W TW klokregeling te monteren dient u de stappen die
worden beschreven in paragraaf 3.1.1 tot en met paragraaf
3.1.4 één voor één uit te voeren.
3.1.1 De bedieningsmodule loskoppelen van de
wandconsole
Koppel de bedieningsmodule los van de wandconsole. Voer
hiervoor de volgende handelingen uit 4:
• Schuif de bedieningsmodule over de twee geleidingspro-
elen op de wandconsole omhoog totdat de bedienings-
module kan worden losgenomen.
3.1.2 Elektrische aansluiting
Om de Klokregeling elektrisch aan de sluiten voert u de
volgende handelingen uit (zie 5):
• Voer de twee aderige kabel (deze komt vanaf het aan te
sluiten toestel) door via de opening aan de achterzijde
van de wandconsole
• Controleer of de uiteinden van de kabels op de juiste wijze
gestript zijn. Indien dit niet het geval is, doe dit alsnog
• Schroef de kabel vast aan klemmenstrook nr. 1 en nr. 2.
Raadpleeg voor meer informatie over de juiste aansluiting
het installatievoorschrift van het aan te sluiten toestel
3.1.3 De wandconsole monteren
De wandconsole kan worden bevestigd op een inbouwdoos
(Ø 55 mm) of kan rechtstreeks op de wand worden
gemonteerd met schroeven en pluggen.
• Schroef de wandconsole op de juiste positie aan
de wand. Maak hierbij gebruik van de standaard
bevestigingsgaten in de wandconsole (zie 6)
Let op! Raadpleeg voor meer informatie over de
plaatsing van de Klokregeling paragraaf 2.2.
3.1.4 De bedieningsmodule terugplaatsen in de
wandconsole
Plaats de bedieningsmodule in de aan de wand gemonteerde
wandconsole. Voer hiervoor de volgende handelingen uit
(zie 7):
• Schuif de bedieningsmodule over de twee geleidingspro-
elen naar beneden toe; let goed op dat de geleidingspro-
elen van de wandconsole op juiste wijze in de hiervoor
bestemde uitsparing van de bedieningsmodule zitten.
Let op! De bedieningsmodule dient vast te klikken in
de wandconsole. Alleen dan is een goede elektrische
verbinding tot stand gekomen.
3.2 Installatie
3.2.1 Taal instellen
U kunt de taal waarin de menu’s worden weergegeven instellen.
Om de taal in te stellen voert u de volgende handelingen uit
(zie 1 , 9 & 12 ):
• Druk zo nodig meerdere malen op return 2 om in het
hoofdscherm (Main screen) te komen
• Druk op 1. ‘Hoofdmenu (Main menu)’ opent
• Selecteer ‘Basisinstellingen (Basic settings)’ door 1 te
draaien
• Druk op 1. ‘Basisinstellingen (Basic settings)’ opent
• Selecteer ’Taal (Language)’ door 1 te draaien
• Kies een taal door 1 te draaien
• Druk op 1 om de gekozen taal in te stellen
Druk zo nodig meerdere malen op return 2 om in het
hoofdscherm te komen
Let op! Indien uw Klokregeling ingesteld is op een
andere taal dan Nederlands, dan komen de namen
van de omschreven menu items niet overeen met de
menu items van deze gebruikershandleiding.
3.2.2 Tijd instellen
U kunt de tijd instellen. De tijd is zichtbaar op het hoofdscherm.

18
Klokregeling / Control unit / Bedienmodul / Contrôle digital
De Klokregeling beschikt alleen over een 24 uurs weergave.
Om de tijd in te stellen, voert u de volgende handelingen uit
(zie 1 , 9 & 12 ):
• Druk zo nodig meerdere malen op return 2 om in het
hoofdscherm (main screen) te komen
• Druk op 1. ‘Hoofdmenu (main menu)’ opent
• Selecteer ‘Basisinstellingen (Basic settings)’ door 1 te
draaien
• Druk op 1. ‘Basisinstellingen (Basic settings)’ opent
• Selecteer ’Klok (Clock)’ door 1 te draaien
• Druk op 1. ‘Klok (Clock)’ opent
• Verander de tijd door 1 te draaien
• Druk 1 om de tijd te bevestigen
• Herhaal de vorige twee stappen voor zowel de minuten
als de seconden
• Druk zo nodig meerdere malen op return 2 om in het
hoofdscherm te komen
3.2.3 Datum instellen
U kunt de datum instellen. De datum is zichtbaar op het hoofd-
scherm. Om de datum in te stellen, voert u de volgende han-
delingen uit (zie 1 , 9 & 12 ):
• Druk zo nodig meerdere malen op return 2 om in het
hoofdscherm (main screen)te komen
• Druk op 1. ‘Hoofdmenu (main menu)’ opent
• Selecteer ‘Basisinstellingen (Basic settings)’ door 1 te
draaien
• Druk op 1. ‘Basisinstellingen (Basic settings)’ opent
• Selecteer ’Datum (Date)’ door 1 te draaien
• Druk op 1. ‘Datum (Date)’ opent
• Verander de dag door te draaien
• Druk 1 om de dag te bevestigen
• Herhaal de vorige twee stappen voor zowel de maanden
als het jaartal
• Druk zo nodig meerdere malen op return 2 om in het
hoofdscherm te komen
3.2.4 Een aan de Klokregeling aangesloten
apparaat selecteren
Indien meerdere apparaten op de Klokregeling aangeslo-
ten zijn, kunt u een keuze maken welk apparaat u met de
Klokregeling wilt regelen. Om de toestelselectie in te stellen,
voert u de volgende handelingen uit (zie 1 & 13 ):
• Druk zo nodig meerdere malen op return 2 om in het
hoofdscherm te komen
• Druk op 1. ‘Hoofdmenu (main menu)’ opent
• Selecteer ‘Installateur (Installer)’ door 1 te draaien
• Druk op 1. ‘Installateur (Installer)’ opent
• Selecteer gewenste toestel door 1 te draaien
• Druk 1 om de gewenste toestel te bevestigen
Indien er maar één toestel is aangesloten is er geen keuze-
mogelijkheid en staat er alleen WTW-toestel (HRU-aplliance)
4 Beschrijving van de bediening:
wijze van gebruik
Met de Klokregeling kunt u de ventilatiestand verhogen en
verlagen. Dit kunt u doen door een programma in te stellen.
Indien het programma loopt kunt u dit tijdelijk overrulen.
4.1 Navigeren: algemene beschrijving
Navigeren door menu’s
De Klokregeling heeft menu’s waar u doorheen kunt navige-
ren. Om te navigeren gebruikt u de instelknop 1 . U scrolt
door de menu’s door de instelknop 1 te draaien 9 B.
U kunt een geselecteerd menu-item openen door op de
instelknop 1 te drukken 9 A.
Terugkeren naar het hoofdscherm
Het hoofdscherm (zie 2) is het startscherm van de
Klokregeling. U kunt altijd naar uw hoofdscherm terugkeren
door een aantal keren op return 2 te drukken (zie 1). Het
aantal keren dat u op return moet drukken, hangt af van hoe
diep u zich in het menu bevindt. U hoeft niet bang te zijn dat u
te vaak op return drukt.
4.2 Een aan de Klokregeling aangesloten apparaat
selecteren
Indien meerdere apparaten aan de Klokregeling aangeslo-
ten zijn, kunt u een keuze maken welk apparaat u met de
Klokregeling wilt regelen. Zie hiervoor paragraaf 3.2.4.
4.3 Weekprogramma’s: P1, P2 en P3.
U kunt de regeling van de ventilatiestand programmeren in
een weekprogramma. U heeft de keuze uit de programma’s
P1, P2 en P3.
Programma P1
Hiermee maakt u één dagprogramma dat geldt voor iedere
dag van de week.
Programma P2
Hiermee maakt u twee dagprogramma’s. Eén dagprogramma
voor doordeweeks ‘ma-vrij’ en één dagprogramma voor het
weekend ‘za-zo’.
Programma P3
Hiermee maakt u zeven dagprogramma’s. Voor iedere dag
van de week afzonderlijk.
4.3.1 Standaard instellingen P1, P2 en P3
De Klokregeling heeft standaard ingestelde weekprogram-
ma’s. Deze instellingen kunt u terugvinden in bijlage 2.
4.3.2 Een P1 programma maken (zie 1))
• Druk zo nodig meerdere malen op return 2 om in het
hoofdscherm te komen
• Druk op ‘Instellen en activeren klokprogramma’ 3
• Selecteer ‘P1 Week’ door 1 te draaien
• Druk op 1. ‘P1 Week’ opent
U heeft de keuze uit ‘Periode 1’, ‘Periode 2’, ‘Periode 3’,
‘Periode 4’, ‘Periode 5’ en ‘Periode 6’. Iedere periode is een
deel van de dag waarin u een ventilatiestand kunt instellen.
Om periode 1 in te stellen voert u de volgende handelingen uit:
• Selecteer ‘Periode 1’ door 1 te draaien
• Druk op 1, ‘Periode 1’ opent
• Selecteer ‘Starttijd’ door 1 te draaien
• Druk op 1, ‘Starttijd’ opent
• Stel de Starttijd in door 1 te draaien.

19
U heeft een bereik tussen 3.00u en 2.59u
Wanneer in een periode de tijd zover wordt terug
gedraaid dat er streepjes komen te staan dan wordt
deze periode en de boven liggende periode gewist.
• Druk op 1 om de starttijd te bevestigen
Stel nu de ventilatiestand in voor periode 1.
Voer hiervoor de volgende handelingen uit:
• Selecteer ‘Ventilatiestand’ door 1 te draaien
• Druk op 1, ‘Ventilatiestand’ opent
• Stel de ventilatiestand voor periode 1 in door 1 te draaien
• Druk op 1 om de ventilatiestand voor periode 1 te
bevestigen
U heeft de ventilatiestand voor periode 1 ingesteld. U kunt
periode 2 t/m 6 op dezelfde wijze instellen. Een periode
eindigt wanneer een nieuwe periode begint.
4.3.3 Een P2 programma maken (zie 1)
• Druk zo nodig meerdere malen op return 2 om in het
hoofdscherm te komen
• Druk op ‘Instellen en activeren klokprogramma’ 3
• Selecteer ‘P2 Week/Weekend’ door 1 te draaien
• Druk op 1. ‘P2 Week/Weekend’ opent
U kunt kiezen tussen ‘Week’ en ‘Weekend’. Bij ‘Week’ kunt
u een dagprogramma instellen voor maandag t/m vrijdag. Bij
‘Weekend’ kunt u een dagprogramma voor zaterdag en zon-
dag instellen.
Week
• Selecteer ’Week’ door 1 te draaien
• Druk op 1. ‘Week’ opent
(*) U heeft de keuze uit ‘Periode 1’, ‘Periode 2’, ‘Periode 3’,
‘Periode 4’, ‘Periode 5’ en ‘Periode 6’. Iedere periode is een
deel van de dag waarin u een ventilatiestand kunt instellen.
Om periode 1 in te stellen voert u de volgende handelingen uit:
• Selecteer ‘Periode 1’ door 1 te draaien
• Druk op 1, ‘Periode 1’ opent
• Selecteer ‘Starttijd’ door 1 te draaien
• Druk op 1, ‘Starttijd’ opent
• Stel de Starttijd in door 1 te draaien.
U heeft een bereik tussen 3.00u en 2.59u
• Druk op 1 om de starttijd te bevestigen
Stel nu de ventilatiestand in voor periode 1.
Voer hiervoor de volgende handelingen uit:
• Selecteer ‘Ventilatiestand’ door 1 te draaien
• Druk op 1, ‘Ventilatiestand’ opent
• Stel de ventilatiestand voor periode 1 in door 1 te draaien
• Druk op 1 om het debiet voor periode 1 te bevestigen
U heeft de ventilatiestand voor periode 1 ingesteld. U kunt pe-
riode 2 t/m 6 op dezelfde wijze instellen. Een periode eindigt
wanneer een nieuwe periode begint.
Weekend
• Volg de stappen van paragraaf 4.3.3, tot u de keuze heeft
uit ‘Week’ en ‘Weekend’
• Selecteer ’Weekend’ door 1 te draaien
• Druk op 1. ‘Weekend’ opent
• Vervolg de stappen uit paragraaf 4.3.3 bij (*)
4.3.4 Een P3 programma maken (zie 1)
• Druk zo nodig meerdere malen op return 2 om in het
hoofdscherm te komen
• Druk op ‘Instellen en activeren klokprogramma’ 3
Selecteer ‘P3 Dag’ door 1 te draaien
• Druk op 1. ‘P3 Dag’ opent
(*) U kunt kiezen uit de dagen tussen ‘maandag’ t/m ‘zondag’.
Om een dagprogramma voor maandag in te stellen voert u de
volgende stappen uit:
• Selecteer ‘maandag’ door 1 te draaien
• Druk op 1. ‘maandag’ opent
U heeft de keuze uit ‘Periode 1’, ‘Periode 2’, ‘Periode 3’,
‘Periode 4’, ‘Periode 5’ en ‘Periode 6’. Iedere periode is een
deel van de dag waarin u een ventilatiestand kunt instellen.
Om periode 1 in te stellen voert u de volgende handelingen uit:
• Selecteer ‘Periode 1’ door 1 te draaien
• Druk op 1, ‘Periode 1’ opent
• Selecteer ‘Starttijd’ door 1 te draaien
• Druk op 1, ‘Starttijd’ opent
• Stel de Starttijd in door 1 te draaien.
U heeft een bereik tussen 3.00u en 2:59u
• Druk op 1 om de starttijd te bevestigen
Stel nu de ventilatiestand in voor periode 1.
Voer hiervoor de volgende handelingen uit:
• Selecteer ‘Ventilatiestand’ door 1 te draaien
• Druk op 1, ‘Ventilatiestand’ opent
• Stel de ventilatiestand voor periode 1 in door 1 te draaien
• Druk op 1 om de ventilatiestand voor periode 1 te
bevestigen
U heeft de ventilatiestand voor periode 1 ingesteld. U kunt pe-
riode 2 t/m 6 op dezelfde wijze instellen. Een periode eindigt
wanneer een nieuwe periode begint.
Indien u het dagprogramma voor maandag gemaakt heeft,
kunt u hetzelfde doen voor de andere dagen van de week.
Herhaal dan de stappen van paragraaf 4.3.4, maar kies na (*)
in plaats van ‘maandag’ een andere dag.
4.4 Programmasoort (P1, P2, of P3) activeren
De Klokregeling heeft drie soorten weekprogramma’s P1, P2
en P3. U kunt de weekprogramma’s zelf programmeren, zie
voor meer informatie paragraaf 4.3.
Indien u één van de weekprogramma’s wilt programmeren
voert u de volgende handelingen uit (zie 1):
• Druk zo nodig meerdere malen op return 2 om in het
hoofdscherm te komen
• Druk op ‘Instellen en activeren klokprogramma’ 3
• Selecteer ‘Programma activeren’ door 1 te draaien
• Druk op 1. ‘Programma activeren’ opent
• Selecteer P1, P2 of P3 door 1 te draaien
• Druk 1 om P1, P2 of P3 te activeren

20
Klokregeling / Control unit / Bedienmodul / Contrôle digital
4.5 Programma tijdelijk overrulen
U kunt het programma tijdelijk overrulen. Hiervoor voert u de
volgende handelingen uit (zie 1):
• Druk zo nodig meerdere malen op return 2 om in het
hoofdscherm te komen
• Druk op ‘Overbrugging klokprogramma’ 5
• Draai 1 om tijdelijk de ventilatiestand in te stellen
Let op! Boven in uw scherm staat tot welke tijd de
nieuw ingestelde ventilatiestand van toepassing is. Na
deze tijd zal het programma weer worden ingescha-
keld. Indien u het toestel overruled in de maximale
stand, dan zal de overrule periode 30 minuten bedra-
gen. Dit kunt u tevens ongedaan maken door op return
2 te drukken.
4.6 Programma voor langere tijd overrulen
Indien u een programma heeft ingesteld, dan kunt u deze
handmatig overrulen, bijvoorbeeld bij vakanties. Om het pro-
gramma te overrulen voert u de volgende handelingen uit (zie
1):
• Druk zo nodig meerdere malen op return 2 om in het
hoofdscherm te komen
• Druk op 4. ‘Handmatig’ verschijnt in het display
• Draai 1 om de ventilatiestand in te stellen
De handmatige stand overruled nu het programma. Indien u
de handmatige stand ongedaan wilt maken, drukt u op return
2. Return knop 2 is pas te bedienen ca. 10 seconden na
laatste instelling!
4.7 Waarde ventilatiestanden instellen
U kunt de waarde per ventilatiestand zelf instellen.
Voer hiervoor de volgende handelingen uit (zie 1 & 13 ):
• Druk zo nodig meerdere malen op return 2 om in het
hoofdscherm te komen
• Druk op 1. ‘Hoofdmenu (main menu)’ opent
• Selecteer ‘Installateur (Installer)’ door 1 te draaien
• Druk op 1. ‘Installateur (Installer)’ opent
• Selecteer gewenste toestel door 1 te draaien
• Druk 1 om de gewenste toestel te bevestigen (of se-
lecteer indien maar één toestel is aangesloten de keuze
WTW-toestel)
• Selecteer ‘Toestelinstellingen’ door 1 te draaien
• Druk op 1. ‘Toestelinstellingen’ opent
• Selecteer ‘Luchtdebiet - stand 0’ door 1 te draaien
Let op!
Met ‘Debiet 0’ wordt ventilatiestand bedoeld.
Met ‘Debiet 1’ wordt ventilatiestand bedoeld.
Met ‘Debiet 2’ wordt ventilatiestand bedoeld.
Met ‘Debiet 3’ wordt ventilatiestand bedoeld.
• Stel ‘Luchtdebiet - stand 0’ in door aan 1 te draaien
• Druk op 1 om de ingestelde waarde voor ‘Luchtdebiet -
stand 0’ te bevestigen
Debiet 1 t/m 3 kunt u op dezelfde wijze instellen als hierboven
beschreven voor Luchtdebiet - stand 0.
Let op! Voor een hogere debietstand kunt u geen
lagere waarde invoeren, dan de waarde van een
lagere debietstand (Debiet 0 < Debiet 1 < Débito 2 <
Debiet 3).
4.8 Instellingen opvragen
U kunt de actuele instellingen van de Klokregeling opvragen.
• Druk hiervoor op 1. (zie 1 & 11 ).
• Selecteer gewenste toestel door 1 te draaien
• Druk 1 om de gewenste toestel te bevestigen (of se-
lecteer indien maar één toestel is aangesloten de keuze
WTW-toestel)
• Selecteer ‘Toestelinformatie (Device information)’ door 1
te draaien
• Druk op 1. ‘Toestelinformatie (Device information)’ opent
• Bekijk gewenste informatie door 1 te draaien
Let op! Via het Toestelinformatie menu kunt u de
instellingen bekijken, maar niet wijzigen.
4.9 Fabrieksinstellingen aangesloten toestel
Op de Klokregeling zit een toestel aangesloten. Het is moge-
lijk om de instellingen van dit toestel terug te zetten naar de
fabrieksinstellingen. Voer hiervoor de volgende handelingen
uit (zie 1):
• Druk zo nodig meerdere malen op return 2 om in het
hoofdscherm te komen
• Druk op 1. ‘Hoofdmenu (main menu)’ opent
• Selecteer ‘Installateur (Installer)’ door 1 te draaien
• Druk op 1. ‘Installateur (Installer)’ opent
• Selecteer ’Fabrieksinstelling (Factory setting)’ door 1 te
draaien
• Druk op 1. ‘Fabrieksinstelling (Factory setting)’ opent
• Kies optie ‘ja (yes)’ door 1 te draaien
• Druk 1 om de terug zetten naar fabrieksinstelling te
bevestigen
Door selectie van fabrieksinstelling worden alle instellingen
teruggezet naar de fabrieksinstelling. Ook worden dan alle
storingsmeldingen gewist
5 Onderhoud
5.1 Algemeen onderhoud
Voorzichtig! Maak het scherm schoon met een zachte
doek.
Voorzichtig! Breng nooit water en/of (schoonmaak)
vloeistof op het scherm aan.
5.2 Filter reinigen of vervangen
5.2.1 Filtermelding
Seite wird geladen ...
Seite wird geladen ...
Seite wird geladen ...
Seite wird geladen ...
Seite wird geladen ...
Seite wird geladen ...
Seite wird geladen ...
Seite wird geladen ...
Seite wird geladen ...
Seite wird geladen ...
Seite wird geladen ...
Seite wird geladen ...
Seite wird geladen ...
Seite wird geladen ...
Seite wird geladen ...
Seite wird geladen ...
Seite wird geladen ...
Seite wird geladen ...
Seite wird geladen ...
Seite wird geladen ...
Seite wird geladen ...
-
 1
1
-
 2
2
-
 3
3
-
 4
4
-
 5
5
-
 6
6
-
 7
7
-
 8
8
-
 9
9
-
 10
10
-
 11
11
-
 12
12
-
 13
13
-
 14
14
-
 15
15
-
 16
16
-
 17
17
-
 18
18
-
 19
19
-
 20
20
-
 21
21
-
 22
22
-
 23
23
-
 24
24
-
 25
25
-
 26
26
-
 27
27
-
 28
28
-
 29
29
-
 30
30
-
 31
31
-
 32
32
-
 33
33
-
 34
34
-
 35
35
-
 36
36
-
 37
37
-
 38
38
-
 39
39
-
 40
40
-
 41
41


in anderen Sprachen
- français: Ubbink 0888030 Guide d'installation
- Nederlands: Ubbink 0888030 Installatie gids
Verwandte Artikel
Andere Dokumente
-
Strong SRT 7805 Spezifikation
-
Yamaha DRX-1 Benutzerhandbuch
-
Yamaha DGC2E3 PE Bedienungsanleitung
-
-
-
Yamaha DS4E3PRO PE Bedienungsanleitung
-
-
Yamaha EAD10 Drum Module Benutzerhandbuch
-