Whirlpool LFTA+ 2294 A.R Benutzerhandbuch
- Kategorie
- Geschirrspüler
- Typ
- Benutzerhandbuch

Operating instructions
Contents
Installation, 2-3
Positioning and levelling
Connecting the water and electricity supplies
Advice regarding the first wash cycle
Technical data
Description of the appliance, 4
Overall view
Control panel
Loading the racks, 5
Lower rack
Cutlery basket
Upper rack
Start-up and use, 6
Starting the dishwasher
Measuring out the detergent
Wash options
Wash cycles, 7
Table of wash cycles
Rinse aid and refined salt, 8
Measuring out the rinse aid
Measuring out the refined salt
Care and maintenance, 9
Shutting off the water and electricity supplies
Cleaning the dishwasher
Preventing unpleasant odours
Cleaning the sprayer arms
Cleaning the water inlet filter
Cleaning the filters
Leaving the machine unused for extended periods
Precautions and advice,10
General safety
Disposal
Saving energy and respecting the environment
Troubleshooting, 11
Assistance,12
English, 1
EN
LFTA+ 2294
DISHWASHER
DE
Deutsch, 13
Polski, 25
HU
Magyar, 37
PL
RO
Românã, 49

EN
2
Installation
Keep this instruction manual in a safe place for
future reference. If the appliance is sold, given away or
moved, please ensure the manual is kept with the
machine, so that the new owner may benefit from the
advice contained within it.
Please read this instruction manual carefully: it
contains important information regarding the safe
installation, use and maintenance of the appliance.
If the appliance must be moved at any time, keep it in
an upright position; if absolutely necessary, it may be
tilted onto its back.
This appliance is intended to be used in household and
similar applications such as:
- staff kitchen areas in shops, offices and other working
environments;
- farm houses;
- by clients in hotels, motels and other residential type
environments;
- bed and breakfast type environments.
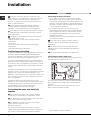
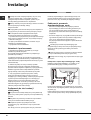
Positioning and levelling
1. Remove the appliance from all packaging and check
that it has not been damaged during transportation.
If it has been damaged, contact the retailer and do not
proceed any further with the installation process.
2. Check the dishwasher by placing it so that its sides or
back panel are in contact with the adjacent cabinets or
even with the wall. This appliance can also be recessed
under a single worktop
* (see the Assembly instruction
sheet).
3. Position the dishwasher on a level and sturdy floor. If
the floor is uneven, the front feet of the appliance may be
adjusted until it reaches a horizontal position. If the
appliance is levelled correctly, it will be more stable and
much less likely to move or cause vibrations and noise
while it is operating.
4. Adjust the height of the rear foot from the front of the
appliance
* on the central lower part of the dishwasher, turning
a hexagonal spanner (red color) with an opening of 8 mm in a
clockwise direction to increase the height or in an
anticlockwise direction to decrease the height.
Connecting the water and electricity
supplies
Connection to the water and electricity supplies
should only be performed by a qualified technician.
The dishwasher should not stand on top of the water
hoses or the electricity supply cable.
The appliance must be connected to the water
supply network using new hoses.
Do not use old hoses.
The water inlet and outlet hoses and the electricity
supply cable may be positioned towards the right or the
left in order to achieve the best possible installation.
Connecting the water inlet hose
To a suitable cold water connection point: before
attaching the hose, run the water until it is perfectly
clear so that any impurities that may be present in the
water do not clog the appliance; after performing this
operation, screw the inlet hose tightly onto a tap with
a ¾ gas threaded connection.
To a suitable hot water connection point: your
dishwasher may be supplied with hot water from the
mains supply (if you have a central heating system
with radiators) provided that it does not exceed a
temperature of 60°C.
Screw the hose to the tap as described for connection
to a cold water supply.
If the inlet hose is not long enough, contact a
specialist store or an authorised technician (see
Assistance).
The water pressure must be within the values
indicated in the Technical data table (see adjacent
information).
The hose should not be bent or compressed.
Connecting the water outlet hose
Connect the outlet hose (without bending it) to a drain
duct with a minimum diameter of 4 cm.
The outlet hose must be at a height ranging from 40 to
80 cm from the floor / surface where the dishwasher
rests (A).
Before connecting the water outlet hose to the sink
drain, remove the plastic plug (B).
* Only available in selected models.

EN
3
Anti-flooding protection
To ensure floods do not occur, the dishwasher:
- is provided with a special system which blocks the
water supply in the event of anomalies or leaks from
inside the appliance.
Some models are also equipped with the supplementary
safety device New Acqua Stop
*, which guarantees anti-
flooding protection even in the event of a supply hose
rupture.
WARNING: HAZARDOUS VOLTAGE!
Under no circumstance should the water inlet hose be
cut as it contains live electrical parts.
Electrical connection
Before inserting the plug into the electrical socket, make
sure that:
The socket is earthed and complies with current
regulations.
The socket can withstand the maximum load of the
appliance, which is indicated on the data plate
located on the inside of the door (see chapter entitled
Description of the appliance).
The power supply voltage falls within the values
indicated on the data plate on the inside of the door.
The socket is compatible with the plug of the
appliance. If this is not the case, ask an authorised
technician to replace the plug (see Assistance); do
not use extension cables or multiple sockets.
Once the appliance has been installed, the power
supply cable and the electrical socket should be easily
accessible.
The cable should not be bent or compressed.
If the power supply cable is damaged, it must be re-
placed by the manufacturer or its Technical Assistance
Service in order to prevent all potential hazards. (See As-
sistance)
The Company shall not be held responsible for any
incidents that occur if these regulations are not
observed.
Anti-condensation strip*
After installing the dishwasher, open the door and stick
the adhesive transparent strip under the wooden shelf in
order to protect it from any condensation which may
form.
Advice regarding the first wash cycle
After the appliance has been installed, immediately
before running the first wash cycle, completely fill the
salt dispenser with water and add only then
approximately 1 kg of salt (see chapter entitled Rinse aid
and refined salt). The water may overflow: this is normal
and is not a cause for concern. Select the water
hardness value (see chapter entitled Rinse aid and
refined salt). - After the salt has been poured into the
machine, the LOW SALT indicator light
* switches off.
If the salt container is not filled, the water softener
and the heating element may be damaged as a result.
* Only available in selected models.
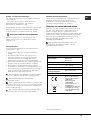
Technical data
Dimensions
width 59.5 cm
height 82 cm
depth 57 cm
Capacity 14 standard place-settings
Water supply
pressure
0,05 ÷ 1MPa (0.5 ÷ 10 bar)
7,25 – 145 psi
Power supply
voltage
See appliance data plate
Total absorbed
power
See appliance data plate
Fuse See appliance data plate
This dishwasher conforms to
the following European
Community Directives:
-2006/95/EC (Low Voltage)
-2004/108/EC (Electromagnetic
Compatibility)
-2005/32/EC (Comm. Reg.
1275/2008) (Ecodesign)
-97/17/EC (Labelling)
-2002/96/EC (WEEE)

EN
4
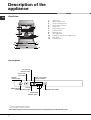
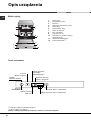
Overall view
Description of the
appliance
1. Upper rack
2. Upper sprayer arm
3. Tip-up compartments
4. Rack height adjuster
5. Lower rack
6. Lower sprayer arm
7. Cutlery basket
8. Washing filter
9. Salt dispenser
10. Detergent and rinse aid dispensers
11. Data plate
12. Control Panel
***
***Only in completely built-in models.
* Only available in selected models.
The number and type of wash cycles and options may vary depending on the dishwasher model.
Control panel
Delayed start button*
ON/OFF/Reset
button
ON/OFF
indicator light
Low salt
indicator light*
Select wash
cycle button
Low rinse aid
indicator light*
Delayed start
indicator lights*
Wash cycle number
light-up indicator

EN
5
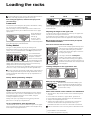
Loading the racks
Before loading the racks, remove all food residues from the
crockery and empty liquids from glasses and cups.
After loading the appliance, check that the sprayer arms
can rotate freely.
Lower rack
The lower rack can hold pans, lids, plates, salad bowls, cutlery,
etc. as seen in the Loading examples.
Plates and large covers should be placed at the sides of the
rack, ensuring that they do not block the rotation of the upper
sprayer arm.
Some dishwasher
models are fitted
with tip-up
sections
*, which
can be used in a
vertical position when arranging plates or in a horizontal position
when arranging pans and salad bowls.
Cutlery basket
The type of cutlery basket may vary according to the
dishwasher model: it may be modular, non-modular or a sliding
version. The non-modular basket must only be positioned at
the front of the lower rack.
The modular basket
may be separated into
two parts, a solution
which is recommended
when performing a half
load wash (only in models offering this option), is available in a
sliding version (positioned at any point on the lower rack by
sliding it between the fixed or tip-up inserts.
- Both versions are fitted with a collapsible sliding system which
means the cutlery can be arranged in the best possible way.
Knives and other utensils with sharp edges must be placed
in the cutlery basket with the points facing downwards, or they
must be positioned horizontally in the tip-up compartments on
the upper rack.
Cutlery basket positioning examples
Upper rack
Load this rack with delicate and lightweight crockery: glasses,
tea and coffee cups, saucers, small salad bowls, saucepans
and small saucepans which are not too soiled, using the
Loading examples as a guide.
Mugs and cups, long sharp knives and serving utensils:
place these on the tip-up compartments
**.
Tip-up compartments with adjustable tilt
- The tilt feature can be used to increase the space in the upper
rack, to position wine glasses with different stem lengths safely
and to improve drying performance.
- Lift the tip-up compartment, slide it gently and position it in the
desired tilt angle.
Adjusting the height of the upper rack
In order to make it easier to arrange the crockery, the upper rack
may be moved to a higher or lower level.
(in models which offer the Baby cycle, the upper rack must be
placed in its lower position when the appliance is being loaded).
The height of the upper rack should ideally be adjusted
WHEN THE RACK IS EMPTY.
Never lift or lower the rack on one side only.
Open the left and right guide rail stops and
pull out the rack; position it higher or lower
as required, slide it along the guide rails
until the front wheels are in place and close
the stops (see figure).
If the rack is fitted with Dual Space
handles
* (see figure), pull out the upper
rack until it reaches its stop point, grip the
handles at the sides of the rack and move it
upwards or downwards, then slowly let it fall
back into place.
Loading examples for the upper/lower rack
Baby Tip-up compartments
*
For dishwasher models with a Baby Cycle,
tip-up compartments suitable for washing
bottles, rings and teats are provided. (see
the instruction sheet)
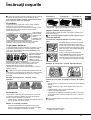
Items which should not be washed in the dishwasher
Wooden items, objects with wooden or horn handles or glued-
on parts.
Items made from aluminium, copper, brass, pewter or tin.
Items made from plastic material which is not heat-resistant.
Antique or hand-painted porcelain.
Antique silver. Silver which is not antique may, however, be
washed in the dishwasher using a delicate wash cycle,
provided that it does not come into contact with other metals.
We recommend the use of crockery which is dishwasher safe.
* Only available in selected models.
** The number and position may vary.
Tilt A Tilt B Tilt C

EN
6
Start-up and use
Starting the dishwasher
1. Turn the water tap on.
2. Open the door and press the ON/OFF button: you will hear
a short beep and the display and option indicator lights switch
on.
3. Measure out the detergent (see below).
4. Load the racks (see Loading the racks).
5. Select the wash cycle in accordance with the type of
crockery and its soil level (see Table of wash cycles),
by
pressing the P button.
6. Select the wash options (see adjacent information).
7. Start the wash cycle by shutting the door: a long beep
signals the start of the wash cycle.
8. Two short beeps and one long one indicate the end of the
wash cycle and the wash cycle number flashes on the display.
Open the door, switch off the appliance by pressing the ON/
OFF button, shut off the water tap and unplug the appliance
from the electricity socket.
9. Wait for a few minutes before removing the crockery, in
order to avoid burns. Unload the racks, beginning with the
lower level.
- The machine will switch off automatically
during certain periods of inactivity, in order to
minimise electricity consumption.
AUTO WASH CYCLES*: this model of dishwasher is
equipped with a special sensor which can be used to assess
the level of soiling and automatically select the most efficient
and economic wash cycle accordingly.
The duration of the auto wash cycles may vary due to the
operation of the sensor.
If the crockery is only lightly soiled or if it has been rinsed
with water before being placed in the dishwasher, reduce the
amount of detergent used accordingly.
Modifying a wash cycle in progress
If a mistake was made during the wash cycle selection
process it is possible to change the cycle, provided that it has
only just begun: open the door, avoiding the escaping steam,
and press and hold the ON/OFF button; the machine will
switch off with a long beep. Switch the machine back on using
the ON/OFF button and select the new wash cycle and any
options desired; start the cycle by closing the door.
Adding extra crockery
Without switching off the machine, open the door, taking care
to avoid the escaping steam, and place the crockery inside
the dishwasher. Close the door: the cycle starts from the point
at which it was interrupted.
Accidental interruptions
If the door is opened during the wash cycle, or if there is a
power cut, the cycle stops. It starts again from the point at
which it was interrupted once the door has been shut or once
the electricity supply is restored.
Measuring out the detergent
A good wash result also depends on the correct amount of
detergent being used; exceeding the stated amount does not
result in a more effective wash and increases environmental
pollution.
Only use detergent which has been
specifically designed for dishwashers.
DO NOT USE washing up liquid.
Using excessive detergent may result in foam
residue remaining in the machine after the cycle
has ended.
The use of tablets is only recommended for
models which offer the MULTI-FUNCTIONAL
TABLETS option.
To achieve the best results from each washing
and drying cycle, powder detergent, rinse aid
liquid and salt should be used.
Compartment A: Washing detergent
Compartment B: Pre-wash detergent
1. Open cover C by pressing button
D.
2. Pour in the detergent after
consulting the Table of wash cycles:
For powder detergent use
compartments A and B.
For detergent in tablet form: when
the cycle requires 1 tablet, place it in
compartment A and close the cover;
when it requires 2, place the second tablet at the bottom of the
appliance.
3. Remove detergent residues from the edges of the
compartment and close the cover until it clicks.
Wash options
If an option is not compatible with the selected was cycle
(see Table of wash cycles), the corresponding LED flashes
rapidly 3 times and 2 short beeps will sound.
Delayed start
It is possible to delay the start time of the cycle by 3, 6 or 9
hours.
1. Press the DELAYED START button: every time it is pressed
a buzzer sounds and the selected period of time is displayed.
2. Select the wash cycle and shut the door: after the beep
sounds, the timer begins counting down.
3. Once this time has elapsed, the indicator light switches off
and the wash cycle begins.
To adjust the delay time and select a smaller period of time,
press the DELAYED START button. To cancel it, press the
button repeatedly until the selected delayed start indicator
light switches off. The wash cycle will start automatically as
soon as the door is shut.
* Only available in selected models.

EN
7
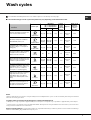
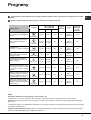
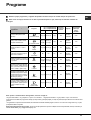
Wash cycles
For available OPTIONS please refer to the Table of options on the Start-up and use page.
The number and type of wash cycles and options may vary depending on the dishwasher model.
Detergent
(A) = compartment A
(B) = compartment B
Wash cycle selection
instructions
Wash cycle
Powder Liquid Tablets
Wash
cycles
which
include
drying
Options
Wash cycle
duration
(tolerance
±10%)
Hrs. Min.
Heavily soiled dishes and pans (not
to be used for delicate items).
1. Auto
Super wash
35 g (A)
35 ml (A)
1 (A)
Yes
Delayed
start
2:25’
Normally soiled pans and dishes.
Standard daily wash cycle.
2. Auto
Normal Wash
29 g (A)
6 g (B)
29 ml (A)
6 ml (B)
1 (A)
Yes
Delayed
start
1:50’
Limited quantity of daily soiling.
(4 place settings + 1 saucepan +1
frying pan).
3. Daily A 60’
25 g (A)
25 ml (A)
1 (A)
No
Delayed
start
1:00’
Pre-wash for dishes while awaiting
completion of the load with the
dishes from the next meal.
4. Soak
No
No
No
No
Delayed
start
0:08’
Environmentally-friendly wash cycle
with low energy consumption levels,
suitable for pans and dishes.
5. Eco
*
29 g (A)
6 g (B)
29 ml (A)
6 ml (B)
1 (A)
Yes
Delayed
start
2:55’
Economic and fast wash to be used
for lightly soiled dishes. (Run cycle
immediately after use) (2 plates + 2
glasses + 4 pieces of cutlery + 1
saucepan + 1 small frying pan). 6. Rapid
25 g (A)
25 ml (A)
1 (A)
No
Delayed
start
0:35’
Economic and fast wash for
delicate items which are sensitive to
high temperatures. (Run cycle
immediately after use) (glasses
upper rack + delicate plates lower
rack). 7. Crystal
35 g (A)
35 ml (A)
1 (A)
Yes
Delayed
start
1:30’
Wash spread over the two racks:
delicate for crystal and glasses on
the upper rack and heavy duty for
the pans on the lower rack.
8. Auto
Duo Wash
35 g (A)
35 ml (A)
1 (A)
Yes
Delayed
start
1:45’
Notes:
Optimum performance levels when using the "Daily wash" and "Rapid wash" cycles can be achieved by observing the maximum
amounts of crockery specified.
To make it easier to measure out the detergent, it is worth remembering that:
1 tablespoon = 15 gr. of powder = approximately 15 ml of liquid - 1 teaspoon = 5 gr. of powder = approximately 5 ml of liquid
* The Eco wash cycle adheres to the regulation EN-50242. Although it has a longer duration than other wash cycles it uses less
energy and is les harmful to the environment.
Note for Test Laboratories: for information relating to comparative EN testing conditions, please send an email to the following
address: [email protected]

EN
8
Rinse aid and refined salt
Only use products which have been
specifically designed for dishwashers.
Do not use table salt or industrial salt, or
washing up liquid.
Follow the instructions given on the packaging.
If using a multi-functional product it is not necessary to add
rinse aid; however, we recommend that you add salt,
especially if you live in an area where the water is hard or
very hard. Follow the instructions given on the packaging.
If you do not add salt or rinse aid, the LOW
SALT
* and LOW RINSE AID* indicator lights
remain lit.
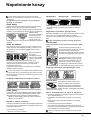
Measuring out the rinse aid
Rinse aid makes it easier for the crockery to dry, as water
runs off surfaces more readily and therefore does not leave
streaks or marks.
The rinse aid dispenser should be filled:
When the LOW RINSE AID
* indicator light on the control
panel is illuminated;
1. Open the dispenser by turning
the lid (G) in an anticlockwise
direction.
2. Pour in the rinse aid, making
sure it does not overflow from the
dispenser. If this happens, clean
the spill immediately with a dry
cloth.
3. Screw the lid back on.
NEVER pour the rinse aid directly into the appliance tub.
Adjusting the amount of rinse aid
If you are not completely satisfied with the drying results, you
may adjust the quantity of rinse aid used. Use a screwdriver
to turn the dosage adjuster (F) to one of the 6 pre-set
positions (the default position is set to 4):
If there are streaks on the crockery, set the adjustment
device to a lower number (1-3).
If drops of water remain on the crockery or if there are
limescale marks present after the cycle has finished, set the
adjuster to a higher number (4-6).
Setting the water hardness
Every dishwasher is equipped with a water softener which, by
using refined salt designed especially for this type of
appliance, supplies water without limescale which is then used
to wash the crockery.
This dishwasher offers a setting which helps to reduce
pollution and optimises washing performance in accordance
with the water hardness level in your area. This information can
be obtained from the organisation which supplies your
household with water.
- Open the door and switch on the machine by pressing the
ON/OFF button.
- Press the P button and hold for approximately 5 seconds;
two short beeps will sound and the set hardness number will
flash slowly on the display (the water softening system is set
to number 3).
- Press the P button repeatedly until the desired hardness
level has been reached (1-2-3-4-5
* see Water hardness
table).
- To exit the function, wait approximately few seconds or press
another option
* button, or switch off the machine using the ON/
OFF button.
Even if using multi-functional tablets, the salt dispenser should
still be filled.
(°dH = hardness measured in German degrees - °f =
hardness measured in French degrees - mmol/l = millimoles
per litre)
Measuring out the refined salt
In order to achieve the best possible results using a wash
cycle, make sure that the dispenser is never empty. Refined
salt removes limescale from the water, thus avoiding the
formation of deposits on crockery.
The salt dispenser is located in the lower part of the
dishwasher (see Description) and should be filled:
When the green float
* cannot be seen by simply looking at
the cap of the salt dispenser.
When the LOW SALT
* indicator light on the control panel is
illuminated;
1. Remove the lower rack and unscrew the
container cap (anticlockwise).
2. The first time you do this: fill the water tank
right up to its edge.
3. Position the funnel
* (see figure) and fill the
salt container right up to its edge (this should hold
approximately 1 kg); it is not unusual for a little water to leak
out.
4. Remove the funnel
* and wipe any salt residue away from
the opening; rinse the cap under running water and then
screw it on, the head facing downwards so as to let the water
flow out of the four cracks which are arranged in a star shape
on the lower part of the cap. (Salt cap with green float
*)
It is advisable to perform this procedure every time you
add salt to the container.
Make sure the cap is screwed on tightly, so that no detergent
can get into the container during the wash cycle (this could
damage the water softener beyond repair).
When necessary, measure out the salt before a wash
cycle so that any saline solution which has leaked out of the
salt dispenser is removed.
* Only available in selected models.
G
F
Water Hardness Table
°dH °fH mmol/l level
0 6 0 10 0 1 1
6 11 11 20 1.1 2 2
12 17 21 30 2.1 3 3
17 34 31 60 3.1 6 4
34 50 61 90 6.1 9
5
*
For values between 0°f and 10°f, we do not
recommend the use of salt.
* this setting may cause a slight increase in the
duration of the cycle.

EN
9
Care and maintenance
Shutting off the water and electricity
supplies
Turn off the water tap after every wash cycle to avoid
leaks.
Always unplug the appliance when cleaning it and
when performing maintenance work.
Cleaning the dishwasher
The external surfaces of the machine and the control
panel may be cleaned using a non-abrasive cloth
which has been dampened with water. Do not use
solvents or abrasive products.
Any marks on the inside of the appliance may be
removed using a cloth dampened with water and a
little vinegar.
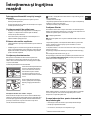
Preventing unpleasant odours
Always keep the door of the appliance ajar in order to
avoid moisture from forming and being trapped inside
the machine.
Clean the seals around the door and detergent
dispensers regularly using a damp sponge. This will
avoid food becoming trapped in the seals, which is
the main cause behind the formation of unpleasant
odours.
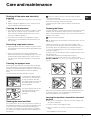
Cleaning the sprayer arms
Food residue may become encrusted onto the sprayer
arms and block the holes used to spray the water. It is
therefore recommended that the arms are checked from
time to time and cleaned with a small non-metallic
brush.
The two sprayer arms may both be removed.
To remove the upper sprayer
arm, rotate the locking ring in
an anti-clockwise direction.
The upper sprayer arm should
be replaced with the holes
facing upwards.
The lower sprayer arm can be
removed by pressing on the
side tabs and pulling it
upwards.
Cleaning the water inlet filter*
If the water hoses are new or have not been used for an
extended period of time, let the water run to make sure it
is clear and free of impurities before performing the
necessary connections. If this precaution is not taken,
the water inlet could become blocked and damage the
dishwasher.
Clean the water inlet filter at the tap outlet regularly.
- Turn off the water tap.
- Unscrew the end of the water inlet hose, remove the filter
and clean it carefully under running water.
- Replace the filter and screw the water hose back into
position.
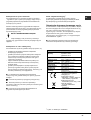
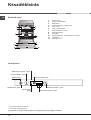
Cleaning the filters
The filter assembly consists of three filters which remove food
residues from the washing water and then recirculate the
water. They should be cleaned if you wish to achieve the best
results in every wash.
Clean the filters regularly.
The dishwasher should not be used without filters, or if the
filter is loose.
After several washes, check the filter assembly and if
necessary clean it thoroughly under running water, using a
non-metallic brush and following the instructions below:
1. Turn the cylindrical filter C in an anti-clockwise direction
and pull it out (fig. 1).
2. Remove the cup filter B by exerting a slight pressure on the
side flaps (fig. 2).
3. Slide out the stainless steel plate filter A (fig. 3).
4.Inspect the trap and remove any food residue.
NEVER REMOVE the wash cycle pump (black detail)
(fig. 4).
After cleaning the filters, replace the filter assembly and fix it
in position correctly; this is essential for maintaining the
efficient operation of the dishwasher.
Leaving the machine unused for extended
periods
Disconnect the appliance from the electricity supply and
shut off the water tap.
Leave the door of the appliance ajar.
When you return, run a wash cycle when the dishwasher is
empty.
* Only available in selected models.
2
C
B
1
3
4

EN
10
Precautions and advice
This appliance was designed and manufactured in
compliance with current international safety standards. The
following information has been provided for safety reasons
and should therefore be read carefully.
General safety
This appliance is not intended for use by persons
(including children) with reduced physical, sensory or
mental capabilities, or lack of experience and knowledge,
unless they have been given supervision or instruction
concerning use of the appliance by a person responsible
for their safety.
Children should be supervised to ensure that they do not
play with the appliance.
The appliance was designed for domestic use inside the
home and is not intended for commercial or industrial use.
The appliance must be used by adults only, to wash
domestic crockery in accordance with the instructions in
this manual.
The appliance must not be installed outdoors, even in
covered areas. It is extremely dangerous to leave the
machine exposed to rain and storms.
Do not touch the appliance when barefoot.
When unplugging the appliance always pull the plug from
the mains socket, do not pull on the cable.
The water supply tap must be shut off and the plug should
be removed from the electrical socket before cleaning the
appliance or carrying out any maintenance work.
If the appliance breaks down, do not under any
circumstances touch the internal parts in an attempt to
perform the repair work yourself.
Never touch the heating element.
Do not lean or sit on the open door of the appliance: this
may cause the appliance to overturn.
The door should not be left open as it may create a
dangerous obstacle.
Keep detergent and rinse aid out of reach of children.
The packaging material should not be used as a toy.
Disposal
Disposal of packaging materials: observe local legislation
so that the packaging may be reused.
The European Directive 2002/96/EC relating to Waste
Electrical and Electronic Equipment (WEEE) states that
household appliances should not be disposed of using the
normal solid urban waste cycle. Exhausted appliances
should be collected separately in order to optimise the cost
of re-using and recycling the materials inside the machine,
while preventing potential damage to the atmosphere and
to public health. The crossed-out dustbin is marked on all
products to remind the owner of their obligations regarding
separated waste collection.
For further information relating to the correct disposal of
household appliances, owners may contact the relevant
public authority or the local appliance dealer.
Saving energy and respecting the
environment
Saving water and energy
Only begin a wash cycle when the dishwasher is full. While
waiting for the dishwasher to be filled, prevent unpleasant
odours using the Soak cycle (see Wash cycles).
Select a wash cycle which is suited to the type of crockery
and to the soil level of the crockery using the Table of wash
cycles:
- For dishes with a normal soil level, use the Eco wash
cycle, which guarantees low energy and water
consumption levels.
- If the load is smaller than usual activate the Half load
option
* (see Start-up and use).
If your electricity supply contract gives details of electricity
saving time bands, run wash cycles during the periods
when a lower tariff is applied. The Delayed start
* button
(see Start-up and use) helps you organise the wash cycles
accordingly.
Phosphate-free and chlorine-free detergents
containing enzymes
We strongly recommend that you use detergents that do
not contain phosphates or chlorine, as these products are
harmful to the environment.
Enzymes provide a particularly effective action at
temperatures around 50°C, and as a result detergents
containing enzymes can be used in conjunction with low-
temperature wash cycles in order to achieve the same
results as a normal 65°C wash cycle.
To avoid wasting detergent, use the product in appropriate
quantities based on the manufacturers recommendations,
the hardness of the water and the soil level and quantity of
crockery to be washed. Even if they are biodegradable,
detergents contain substances which may alter the balance
of nature.
* Only available in selected models.

EN
11
Troubleshooting
Whenever the appliance fails to work, check for a solution from the following list before calling for Assistance.
Problem: Possible causes / Solutions:
The dishwasher does not start or
cannot be controlled
• Switch off the appliance by pressing the ON/OFF button, switch it back on after
approximately one minute and reset the program.
• The appliance has not been plugged in properly.
• The dishwasher door has not been shut properly.
The door won’t close • The lock was released. Strongly push the door until a “clacking” noise is heard.
No water drains out from the
dishwasher.
• The dishwasher cycle has not yet finished.
• The water inlet hose is bent (see Installation).
• The drain duct is blocked.
• The filter is clogged up with food residues.
The dishwasher makes excessive
noise.
• The dishes are rattling against each other or against the sprayer arms.
• An excessive amount of foam has been produced: the detergent has not been
measured out correctly or it is not suitable for use in dishwashers (see Start-up
and use).
The dishes and glasses are
covered in a white film or
limescale deposits.
• The level of the refined salt is low or the dosage setting is not suited to the
hardness of the water (see Rinse aid and salt).
• The lid on the salt dispenser is not closed properly.
• The rinse aid has been used up or the dosage is too low.
The dishes and glasses are
streaked or have a bluish tinge.
• The rinse aid dosage is too high.
The crockery has not been dried
properly.
• A wash cycle without a drying program has been selected.
• The rinse aid has been used up or the dosage is too low (see Rinse aid and
salt).
• The rinse aid dispenser setting is not suitable.
• The crockery is made from non-stick material or plastic.
The dishes are not clean. • The racks are overloaded (see Loading the racks).
• The crockery has not been arranged well.
• The sprayer arms cannot move freely.
• The wash cycle is too gentle (see Wash cycles).
• An excessive amount of foam has been produced: the detergent has not been
measured out correctly or it is not suitable for use in dishwashers (see Start-up
and use).
• The lid on the rinse aid compartment has not been shut correctly.
• The filter is dirty or blocked (see Care and maintenance).
• The refined salt level is low (see Rinse aid and salt).
The dishwasher does not take any
water in - Tap shut-off alarm
(several short beeps are emitted)
(the ON/OFF indicator light flashes
and the number 6 appears on the
display).
• There is no water in the mains supply.
• The water inlet hose is bent (see Installation).
• Turn on the tap and the appliance will start after a few minutes.
• The appliance lock has been activated because no action was taken when the
beeps sounded.
Switch off the appliance using the ON/OFF button, turn on the tap and switch
the appliance back on after 20 seconds by pressing the same button. Re-
program the appliance and restart the wash cycle.
Water inlet hose alarm / Water inlet
filter blocked
(the ON/OFF indicator light flashes
and the number 7 appears on the
display).
• Switch off the appliance by pressing the ON/OFF button. Shut off the water tap
to eliminate the risk of flooding and remove the plug from the electrical socket.
Make sure the water inlet filter has not become blocked by impurities (see “Care
and maintenance” chapter).
* Only available in selected models.

EN
12
Assistance
Before contacting Assistance:
Check whether the problem can be resolved using the Troubleshooting guide (see Troubleshooting).
Restart the programme to check whether the problem has ceased to exist.
If the problem persists, contact the Authorised Technical Assistance Service.
Never use the services of unauthorised technicians.
Please have the following information to hand:
The type of malfunction.
The appliance model (Mod.).
The serial number (S/N).
This information can be found on the appliance data plate (see Description of the appliance).

,-
13
Bedienungsanleitung
Inhaltsverzeichnis
Installation, 14-15
Positionierung und Nivellierung
Wasser- und Elektroanschlüsse
Hinweise zur ersten Inbetriebnahme
Technische Daten
Beschreibung Ihres Geschirrspülers, 16
Geräteansicht
Bedienblende
Beschickung der Körbe, 17
Unterkorb
Besteckkorb
Oberkorb
Start und Inbetriebnahme, 18
Starten des Geschirrspülers
Einfüllen des Spülmittels
Spüloptionen
Spülprogramme, 19
Spülprogrammtabelle
Klarspüler und Regeneriersalz, 20
Einfüllen des Klarspülers
Einfüllen des Regeneriersalzes
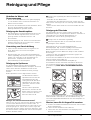
Reinigung und Pflege, 21
Abstellen der Wasser- und Stromversorgung
Reinigung des Geschirrspülers
Vermeidung von Geruchsbildung
Reinigung der Sprüharme
Reinigen des Wasserzufuhr-Filtersiebes
Reinigung der Filtersiebe
Was tun, bevor Sie für längere Zeit verreisen
Vorsichtsmaßregeln und Hinweise , 22
Allgemeine Sicherheit
Entsorgung
Energie sparen und Umwelt schonen
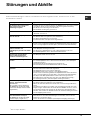
Störungen und Abhilfe, 23
Kundendienst, 24
LFTA+ 2294
DE
Deutsch, 13
GESCHIRRSPÜLER

,-
14
Installation
Es ist äußerst wichtig, diese Bedienungsanleitung
sorgfältig aufzubewahren, um sie jederzeit zu Rate
ziehen zu können. Sorgen Sie dafür, dass sie im Falle
eines Umzugs oder Übergabe an einen anderen
Benutzer das Gerät stets begleitet.
Lesen Sie bitte folgende Hinweise aufmerksam
durch, sie liefern wichtige Informationen hinsichtlich der
Installation, des Gebrauchs und der Sicherheit.
Im Falle eines Umzugs sollte das Gerät möglichst in
vertikaler Position transportiert werden, falls erforderlich,
neigen Sie das Gerät zur Rückseite hin.
Dieses Gerät ist für den Hausgebrauch oder
ähnliche Anwendungen, zum Beispiel:
- Küchenbereiche für das Personal von Geschäften,
Büros und andere Arbeitsumgebungen;
- Bauernhäuser;
- Nutzung durch Kunden in Hotels, Motels und anderen
Wohnbereichen;
- Bed and Breakfast.
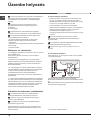
Positionierung und Nivellierung
1. Nehmen Sie das Verpackungsmaterial ab und prüfen
Sie Ihr Gerät auf eventuelle Transportschäden.
Schließen Sie das Gerät im Falle einer Beschädigung
bitte nicht an, sondern fordern Sie den Kundendienst an.
2. Stellen Sie das Gerät so auf, dass es mit den
Seitenteilen oder mit der Rückwand an den anliegenden
Möbeln oder an der Wand anlehnt. Das Gerät kann auch
unter einer durchlaufenden Arbeitsplatte eingebaut
werden* (siehe Montageanleitung).
3. Stellen Sie den Geschirrspüler auf einem ebenen und
festen Boden auf. Gleichen Sie eventuelle
Unregelmäßigkeiten durch Anziehen oder
Losschrauben der vorderen Stellfüße aus, bis das Gerät
eben ausgerichtet ist. Eine präzise Nivellierung verleiht
dem Gerät die erforderliche Stabilität, durch die
Vibrationen, Betriebsgeräusche und ein Verrücken des
Gerätes vermieden werden.
4. Regulieren Sie den hinteren Stellfuß durch Einwirken
mittels eines 8mm-Sechskantschlüssels auf die rote
Sechskantbuchse (befindlich unter der Frontseitenmitte
des Geschirrspülers). Durch Drehen nach rechts wird
die Höhe erhöht, durch Drehen nach links wird sie
herabgesetzt (siehe beigefügtes Einbaublatt).
Wasser- und Elektroanschlüsse
Die Anpassung der Elektro- und Wasseranlagen zur
Installation des Gerätes darf nur von Fachpersonal
durchgeführt werden..
Der Geschirrspüler darf nicht auf Rohrleitungen
oder auf dem Netzkabel aufstützen.
Für den Anschluss des Gerätes an die
Wasserversorgung müssen neue Schläuche verwendet
werden.
Die alten Schläuche sollten niemals erneut verwendet
werden.
Der Wasserzulaufschlauch, der Wasserablaufschlauch
und das Netzkabel können sowohl nach rechts als auch
nach links ausgerichtet werden, wodurch eine optimale
Installation gewährleistet wird.
Anschluss des Zulaufschlauchs
An einen Kaltwasserhahn: Schrauben Sie den
Wasserzulaufschlauch fest an einen mit ¾-
Gewindeanschluss versehenen Hahn; bevor Sie ihn
jedoch anschrauben, lassen Sie Wasser auslaufen,
bis klares Wasser austritt, um das Gerät vor Verstopfen
durch Unreinheiten zu bewahren.
An einen Warmwasserhahn: Im Falle einer
Zentralheizungsanlage kann der Geschirrspüler auch
durch heißes Leitungswasser gespeist werden,
vorausgesetzt dass die Temperatur 60°C nicht
übersteigt.
Schrauben Sie den Schlauch an den Wasserhahn, so
wie für den Anschluss an den Kaltwasserhahn
beschrieben.
Sollte der Zulaufschlauch nicht lang genug sein,
dann wenden Sie sich bitte an einen Fachhändler oder
an einen autorisierten Techniker (siehe Kundendienst).
Der Wasserleitungsdruck muss innerhalb der in der
Tabelle der technischen Daten (siehe seitlich )
angegebenen Werte liegen.
Der Schlauch darf nicht eingeklemmt oder
abgeknickt werden.
Anschluss des Ablaufschlauchs
Schließen Sie den Ablaufschlauch, ohne ihn zu
krümmen, an eine Ablaufleitung mit Mindestdurchmesser
von 4 cm an.
Der Ablaufschlauch muss sich in einer Höhe von 40 bis
80 cm vom Boden oder von der Standfläche der
Spülmaschine (A) befinden.
Vor dem Anschließen des Ablaufschlauchs an den
Siphon des Spülbeckens den Plastikdeckel (B)
abnehmen.
* Nur an einigen Modellen

,-
15
Schutz vor Überschwemmungen
Um Überschwemmungen auszuschließen, wurde der
Geschirrspüler:
- mit einem System versehen, dank dessen der
Wasserzulauf bei Anomalien oder internem
Wasserverlust unterbrochen wird.
Einige Modelle sind mit einem zusätzlichen New Acqua
Stop
* Sicherheitssystem ausgestattet, das auch bei
Schlauchdefekten vor Überschwemmung schützt.
ACHTUNG: GEFÄHRLICHE SPANNUNG!
Der Versorgungsschlauch darf auf keinen Fall
abgeschnitten werden: er enthält nämlich Strom
führende Teile.
Stromanschluss
Vor Einfügen des Netzsteckers in die Steckdose ist
sicherzustellen, dass:
die Steckdose über eine normgerechte Erdung
verfügt;
die Netzsteckdose die auf dem Typenschild
(befindlich auf der Innentür) angegebene max.
Leistungsaufnahme des Gerätes trägt (siehe
Abschnitt Beschreibung Ihres Geschirrspülers);
die Versorgungsspannung den auf dem Typenschild
(auf der Innentür) vermerkten Werten entspricht;
die Steckdose mit dem Netzstecker des Gerätes
kompatibel ist. Andernfalls muss der Netzstecker von
einem autorisierten Techniker ausgetauscht werden
(siehe Kundendienst), verwenden Sie bitte keine
Verlängerungen oder Vielfachstecker.
Der Netzstecker, das Netzkabel und die Steckdose
sollten bei installiertem Gerät leicht zugänglich sein.
Das Netzkabel darf nicht gebogen bzw.
eingeklemmt werden.
Sollte das Speisekabel beschädigt sein, muss es vom
Hersteller oder seiner technischen Kundendienststelle
ausgetauscht werden, um Unfallrisiken vorzubeugen.
(Siehe Kundendienst)
Der Hersteller übernimmt keinerlei Haftung, sollten
diese Vorschriften nicht genau beachtet werden.
* Nur an einigen Modellen
Kondensationsschutzstreifen*
Öffnen Sie nach dem Einbau des Geschirrspülers die
Gerätetür und bringen Sie den transparenten
Klebestreifen unter dem Holzbord an, um es vor
eventuellem Kondenswasser zu schützen.
Hinweise zur ersten Inbetriebnahme
Füllen Sie nach der Installation des Gerätes und direkt
vor dem ersten Spülgang den Salzbehälter ganz mit
Wasser und fügen Sie ca. 1 kg Salz hinzu (siehe
Klarspüler und Regeneriersalz): Es ist völlig normal, dass
Wasser austritt. Stellen Sie den Härtegrad des Wassers
ein (siehe Abschnitt Klarspüler und Regeneriersalz). -
Nach dem Einfüllen des Salzes erlischt die
SALZNACHFÜLLANZEIGE
*.
Das Nichtfüllen des Salzbehälters kann eine
Beschädigung des Wasserenthärters und des
Heizwiderstandes bewirken.
Technische Daten
Abmessungen
Breite 59.5 cm
Höhe 82 cm
Tiefe 57 cm
Fassungsvermögen 14 Maßgedecke
Wasserversorgungsdruck
0,05 ÷ 1MPa (0,5 ÷10 bar)
7,25 – 145 psi
Versorgungsspannung Siehe Typenschild
Maximale
Leistungsaufnahme
Siehe Typenschild
Schmelzsicherung Siehe Typenschild
Dieses Gerät entspricht
folgenden EG-Richtlinien:
- 2006/95/EC
(Niederspannung)
- 2004/108/EC
(elektromagnetische
Verträglichkeit)
- 2005/32/EC (Comm. Reg.
1275/2008) (Ecodesign)
-97/17/EC (Etikettierung)
- 2002/96/EC

,-
16
Geräteansicht
Beschreibung Ihres
Geschirrspülers
1. Oberkorb
2. Oberer Sprüharm
3. Hochklappbare Ablagen
4. Einstellung der Korbhöhe
5. Unterkorb
6. Unterer Sprüharm
7. Besteckkorb
8. Spülsiebe
9. Salzbehälter
10. Spülmittelkammern und Klaspülerbehälter
11. Typenschild
12. Bedienblende
***
***Nur bei den komplett integrierten Modellen.
*Nur an einigen Modellen
Die Anzahl und die Art der Spülprogramme und -optionen ist abhängig vom jeweiligen Geschirrspülermodell.
Bedienblende
Taste Startzeitvorwahl
Taste EIN/AUS/Reset
Kontrollleuchte
EIN/AUS
Salz-
Nachfüllanzeige*
Taste Programmauswahl
Klarspüler-Nachfüllanzeige*
Kontrollleuchten
Startzeitvorwahl
Programmnummern-
Leuchtanzeige

,-
17
Beschickung der Körbe
Bevor Sie das Geschirr in den Geschirrspüler einräumen,
befreien Sie es von Speiserückständen und entleeren Sie Gläser
und Schalen von Getränkeresten.
Stellen Sie nach Einräumen des Geschirrs sicher, dass sich
die Sprüharme frei bewegen können.
Unterer Geschirrkorb
Der Unterkorb kann für Töpfe, Deckel, Teller, Saltschüsseln,
Besteck usw. eingesetzt werden. Siehe Beschickungsbeispiele.
Große Teller und große Deckel sollten am Korbrand einsortiert
werden, und zwar so, dass der obere Sprüharm nicht behindert
wird.
Einige
Geschirrspülermodelle
verfügen über
klappbare Bereiche*,
die in senkrechter
Stellung zum Einsortieren von Tellern, oder in waagerechter
Stellung zum Einsortieren von Töpfen und Salatschüsseln
verwendet werden können.
Besteckkorb
Der Besteckkorb kann je nach Geschirrspülermodell
unterschiedlich ausgeführt sein: nicht teilbar, teilbar oder
verschiebbar. Der nicht teilbare Besteckkorb darf nur im
vorderen Teil des unteren Korbes eingesetzt werden.
Der teilbare
Besteckkorb kann
zweigeteilt werden -
somit kann eine
Korbhälfte entfernt
werden, eine praktische Lösung, wenn bei nur halber Füllung
gespült wird (bei den Modellen, die mit einer solchen Funktion
ausgestattet sind) - und er kann versetzt werden, d. h. in jeden
Bereich des Unterkorbs (feste oder klappbare Bereiche)
verschoben werden.
- Beide sind mit verschiebbaren Klappen ausgerüstet, die eine
optimale Anordnung des Bestecks ermöglichen.
Messer und andere Küchenutensilien mit scharfen Spitzen
sind mit nach unten gerichteten Spitzen in den Besteckkorb
einzuordnen, oder waagerecht auf die Ablagen des oberen
Geschirrkorbs zu legen.
Beispiele zur Einordnung des Besteckkorbes
Oberer Geschirrkorb
In den oberen Geschirrkorb sortieren Sie empfindliches und
leichtes Geschirr ein: Gläser, Tee- und Mokkatassen, Untertassen,
flache Schüsseln, Pfannen, flache, nur leicht verschmutzte Töpfe
gemäß den Beschickungsbeispielen.
Tassen und Mokkatassen, Lange und spitze Messer,
Servierbesteck: auf den hochklappbaren Ablagen**.
Hochklappbare Ablagen mit unterschiedlicher
Neigungseinstellung
- Die Neigung schafft mehr Platz im Oberkorb, sie ermöglicht
das Einstellen von Stielgläsern unterschiedlicher Höhe und
verbessert die Trockenleistung.
- Heben Sie die hochklappbare Ablage an, verschieben Sie sie
etwas und stellen Sie sie auf den gewünschten Neigungswinkel.
Höheneinstellung des Oberkorbes
Um das Einordnen des Geschirrs zu vereinfachen, kann der
Oberkorb je nach Bedarf in Hoch- oder Niedrigstellung
eingeschoben werden. (für die Befüllung mit Babygeschirr bei
Geschirrspülermodellen, die einen Spülzyklus Baby vorsehen,
muss der obere Korb auf die untere Position gestellt werden).
Es empfiehlt sich, die Höhe des Oberkorbes bei LEEREM
KORB zu regulieren.
Heben oder senken Sie den Korb niemals nur an einer Seite.
Öffnen Sie den rechten und linken Arretierstift
der Korbführungen und ziehen Sie den Korb
heraus; schieben Sie ihn in Hoch- oder
Niedrigstellung ein; lassen Sie ihn über die
Führungen nach hinten gleiten und schieben
Sie hierbei auch die Vorderräder ein;
schließen Sie die Arretierstifte (siehe Abbildung).
Ist der Korb mit Dual Space*-Griffen
ausgestattet (siehe Abbildung), ziehen Sie
den Oberkorb bis zum Anschlag heraus,
fassen die an den Korbseiten befindlichen
Griffe mit den Händen, ziehen diese nach
oben bzw. drücken sie nach unten, und
lassen Sie den Korb daraufhin herab (hierbei begleiten).
Beschickungsbeispiele für den Oberkorb/Unterkorb
Hochklappbare Ablagen Baby
*
Bei den Geschirrspülermodellen, die einen
Spülzyklus Baby vorsehen, werden
entsprechende hochklappbare Ablagen
mitgeliefert, auf die Babyflaschen, Sauger und
Schnuller gegeben werden können. (siehe der
Dokumentation beiliegendes Anleitungsblatt)
Nicht spülmaschinenfestes Geschirr
Gegenstände aus Holz, mit Holzgriffen, aus Horn, oder mit
geleimten Teilen.
Gegenstände aus Aluminium, Kupfer, Messing, Zinn.
Nicht hitzefestes Geschirr aus Kunststoff.
Antikes, oder handbemaltes Porzellan.
Antike Silberwaren. Nicht antike Silberwaren dagegen können im
Geschirrspüler gespült werden. Stellen Sie ein sanftes Programm
ein, und vermeiden Sie den Kontakt mit anderem Metall.
Es empfiehlt sich, spülmaschinenfestes Geschirr zu verwenden.
* Nur an einigen Modellen.
** In unterschiedlicher Anzahl und Platzierung.
Neigung A Neigung B Neigung C

,-
18
Start und
Inbetriebnahme
Starten des Geschirrspülers
1. Öffnen Sie den Wasserhahn.
2. Öffnen Sie die Tür und drücken Sie die EIN/AUS-Taste: Sie
vernehmen ein kurzes Tonsignal, die EIN/AUS-Kontrollleuchte,
das Display und die Options-Kontrollleuchten schalten sich ein.
3. Dosieren Sie das Spülmittel (siehe unten).
4. Befüllen Sie die Geschirrkörbe (siehe Beschickung der
Körbe).
5. Wählen Sie das Spülprogramm je nach Geschirrart und
Verschmutzungsgrad aus (siehe Spülprogrammtabelle) Drücken
Sie hierzu die Taste P.
6. Wählen Sie die Spüloptionen (siehe nebenstehende Spalte).
7. Starten Sie das Programm, indem Sie die Tür schließen: der
Programmstart wird durch Auftönen eines langen akustischen
Signals angezeigt.
8. Zwei kurze und ein langes Tonsignal zeigen an, dass das
Programm abgelaufen ist. Die auf dem Display angezeigte
Programmnummer schaltet auf Blinklicht. Öffnen Sie die
Gerätetür, schalten Sie das Gerät über die EIN/AUS-Taste aus,
schließen Sie den Wasserhahn und ziehen Sie den Netzstecker
aus der Steckdose.
9. Warten Sie einige Minuten, bevor Sie das Geschirr
herausnehmen. Sie könnten sich daran verbrennen. Räumen Sie
die Geschirrspülerkörbe aus, beginnen Sie dabei mit dem
Unterkorb.
- Zur Senkung des Stromverbrauchs bei
Stillstand des Geräts schaltet sich das Gerät
unter gewissen Bedingungen automatisch aus.
AUTOMATIK-PROGRAMME*: Dieses Geschirrspülgerät
ist mit einem Spezialfühler ausgestattet, der in der Lage ist, den
Verschmutzungsgrad zu erfassen, diesen auszuwerten und
demnach das effektiv und wirtschaftlich geeignetste
Spülprogramm einzustellen.
Die Dauer der Automatikprogramme kann aufgrund der
Einwirkung des Sensors variieren.
Für nur leicht verschmutztes Geschirr, oder für Geschirr,
das vorher unter laufendem Wasser abgespült wurde, kann die
Spülmittelmenge erheblich reduziert werden.
Änderung eines laufenden Programms
Sollten Sie irrtümlich ein falsches Programm gewählt haben, kann
es noch geändert werden, vorausgesetzt es wurde gerade erst
in Gang gesetzt. Öffnen Sie die Gerätetür. (Seien Sie bitte
vorsichtig, es könnte heißer Dampf austreten.) Halten Sie die
EIN/AUS-Taste etwas länger gedrückt. Das Gerät schaltet sich
aus. (Sie vernehmen ein langes Tonsignal). Schalten Sie das
Gerät über die EIN/AUS-Taste wieder ein, und wählen Sie das
neue Spülprogramm und die eventuellen Spüloptionen. Starten
Sie das Spülprogramm durch Schließen der Gerätetür.
Hinzufügen von weiterem Geschirr
Öffnen Sie die Gerätetür vorsichtig, da heißer Dampf austreten
könnte, ohne den Geschirrspüler auszuschalten, und räumen
Sie das Geschirr ein. Schließen Sie die Gerätetür, das
Spülprogramm startet daraufhin erneut.
Unbeabsichtigtes Unterbrechen des
Spülprogramms
Wird während des Spülgangs die Gerätetür geöffnet, oder sollte
ein Stromausfall stattfinden, wird der Spülgang unterbrochen.
Wird die Gerätetür wieder geschlossen, oder kehrt der Strom
zurück, läuft das Programm an der Stelle weiter, an der es
unterbrochen wurde.
Einfüllen des Spülmittels
Ein gutes Spülergebnis hängt auch von einer korrekten
Spülmitteldosierung ab. Eine zu hohe Dosierung ist nicht
gleichzusetzen mit einem besseren Spülergebnis, man belastet
dadurch nur die Umwelt.
Verwenden Sie bitte ausschließlich Spülmittel
für Geschirrspüler.
VERWENDEN SIE BITTE KEIN
HANDSPÜLMITTEL.
Bei übermäßiger Spülmittelverwendung können
Schaumreste am Ende des Spülgangs
zurückbleiben.
Zum Einsatz von Tabs wird nur dann geraten,
wenn das Modell die Zusatzfunktion
MULTIFUNKTIONSTABS vorsieht.
Die besten Spül- und Trockenergebnisse
erhalten Sie nur durch Einsatz von Spülmitteln in
Pulverform, flüssigen Klarspülern und Salz.
Kammer A: Spülmittel für den Hauptspülgang
Kammer B: Spülmittel für den Vorspülgang
1. Öffnen Sie den Deckel C und drücken
Sie die Taste D.
2. Hinsichtlich der Dosierung verweisen
wir auf die Programmtabelle:
Spülpulver: Kammern A und B.
Spültabs: Erfordert das Spülprogramm
1 Tab, geben Sie diesen in Kammer A
und schließen den Deckel. Erfordert es 2
Tabs, geben Sie den zweiten Tab auf
den Geräteboden.
3. Entfernen Sie eventuelle Spülmittelrückstände von den Kanten
der Kammern und schließen Sie den Deckel so, dass er einrastet.
Spüloptionen
Ist eine Option mit dem eingestellten Programm nicht kompatibel
(siehe Spülprogrammtabelle) leuchtet die entsprechende LED 3
Mal rasch auf und Sie vernehmen 2 kurze akustische Signale.
Startzeitvorwahl
Der Start des Spülprogramms kann um 3, 6 oder 9 Stunden
verschoben werden.
1. Drücken Sie die Taste STARTZEITVORWAHL: Jeder Tastendruck
bewirkt ein akustisches Signal, die gewählte Zeit wird angezeigt.
2. Wählen Sie ein Spülprogramm aus und schließen Sie die
Gerätetür: Nach einem kurzen Signalton setzt sich der Countdown in
Gang.
3. Ist die Zeit abgelaufen, erlischt die Anzeigeleuchte und das
Spülprogramm startet.
Zur Änderung der Startzeit und zur Wahl eines früheren Starts
drücken Sie die Taste STARTZEITVORWAHL. Zum Löschen drücken
Sie die Taste so oft, bis sich die der gewünschten Startverzögerung
entsprechende Kontrollleuchte ausschaltet. Das Programm startet
beim Schließen der Tür.
* Nur an einigen Modellen

,-
19
Spülprogramme
Zur Vereinfachung der Spülmitteldosierung berücksichtigen Sie bitte Folgendes:
1 Esslöffel = ca. 15 gr Spülpulver = ca. 15 ml Flüssigspülmittel - 1 Teelöffel = ca. 5 gr Spülpulver = ca. 5 ml Flüssigspülmittel
Hinsichtlich der SPÜLOPTIONEN verweisen wir auf die Tabelle Spüloptionen, befindlich im Abschnitt Start und Inbetriebnahme
Die Anzahl und die Art der Spülprogramme und -optionen ist abhängig vom jeweiligen Geschirrspülermodell.
Spülmittel
(A) = Dosierkammer A
(B) = Dosierkammer B
Hinweise zur Programmwahl Spülprogramm
Pulver flüssig Tabs
Programme
die einen
Trockengan
g vorsehen
Spülop-
tionen
Programmdau
er (Toleranz
±10%)
Std. Min.
Stark verschmutztes Geschirr,
Töpfe und Pfannen (nicht
geeignet für empfindliches
Geschirr).
1. Automatikb.
Super Wash
35 g (A)
35 ml (A)
1 (A)
Ja
Startzeit-
vorwahl
2:25’
Normal verschmutztes Geschirr
und Töpfe. Normaler täglicher
Abwasch
2. Automatikb.
Normal
29 g (A)
6 g (B)
29 ml (A)
6 ml (B)
1 (A)
Ja
Startzeit-
vorwahl
1:50’
Tägl. Abwasch geringfügiger
Mengen (4 Maßgedecke + 1
Topf + 1 Pfanne)
3. Tägliche
Anwendung
25 g (A)
25 ml (A)
1 (A)
Nein
Startzeit-
vorwahl
1:00’
Abspülen des Geschirrs, das
erst später, zusammen mit
weiterem Geschirr, gespült
werden soll.
4. Einweichen
Nein
Nein
Nein
Nein
Startzeit-
vorwahl
0:08’
Öko-Programm mit niedrigem
Energieverbrauch, geeignet für
Geschirr und Töpfe.
5. Eco
*
29 g (A)
6 g (B)
29 ml (A)
6 ml (B)
1 (A)
Ja
Startzeit-
vorwahl
2:55’
Kurzes Sparprogramm für nur
leicht verschmutztes, sofort
nach dem Gebrauch gespültes
Geschirr (2 Teller + 2 Gläser +
4 Bestecke + 1 Topf + 1 kleine
Pfanne) 6. Kurz
25 g (A)
25 ml (A)
Nein
Nein
Startzeit-
vorwahl
0:35’
Kurzes Sparprogramm für
temperaturempfindliches, sofort
nach dem Gebrauch zu
reinigendes Geschirr.
(Kelchgläser Oberkorb +
empfindliche Teller, Unterkorb).
7. Kristallgläser
35 g (A)
35 ml (A)
1 (A)
Ja
Startzeit-
vorwahl
1:30’
Unterschiedliches Programm
für die beiden Körbe: schonend
für Kristallgläser und Gläser im
oberen Korb; intensiv für Töpfe
und Pfannen im unteren Korb.
8. Automatikb.
Duo Wash
35 gr (A)
35 ml A)
1 (A)
Ja
Startzeit-
vorwahl
1:45’
Anmerkung:
Die optimale Leistung der Programme "Täglicher Abwasch" und "Kurz" ist dann gewährleistet, wenn die Anzahl der angegebenen
Maßgedecke eingehalten wird.
* Das Sparprogramm Eco (Öko), das den Anforderungen der Norm EN 50242 entspricht, hat eine längere Dauer im Vergleich zu den
übrigen Programmen. Trotzdem handelt es sich um das Programm mit dem niedrigsten Energieverbrauch, das die Umwelt nicht belastet.
Hinweis für die Prüflabors: Detaillierte Informationen hinsichtlich der Bedingungen des EN-Vergleichstests sind an nachfolgender
Adresse anzufordern: [email protected]

,-
20
Klarspüler und
Regeneriersalz
Verwenden Sie bitte nur Spezialspülmittel für
Geschirrspüler.
Verwenden Sie bitte kein Koch- oder
Industriesalz, und auch keine Handspülmittel.
Bitte befolgen Sie die auf der Verpackung
befindlichen Anweisungen.
Sollten Sie ein Multifunktionsprodukt verwenden, ist ein
Hinzufügen von weiterem Klarspüler nicht erforderlich. Der
Zusatz von Regeneriersalz ist jedoch ratsam, besonders
bei hartem oder sehr hartem Wasser. Bitte befolgen Sie die
auf der jeweiligen Verpackung befindlichen Anweisungen.
Da weder Salz noch Klarspüler eingefüllt wird, ist
es ganz normal, dass die SALZNACHFÜLLANZEIGE*
und die KLARSPÜLERNACHFÜllANZEIGE* bleiben
eingeschaltet.
Einfüllen des Klarspülers
Der Klarspüler fördert das Trocknen des Geschirrs, da das
Wasser von der Geschirroberfläche abläuft; es verbleiben
weder Streifen noch Flecken.
Der Klarspülerbehälter muss aufgefüllt werden:
wenn auf der Bedienblende die
KLARSPÜLERNACHFÜLLANZEIGE
* aufleuchtet;
1. Behälter durch Drehen des
Stöpsels (G) gegen den
Uhrzeigersinn öffnen.
2. Klarspüler einfüllen, er darf
nicht überlaufen. Andernfalls
sofort mit einem trockenen Tuch
abwischen.
3. Stöpsel wieder aufschrauben.
Füllen Sie den Klarspüler NIEMALS direkt ins
Innere des Geschirrspülers.
Klarspülerdosierung
Sollte das Trockenergebnis unzufrieden stellend sein, kann
die Klarspülerdosierung neu eingestellt werden. Drehen Sie
den Regler (F) mit Hilfe eines Schraubenziehers auf eine der 6
Einstellungen (werkseitig eingestellt auf 4):
wenn das Geschirr Streifen aufweist, drehen Sie den Regler
auf eine niedrige Einstellung (1-3).
Befinden sich Wassertropfen oder Kalkflecken darauf,
drehen Sie den Regler auf höhere Einstellungen (4-6).
Einstellen der Wasserhärte
Jeder Geschirrspüler ist mit einem Wasserenthärter
ausgestattet, der durch Verwendung von speziell für
Geschirrspüler vorgesehenem Regeneriersalz den
Geschirrspüler mit kalkfreiem Wasser versorgt.
Dieser Geschirrspüler kann so eingestellt werden, dass die
Umweltbelastung reduziert und die Spülleistungen
entsprechend der Wasserhärte optimiert werden. Angaben
zur Wasserhärte erhalten Sie bei Ihrem Wasserwerk.
- Öffnen Sie die Gerätetür und schalten Sie das Gerät über die
EIN/AUS-Taste ein.
- Drücken Sie für ca. 5 Sekunden die Taste P. Sie vernehmen
zwei kurze Signaltöne. Die dem eingestellten
Wasserhärtegrad entsprechende Kontrollleuchte schaltet auf
G
F
langsames Blinklicht. (Der Entkalker ist auf den Wert 3
eingestellt).
Drücken Sie die Taste P mehrmals hintereinander, bis auf den
Härtegrad, den Sie einstellen möchten (1-2-3-4-5
* Siehe
Tabelle Wasserhärte).
- Zum Verlassen der Funktion warten Sie bitte einige
Sekunden, oder drücken Sie eine Taste der Optionen
*, oder
schalten Sie das Gerät über die EIN/AUS-Taste aus.
Wenn Multifunktionstabs verwendet werden, ist trotzdem der
Salzbehälter zu füllen.
(°dH = Grad deutsche Härte - °fH = Grad französische Härte
- mmol/l = Millimol/Liter)
Einfüllen des Regeneriersalzes
Um ein optimales Spülergebnis zu gewährleisten, sollte der
Salzbehälter niemals leer sein. Durch das Regeneriersalz wird
das Wasser entkalkt; demnach setzt sich kein Kalk auf Ihrem
Geschirr ab.
Der Salzbehälter befindet sich im Geschirrspülerboden (siehe
Beschreibung) und muss aufgefüllt werden:
Wenn der grüne Schwimmer* durch den Salzstöpsel
hindurch nicht sichtbar ist;
wenn auf der Bedienblende die
SALZNACHFÜLLANZEIGE
* aufleuchtet.
1. Ziehen Sie den Unterkorb heraus und
schrauben Sie den Salzbehälterdeckel gegen
den Uhrzeigersinn ab.
2. Nur für die erstmalige Inbetriebnahme:
Füllen Sie den Behälter bis zum Rand mit
Wasser.
3. Setzen Sie den mitgelieferten Trichter* auf (siehe Abbildung)
und füllen Sie den Behälter bis zum Rand mit Salz (ca. 1 kg);
es ist ganz normal, wenn etwas Wasser austritt.
4. Nehmen Sie den Trichter
* heraus und entfernen Sie die
Salzreste vom Öffnungsrand; Spülen Sie den Deckel unter
fließendem Wasser ab, bevor Sie ihn wieder aufschrauben.
Halten Sie ihn hierzu kopfüber unter den Wasserstrahl und
lassen Sie das Wasser aus den vier Schlitzen im unteren
Bereich des Deckels abfließen. (Salzdeckel mit grünem
Schwimmer
*)
Es wird empfohlen, diesen Vorgang bei jedem Nachfüllen
von Salz zu wiederholen.
Schrauben Sie den Deckel fest auf, damit während des
Spülgangs keine Spüllauge eintreten kann. (Diese könnte den
Enthärter dauerhaft beschädigen).
Sollte das Nachfüllen von Salz erforderlich sein, sollte dies
sofort vor der Durchführung eines Spülgangs erfolgen, damit
die übergelaufene Salzlösung sofort entfernt wird.
* Nur an einigen Modellen
Tabelle zur Wasserhärte
°dH °fH mmol/l Stufe
0 6 0 10 0 1 1
6 11 11 20 1,1 2 2
12 17 21 30 2,1 3 3
17 34 31 60 3,1 6 4
34 50 61 90 6,1 9
5
*
Von 0°f bis 10°f wird empfohlen, kein Salz zu
verwenden.
* Bei dieser Einstellung kann sich die Dauer
der Spülgänge geringfügig verlängern.
Seite laden ...
Seite laden ...
Seite laden ...
Seite laden ...
Seite laden ...
Seite laden ...
Seite laden ...
Seite laden ...
Seite laden ...
Seite laden ...
Seite laden ...
Seite laden ...
Seite laden ...
Seite laden ...
Seite laden ...
Seite laden ...
Seite laden ...
Seite laden ...
Seite laden ...
Seite laden ...
Seite laden ...
Seite laden ...
Seite laden ...
Seite laden ...
Seite laden ...
Seite laden ...
Seite laden ...
Seite laden ...
Seite laden ...
Seite laden ...
Seite laden ...
Seite laden ...
Seite laden ...
Seite laden ...
Seite laden ...
Seite laden ...
Seite laden ...
Seite laden ...
Seite laden ...
Seite laden ...
-
 1
1
-
 2
2
-
 3
3
-
 4
4
-
 5
5
-
 6
6
-
 7
7
-
 8
8
-
 9
9
-
 10
10
-
 11
11
-
 12
12
-
 13
13
-
 14
14
-
 15
15
-
 16
16
-
 17
17
-
 18
18
-
 19
19
-
 20
20
-
 21
21
-
 22
22
-
 23
23
-
 24
24
-
 25
25
-
 26
26
-
 27
27
-
 28
28
-
 29
29
-
 30
30
-
 31
31
-
 32
32
-
 33
33
-
 34
34
-
 35
35
-
 36
36
-
 37
37
-
 38
38
-
 39
39
-
 40
40
-
 41
41
-
 42
42
-
 43
43
-
 44
44
-
 45
45
-
 46
46
-
 47
47
-
 48
48
-
 49
49
-
 50
50
-
 51
51
-
 52
52
-
 53
53
-
 54
54
-
 55
55
-
 56
56
-
 57
57
-
 58
58
-
 59
59
-
 60
60


Whirlpool LFTA+ 2294 A.R Benutzerhandbuch
- Kategorie
- Geschirrspüler
- Typ
- Benutzerhandbuch