Seite wird geladen ...

Gebrauchsanweisung
LINHOF TECHNO ROLLEX 6x12 cm - Bestell-
Nr. 001560 (für Film-typ 120)
Mit der Linhof Techno Rollex haben Sie eine
Präzisions-Roolfilm-Kasette für alle Kameras mit
internationalem Rückteil 9x12 cm /4x5 in. erworben, die
nach den gleichen strengen Qualitätsmaßstäben wie
die bewährten Linhof Fachkameras gefertigt ist. Wir
beglückwünschen Sie zu dieser Wahl und sind sicher,
daß Ihnen die Techno Rollex viele Jahr ausgezeichnete
Dienste leisten wird.
Die Techno Rollex ist eine solide, hochpräzise
Ganzmetallkonstruktion, wie alle Linhof Rollex
Kassetten, praxisgerecht ausgelegt auf lange
Lebensdauer und einwandfreie Funktion auch im
härtesten Profi-Einsatz. Der für alle wichtigen Bauteile
verwendete korrosionssichere Aluminium-Druckguß ist
absolut verwindungssteif und erlaubt daher eine
äußerst genaue Bearbeitung mit den gleichen engen
Toleranzen wie in der Linhof-Kamerafertigung.
Überdimensionierte Filmtransportrollen, genauestens
abgestimmt auf den Filmkanal, diamantgefräste
Filmführung und hartverchromte Gleittrollen garantieren
eine unübertroffene Filmplanlage mit allen Filmsorten
auch bei extremen Aufnahmebedingungen. Exakt
errechnete Präzisions-Metall-Labyrinthe verhindern
zuverlässig und dauerhaft jeden Lichteinfall und
machen zusätzliche Abdichtungen, die nach gewisser
Zeit altern könnten, überflüssig. Der griffgünstige
Schnellschalthebel mit Kugellager-Freilaufsystem sorgt
für zügigen, doch stets schonenden und ruckfreien
Filmdurchlauf.
Vor erstmaligen Gebrauch der Techno Rollex nehmen
Sie sich bitte ein paar Minuten Zeit, die folgende
kurzgefaßte Beschreibung durchzulesen, deren
Nummern sich auf die entsprechende Abbildungen
beziehen.
Mode d’emploi
LINHOF TECHNO ROLLEX 6x12 cm/2½ x5 ”
(réf. 001560) pour film 120/220
Le dos Linhof Techno Rollex que vous venez d’acquérir,
convient à toutes les chambres photographiques
possédant le dos international 9x12 cm /4x5”. Il est
dans la même lignée de qualité par laquelle Linhof a
fait ses preuves. Nous vous félicitons pour votre sage
décision d’achat et espérons que vous obtiendrez de
nombreuses années de satisfaction avec votre Techno
Rollex.
Comparable aux autres dos Linhof de la gamme Rollex,
le Techno Rollex est d’une extrême robustesse, de
construction de précision tout-métal, conçu pour une
utilisation extrême et intense dans la durée. La fonte
d’aluminium avec traitement de surface anti-corrosion
utilisée pour la majeure partie des éléments est d’une
extrême rigidité et usinée avec la même précision que
les chambres Linhof. Les rouleaux surdimensionnés
d’avance du film, l’appairage des tunnels, la
rectification à la meule diamantée des guides et le
chromage des rouleaux assurent une avance régulière
et un maintien parfaitement plan de tous types de film,
même sous conditions d’utilisations sévères. La
conception particulière des chicanes exclue toute
entrée indésirable de lumière sans l’aide de joint
d’étanchéité dont la durée de vie serait limitée. Le
levier d’armement décuplé et le système de roue-libre
sur roulement à billes facilitent une avance rapide mais
sûre du film.
Avant de charger votre Techno Rollex, veuillez prendre
le temps de lire cette brève description du mode
opératoire. Les chiffres entre parenthèses vous
renvoient aux vues descriptives.
Operating Instructions
LINHOF TECHNO ROLLEX 6x12 cm/2½ x5 in.
for 120/220 roll film (Oder No. 001560)
The Linhof Techno Rollex you have acquired is a roll
film magazine intendend for all cameras with the
internationally standardized 9x12 cm/4x5 inch back. It
conforms to the same exacting quality standards for
wich Linhof cameras are famous. We congratulate you
on account of your wise decision and hope that you will
obtain many years of satisfaction from your Techno
Rollex.
Similar to the other Linhof magazines in the Rollex
range, the Techno Rollex is an extremely robust, all-
metal construction of high precision designed for
heavy-duty operation and long service life. The
corrosion-resistant aluminium castings used for all
major parts are extremely rigid and machined to the
same fine tolerances observed in the manufacture of
Linhof cameras. Oversized film transport rollers,
perfectly-matched film channel, diamond-milled film
guides and chromium-plated guide rollers ensure that
all types of roll film are advanced smoothly and kept
absolutely flat even under extreme conditions. Cleverly-
designed labyrinth light traps permanently exclude
unwanted light without the use of additional sealing
material which might age in the course of time. The
easily-grasped film advance lever and free-wheel ball-
bearing system facilitate rapid yet careful advance of
the film.
Before loading the Techno Rollex, please take a few
minutes of your time to read the following brief
description of the necessary operations. The numbers
in brackets will be found again in the appropriate
diagram.
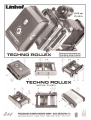
Einlegen von Rollfilmen Typ 120
Den Rundbügel des Verriegelungsschlüssels (2)
anheben und in die Position „off” drehen.
Gehäusedeckel (1) und Filmeinsatz (7) nacheindander
von der Bodenplatte (12) anheben. Die leere
Aufwickelspule (14) muß sich auf der Achse des
Transporthebels (4) befinden.
Achsbollzen (11) nach außen drücken und die volle
Filmspule nach Entfernen des Klebestreifens mit
leichtem Drehen so einsetzen, daß der
Mitnehmerschlitz der Spule in den Mitnehmer (10) am
Spulen-Einsatz einfällt und auch der Achsbolzen (11)
wieder vollständig eingedrückt werden kann. Die volle
Filmspule muß so eingelegt werden, daß beim
Abwickeln über die große Transportrolle die schwarze
Innenseite des Schutzpapiers außen bzw. oben liegt.
Jetz kann der Papiervorspann über diese Transportrolle
und über den Boden des Filmeinsatzes gezogen und
die Papierzunge in den breiteren Schlitz der Leerspule
(14) eingeschoben werden. Durch behutsame
Betätigung des Aufzugshebels (4) wird der Film nach
erfolgter Einfädelung leicht gespannt (nicht zu weit
aufwickein – höchstens eine Umdrehung der
Leerspule), die mittige Aufwicklung kontrolliert und
durch langsame Bewegung des Aufzugshebels
Loading roll film type 120
Raise the semi-circular catch (2) and turn it to the
positions “Off ”. Remove the back cover (1) and then
the film insert (7) from the base plate (12). The empty
take-up spool (14) must be inserted on the axle of the
advance lever (4).
Next, push out the spigot (11) so that the roll of
unexposed film – having, of course, removed the
adhesive band – can be inserted in the film chamber in
such a manner that the slot in the spool engages in the
dog (10) and the spigot (11) can be pushed in again.
Observe that the spool has been loaded in such a way
that, when the leader is fed over the large advance
roller, the black side of the paper is uppermost.
The leader can now be bent around the latter transport
roller, across the film gate at the base of the film insert
and tucked into the broad slit of the take-up spool (14).
Through gentle operating of the advance lever (4), the
leader may now be tightened (do not advance further
than one revolution of the take-up spool); check that
the leader has been correctly threaded and is running
square in the spool. Now continue to transport the film
by gently operating the advance lever until such time as
the doubble-arrow printing on the backing paper
appears in the window (13); this symbol must be
Chargement du film 120
Soulever la clef semi-circulaire (2) et la tourner sur la
position « Off » (ouvert). Retirer ensuite le capot (1),
puis la cartouche (7) de son châssis (12). La bobine
réceptrice (14) doit être introduite sur l’axe du levier
d’armement (4).
Ensuite, pousser vers l’extérieur l’ergot (11) de sorte
que la bobine du film vierge – après avoir, bien sûr, ôté
la languette autocollante – puisse être insérée dans la
dent d’entraînement (10) pour que l’ergot (11) puisse
retrouver sa place d’origine. Veiller à ce que le papier
noir de protection du film soit tourné vers l’extérieur
une fois la bobine chargée et passée sur le gros
rouleau du compteur.
L’amorce peut maintenant être amenée sur le second
rouleau et glissée dans la fente de la bobine
réceptrice (14). Le film doit à présent être délicatement
embobiné à l’aide du levier d’armement (14) sans
toutefois aller au-delà d’un tour complet ; vérifiez que
l’amorce soit correctement enroulée sur l’axe et file
droit sur la bobine réceptrice. Reprendre l’action
jusqu’à apparition du repère à double flèches du papier
de protection du film dans la fenêtre (13) ; ce dernier
doit coïncider avec le triangle blanc dénommé « 120 »,
gravé à l’intérieur de la cartouche (7).

weitertransportiert, bis im Bildfenster (13) die
Dreiecksoder Doppelpfeilmarkierung auf dem
Schutzpapier sichtbar wird, die mit dem Index „120” am
Einsatz zur Deckung gebracht werden muß.
Filmeinsatz (7) und Gehäusedeckel (1) werden jetzt
wieder über die Bodenplatte (12) gesetzt und die
Kasette durch Drehen des Verschlußbügels (2)
verriegelt. Zur Kennzeichnung der verwendeten
Filmsorte kann die Kopflasche der Filmpackung hinter
die Haltefeder (15) geklemmt werden. Vor weiterer
Betätigung des Transporthebels Zählscheibe (6) im
Uhrzeigersinn (hierzu muß eventuell der
Entriegelunsknopf (5) gedrückt werden) möglichst
genau auf die indexmarke (6a) für Rollfilm 120
einstellen. Jetzt den Film durch mehrmalige
Hebelschwünge transportieren, bis in Ausgansposition
„Bild Nr. 1” die Zählscheibe automatisch einrastet und
den weiteren Filmtransport stoppt. Nach jeder
Belichtung ist vor dem Filmtransport der
Entriegelungsknopf (5) der automatisck einfallenden
Transportsperre zu drücken. Der Transporthebel kann
Belieben auch mit mehreren kleinen Bewegungen bis
zur nächsten Bildrastung betätigt werden. Nach der 6.
Aufnahme (Zählscheibe (6) kontrollieren !) den Film
über Bild 12 durchtransportieren, bis sich durch Lösen
des Papier-Nachspannes von der Abwickel-Spule der
Transportwiderstand deutlich verringert. Das Zählwerk
verriegelt ab Bild 12 nicht mahr, der Film ist voll
aufgewickelt. Kassette öffnen, Film entnehmen,
Leerspule umsetzen.
Verwendung von Rollfilm 220
Der Einsatz des Rollfilmes 220 ermöglicht 12
Aufnahmen 6x12 cm. Hierzu muß die Bodenplatte (12)
für Filmtyp 120 gegen eine speziell abgestimmte
Bodenplatte 220 (001562) ausgetauscht werden. Beim
Filmeinlegen wird die Markierung des
Papiervorspanns nicht im Bildfenster (13) eingestellt,
sonden die Dreiecks- oder Doppelpfeilmarke auf dem
Papiervorspann dem Index 220 (8) gegenübergestellt.
Nach Schließen der Kassette die Markierung „220 ” der
Zählscheibe (6) auf die Indexmarke (6a) einstellen und
weiter wie beim Rollfilm 120 verfahren.
Einsatz an Kameras mit internationalen
Rückteill 9 x12 cm / 4x5 in.
Techno Rollex nach Aushängen des
Mattscheibenrahmens am 9x12 Rückteil mit Hilfe der
beidseitigen Befestigungsschieber (wie die anderen
Linhof Rollex-Kassetten) verriegeln. Kassettenschieber
(9) herausziehen ; er kann zur ständigen Bereitschaft
hinter die Haltefeder (15) geklemmt werden. Nach jeder
Belichtung Entriegelungsknopf (5) betätigen und Film
mit Schnellschalthebel transpotieren, bis Zählscheibe
(6) einrastet. Am Anfang des Films ist mehr Hebelweg
erforderlich als gegen Ende des Filmes. Nach der 6.
Aufnahme (bei Rollfilm 120) bzw. nach der 12.
Aufnahme (bei Rollfilm 220) Film vollständig
durchtranspotieren wie beschrieben. Nach der 12.
Aufnahme erfolgt keine Einrastung mehr, wodurch sich
automatisch das Filmende bei Rollfilm 220 anzeigt.
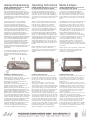
Formatmaske 6 x12
Um bei Aufnahmen über Mattscheibeneinstellung den
6x12-Ausschnitt genau definieren zu können, liegt jeder
Techno Rollex eine Formatmaske bei. Diese wird,
ähnlich wie die 6x9-Maske der Super Rollex, zwischen
Mattscheibe und dem aufgebördelten Halteblech
eingeklemmt. Durch diese Formatmaske ist neben dem
genauen Bildfenster auch der angrenzende Bereich
stets kontrollierbar. Spezielle 6x12 Suchermasken sind
für derzeitige optische Linhof Sucher 9x12 erhältlich.
Auch 6x12 Negativmasken für Linhof Vergrößerer
können auf Anfrage geliefert werden.
brought into coincidence with the index mark “120”
engraved on the film insert (7).
You are now ready to replace the film insert (7) on the
base plate (12), likewise the corner (1) which is then
locked by turning the catch (2). To remind you what
kind of film you are shooting, the end of the film box
can be tucked behind the clip (15). Before winding any
further, the mark “120” on the conter (6) must be turned
in a clockwise direction (press release button (5) if
necessary) until it is positioned – as accurately as
possible – opposite the index mark (6a) for 120 roll film.
Operate the advance lever several times until it
automatically locks; you will notice now that frame
“No. 1” is indicated on the dial. After every exposure
and before winding on, it is necessary to press the
release button (5) which had automatically come into
effect after the correct length of film had been
advanced. It is possible to wind on, namely, either by
means of several short jabs or a lesser number of full
swings. After the sixth exposure (remember to look at
the counter!), the film is wound on all the way to frame
12 until you feel – through the decreased resistance on
the advance lever – that the film backing paper has left
the feel spool. The counter lock no longer engages
after frame 12, a further sign that the film is fully wound
up. The magazine may now be opened the film
removed and the empty spool slipped into the take-up
chamber.
Loading roll film type 220
The use of 220-type film provides 12 exposures
6x12 cm. For this purpose, the base plate (12) intended
only for 120 film has to be exchanged for a specially
dimensioned plate (Order No 001562). When loading
this film, the double-arrow printing on the backing paper
is not aligned with the window (13) but set opposite the
index “220” (8). After the back has been closed, the
“220” symbol on the counter dial (6) should be made to
coincide with the index mark (6a). The rest of the
procedure is as for 120 film.
Use with cameras equiped with 4 x5 in.
international back
Once the groundglass screen has been removed, the
Techno Rollex can be secured to the back of these
cameras with the aid of the sliding catches on both
sides (identical to other Linhof Rollex film holders).
Withdraw the dark slide (9). It can be kept handy and
safe in the clip (15). Press the release button (5) and
operate the advance lever after every exposure until
the counter engages. You will observe that the lever
has to be swung a greater number of times at the
beginning of a film than towards the end. After the sixth
exposure (120), resp., the twelfth (220), wind on the
film fully as described above.
Format mask 6x12 cm/2½ x5 in.
To assist you in determined how much of the scene is
taken in when viewing via a groundglass screen, we
supply a special format mask with every Techno Rollex.
Similar to the 6x9 cm mask for the Super Rollex, this
framing aid is clamped to the groundglass of the
camera and indicates the exact picture section as well
the surrounding field. Afternatively, when viewing via
the Linhof Universal Finder, there is also a special
adapter mask for the latter. Finally, we are in a position
to supply 6x12cm negative masks for all Linhof
enlargers.
Vous pouvez à présent remettre la cartouche (7) sur
son châssis (12) puis le capot (1) et le vérouiller à
l’aide de la clé semi-circulaire (2). Afin de mémoriser le
film utilisé, vous pouvez insérer le couvercle de
l’emballage du film dans la pince (15). Avant d’avancer
le film, le compte-vues (6) doit être tourné dans le sens
des aiguilles d’une montre – s’il est bloqué,
appuyer/relacher le bouton de dévérouillage (5) – afin
de faire coïncider – autant que possible – son repère
blanc « Film 120 » avec le repère triangulaire
blanc (6a) du capot. Actionner plusieurs fois le levier
d’armement (4) jusqu’à son blocage automatique ; le
compte-vues (6) est maintenant positionné sur le
repère « 1 ». Après chaque exposition et avant
d’avancer le film, appuyer/relacher le bouton
déverouilleur (5) qui se revérouillera automatiquement
dès la bonne longueur de film déroulée. L’armement
peut aussi bien s’effectuer par une grande amplitude
que par plusieurs petites actions du levier d’armement.
Après la sixième vue exposée (ne pas oublier de
regarder le compteur !), le film doit continuer d’être
enroulé vers la vue 12, jusqu’à sentir – par une moindre
résistance sur le levier d’armement – le décrochage de
la bobine éméttrice. Le compteur ne bloque plus passé
la vue 12, autre signe marquant la fin du film. Le capot
peut maintenant être ouvert, le film retiré et la bobine
vide transférée sur l’axe du levier d’armement pour
devenir, à son tour, bobine réceptrice.
Chargement du film 220
L’utilisation du film 220 fournit 12 vues 6x12 cm. À cet
effet, le châssis (12) ne convient qu'aux films 120 et
doit être changé contre un autre modèle spécifique,
redimensionné (réf. 001562). En chargeant ce film, le
repère à double flèches du papier de protection n’est
plus aligné sur l’index « 120 » de la fenêtre (13) mais
avec celui du « 220 » (8), à l’opposé. Une fois le capot
refermé, il convient de faire coïncidé le repère noir
« Film 220 » du compte-vues (6) avec le repère
triangulaire blanc (6a) du capot. La suite de la
procédure est conforme à celle décrite ci-dessus pour
le film 120.
Utilisation avec les chambres équipées d’un
dos 4 x5 ” international (Graflok
TM
)
Une fois le cadre porte-dépoli enlevé, le Techno Rollex
peut être fixé en toute sécurité au dos de la chambre à
l’aide des glissières latérales prévues à cet effet (de la
même façon que les autres dos Rollex de Linhof).
Retirer le volet occultant (9) ; lors de la prise de vue, ce
volet peut être mis en attente dans la pince (15).
Appuyer/relacher le bouton de déverouillage (5) après
chaque vues et avant d’avancer le film, autant de fois
que le compte-vues vous le permet. Il est à noter que
la course du levier d’armement est plus importante au
début du film que vers la fin. Après la sixième vue pour
les films 120 et, respectivement, douze pour les 220,
dévider totalement le film comme décrit ci-dessus.
Masque de cadrage 6 x12 cm/2½ x5 ”
Afin de faciliter le cadrage sur le dépoli, nous
fournissons un masque de cadrage avec tous les
Techno Rollex. Identique au masque 6x9 cm des
Super Rollex, cette aide au cadrage se fixe sur le
dépoli et définit exactement le champ photographié. De
même, pour l’utilisation du viseur multi-focale Linhof, il
existe un cache spécifique. Enfin, nous pouvons fournir
des masques négatifs 6x12 cm pour tous les
agrandisseurs Linhof.
Informations complémentaires
Le Techno Rollex (exemplaire n° 9115103) mesure
125 x 168 x 46 mm et pèse 995 g nu. L’image formée
sur le film mesure 56 x 120 mm et l’espacement entre
les vues est d’environ 8 mm.
Cette notice a fait l’objet d’une nouvelle mise en page
d’après les documents Linhof et la traduction française
(dont ce dernier paragraphe) a été ajoutée par un
utilisateur dans un but de partage d’information ; elle
n’a pas été validée par Linhof.
20150214
-
 1
1
-
 2
2
-
 3
3


Linhof TECHNO ROLLEX Benutzerhandbuch
- Typ
- Benutzerhandbuch
- Dieses Handbuch eignet sich auch für
in anderen Sprachen
- English: Linhof TECHNO ROLLEX User manual
- français: Linhof TECHNO ROLLEX Manuel utilisateur
