Toro 48cm Super Bagger Lawn Mower Benutzerhandbuch
- Kategorie
- Rasenmäher
- Typ
- Benutzerhandbuch

FormNo.3419-112RevA
48cmSuperBaggerLawn
Mower
20836
SuperBagger-Rasenmäher(48
cm)
20836
TondeuseSuperBaggerde48
cm
20836
SuperBaggergazonmaaier
van48cm
20836
www.T oro.com.
*3419-112*A

CV
FormNo.3419-101RevA
48cmSuperBaggerLawnMower
ModelNo.20836—SerialNo.401500000andUp
Operator'sManual
Introduction
Thisrotary-blade,walk-behindlawnmowerisintended
tobeusedbyresidentialhomeownersorprofessional,
hiredoperators.Itisdesignedprimarilyforcutting
grassonwell-maintainedlawnsonresidentialor
commercialproperties.Itisnotdesignedforcutting
brushorforagriculturaluses.
Readthisinformationcarefullytolearnhowtooperate
andmaintainyourproductproperlyandtoavoid
injuryandproductdamage.Youareresponsiblefor
operatingtheproductproperlyandsafely.
YoumaycontactTorodirectlyatwww.Toro.comfor
productandaccessoryinformation,helpndinga
dealer,ortoregisteryourproduct.
Wheneveryouneedservice,genuineToroparts,or
additionalinformation,contactanAuthorizedService
DealerorToroCustomerServiceandhavethemodel
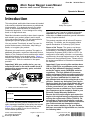
andserialnumbersofyourproductready.Figure1
identiesthelocationofthemodelandserialnumbers
ontheproduct.Writethenumbersinthespace
provided.
Important:Withyourmobiledevice,youcan
scantheQRcodeontheserialnumberdecal(if
equipped)toaccesswarranty,parts,andother
productinformation.
g226629
Figure1
1.Modelandserialnumberlocation
ModelNo.
SerialNo.
Thismanualidentiespotentialhazardsandhas
safetymessagesidentiedbythesafety-alertsymbol
(Figure2),whichsignalsahazardthatmaycause
seriousinjuryordeathifyoudonotfollowthe
recommendedprecautions.
g000502
Figure2
Safetyalertsymbol
Thismanualuses2wordstohighlightinformation.
Importantcallsattentiontospecialmechanical
informationandNoteemphasizesgeneralinformation
worthyofspecialattention.
ThisproductcomplieswithallrelevantEuropean
directives.Fordetails,seetheseparateproduct
specicDeclarationofConformity(DOC)sheet.
GrossorNetTorque:Thegrossornettorque
ofthisenginewaslaboratoryratedbytheengine
manufacturerinaccordancewiththeSocietyof
AutomotiveEngineers(SAE)J1940orJ2723.As
conguredtomeetsafety,emission,andoperating
requirements,theactualenginetorqueonthisclass
ofmowerwillbesignicantlylower.Pleasereferto
theenginemanufacturer’sinformationincludedwith
themachine.
Important:Ifyouareusingthismachineabove
1500m(5,000ft)foracontinuousperiod,ensure
thattheHighAltitudeKithasbeeninstalled
sothattheenginemeetsCARB/EPAemission
regulations.TheHighAltitudeKitincreases
engineperformancewhilepreventingspark-plug
fouling,hardstarting,andincreasedemissions.
Onceyouhaveinstalledthekit,attachthe
high-altitudelabelnexttotheserialdecalonthe
machine.ContactanyAuthorizedToroService
DealertoobtaintheproperHighAltitudeKitand
high-altitudelabelforyourmachine.Tolocate
adealerconvenienttoyou,accessourwebsite
atwww.Toro.comorcontactourToroCustomer
CareDepartmentatthenumber(s)listedinyour
EmissionControlWarrantyStatement.
Removethekitfromtheengineandrestorethe
enginetoitsoriginalfactorycongurationwhen
runningtheengineunder1500m(5,000ft).Do
notoperateanenginethathasbeenconverted
forhigh-altitudeuseatloweraltitudes;otherwise,
youcouldoverheatanddamagetheengine.
Ifyouareunsurewhetherornotyourmachine
hasbeenconvertedforhigh-altitudeuse,lookfor
thefollowinglabel:
©2017—TheToro®Company
8111LyndaleAvenueSouth
Bloomington,MN55420
Registeratwww.T oro.com.
OriginalInstructions(EN)
PrintedinMexico
AllRightsReserved
*3419-101*A

decal127-9363
Contents
Introduction...............................................................1
Safety.......................................................................2
GeneralSafety...................................................2
SafetyandInstructionalDecals..........................3
Setup........................................................................4
1UnfoldingtheHandle.......................................4
2InstallingtheRecoil-StarterRopeinthe
RopeGuide.....................................................4
3FillingtheEnginewithOil.................................5
4AssemblingtheGrassBag...............................5
ProductOverview.....................................................6
Specications....................................................6
Operation..................................................................7
BeforeOperation...................................................7
BeforeOperationSafety.....................................7
FillingtheFuelT ank............................................7
CheckingtheEngine-OilLevel............................7
AdjustingtheHandleHeight...............................8
AdjustingtheCuttingHeight...............................8
DuringOperation...................................................9
DuringOperationSafety.....................................9
StartingtheEngine.............................................9
UsingtheSelf-PropelDrive...............................10
ShuttingOfftheEngine.....................................10
RecyclingtheClippings....................................10
BaggingtheClippings.......................................10
Rear-DischargingtheClippings.........................11
OperatingTips..................................................11
AfterOperation....................................................12
AfterOperationSafety......................................12
CleaningundertheMachine.............................12
FoldingtheHandle...........................................13
Maintenance...........................................................14
RecommendedMaintenanceSchedule(s)...........14
MaintenanceSafety..........................................14
PreparingforMaintenance...............................14
ServicingtheAirFilter.......................................15
ChangingtheEngineOil...................................15
ServicingtheSparkPlug...................................16
ReplacingtheBlade..........................................17
Storage...................................................................18
PreparingtheMachineforStorage...................18
RemovingtheMachinefromStorage................18
Safety
Thismachinehasbeendesignedinaccordancewith
ENISO5395:2013.
GeneralSafety
Thisproductiscapableofamputatinghandsand
feetandofthrowingobjects.Alwaysfollowallsafety
instructionstoavoidseriouspersonalinjury.
Usingthisproductforpurposesotherthanitsintended
usecouldprovedangeroustoyouandbystanders.
•Read,understand,andfollowtheinstructions
andwarningsinthisOperator’sManualandon
themachineandattachmentsbeforestartingthe
engine.
•Donotputyourhandsorfeetnearmovingpartsof
orunderthemachine.Keepclearofanydischarge
opening.
•Donotoperatethemachinewithoutallguards
andothersafetyprotectivedevicesinplaceand
workingonthemachine.
•Keepbystandersandchildrenasafedistance
awayfromthemachine.Donotallowchildrento
operatethemachine.Allowonlypeoplewhoare
responsible,trained,familiarwiththeinstructions,
andphysicallycapabletooperatethemachine.
•Stopthemachineandshutofftheenginebefore
servicing,fueling,oruncloggingthemachine.
Improperlyusingormaintainingthismachinecan
resultininjury.Toreducethepotentialforinjury,
complywiththesesafetyinstructionsandalwayspay
attentiontothesafety-alertsymbol,whichmeans
Caution,Warning,orDanger—personalsafety
instruction.Failuretocomplywiththeseinstructions
mayresultinpersonalinjuryordeath.
Youcanndadditionalsafetyinformationwhere
neededthroughoutthismanual.
2

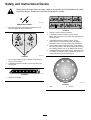
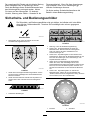
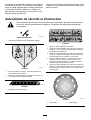
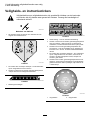
SafetyandInstructionalDecals
Safetydecalsandinstructionsareeasilyvisibletotheoperatorandarelocatednearanyarea
ofpotentialdanger.Replaceanydecalthatisdamagedormissing.
decaloemmarkt
Manufacturer'sMark
1.Thismarkindicatesthatthebladeisidentiedasapart
fromtheoriginalmachinemanufacturer.
decal112-8760
112-8760
1.Thrownobjecthazard—keepbystandersasafedistance
awayfromthemachine.
2.Cutting/dismembermentofhandorfoot—stayawayfrom
movingparts.
decal119-2283
119-2283
1.Height-of-cutsettings
decal131-4514b
131-4514
1.Warning—readtheOperator'sManual.
2.Cutting/dismembermenthazardofhand,mower
blade—stayawayfrommovingparts;keepallguardsand
shieldsinplace.
3.Cutting/dismembermenthazardofhand,mower
blade—disconnectthespark-plugwireandreadthe
instructionsbeforeservicingorperformingmaintenance.
4.Thrownobjecthazard—keepbystandersasafedistance
awayfromthemachine;shutofftheenginebeforeleaving
theoperatingposition;pickupanydebrisbeforemowing.
5.Cutting/dismembermenthazardofhand,mowerblade—do
notoperateupanddownslopes;operatesidetosideon
slopes;lookbehindyouwhenbackingup.
decal137-9196
137-9196
1.Lock2.Unlock
3

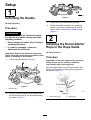
Setup
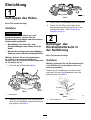
1
UnfoldingtheHandle
NoPartsRequired
Procedure
WARNING
Foldingorunfoldingthehandleimproperly
candamagethecables,causinganunsafe
operatingcondition.
•Donotdamagethecableswhenfoldingor
unfoldingthehandle.
•Ifacableisdamaged,contactan
AuthorizedServiceDealer.
Important:Removeanddiscardtheprotective
plasticsheetthatcoverstheengineandanyother
plasticorwrappingonthemachine.
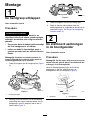
1.Loosenthehandleknobs(Figure4).
g020721
Figure4
1.Handleknobs
2.Carefullymovetheupperhandleforwarduntil
thehandlehalvesareinlineandnesttogether
asshowninFigure5.
g020722
Figure5
3.Tightenthehandleknobsrmlybyhand.
4.Rotatethehandlerearwardtotheoperating
position,andlockthehandleatyourdesired
height.RefertoAdjustingtheHandleHeight
(page8).
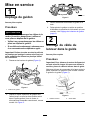
2
InstallingtheRecoil-Starter
RopeintheRopeGuide
NoPartsRequired
Procedure
Important:Tostarttheenginesafelyandeasily
wheneveryouusethemachine,installthe
recoil-starterropeintheropeguide.
Holdtheblade-controlbartotheupperhandleand
pulltherecoil-starterropethroughtheropeguideon
thehandle(Figure6).
g003251
Figure6
1.Recoil-starterrope2.Ropeguide
4

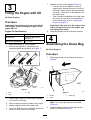
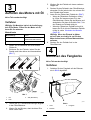
3
FillingtheEnginewithOil
NoPartsRequired
Procedure
Important:Yourmachinedoesnotcomewithoil
intheengine.Beforestartingtheengine,llthe
enginewithoil.
EngineOilSpecications
Engineoilcapacity
0.55L(18.6oz)
OilviscositySAE30orSAE10W-30
detergentoil
APIserviceclassicationSJorhigher
1.Movethemachinetoalevelsurface.
2.Removethedipstickbyrotatingthecap
counterclockwiseandpullingitout(Figure7).
g012127
Figure7
1.Full3.Add
2.High
3.Carefullypourabout3/4oftheenginecapacity
ofoilintotheoil-lltube.
4.Wait3minutesfortheoiltosettleintheengine.
5.Wipethedipstickcleanwithacleancloth.
6.Insertthedipstickintotheoil-lltube,butdonot
screwitin,thenremovethedipstick.
7.Readtheoillevelonthedipstick(Figure7).
•Iftheoillevelonthedipstickistoolow,
carefullypourasmallamountofoilintothe
oil-lltube,wait3minutes,andrepeatsteps
5through7untiltheoilonthedipstickisat
thecorrectlevel.
•Iftheoillevelonthedipstickistoohigh,drain
theexcessoiluntiltheoilonthedipstickis
atthecorrectlevel;refertoChangingthe
EngineOil(page15).
Important:Iftheoillevelintheengineistoo
lowortoohighandyouruntheengine,you
maydamagetheengine.
8.Installthedipstickintotheoil-lltubesecurely.
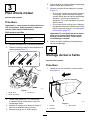
4
AssemblingtheGrassBag
NoPartsRequired
Procedure
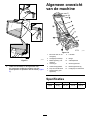
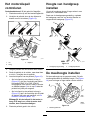
1.Slipthegrassbagovertheframeasshownin
Figure8.
g027257
Figure8
1.Handle
3.Grassbag
2.Frame
Note:Donotslipthebagoverthehandle
(Figure8).
2.Hookthebottomchannelofthebagontothe
bottomoftheframe(Figure9).
5

g027258
Figure9
3.Hookthetopandsidechannelsofthebagonto
thetopandsidesoftheframe,respectively
(Figure9).
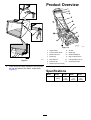
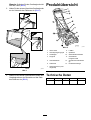
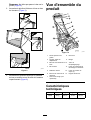
ProductOverview
g015114
Figure10
1.Upperhandle
8.Airlter
2.Traction-assisthandle
9.Sparkplug
3.Blade-controlbar
10.Oil-lltube/dipstick
4.Grassbag
11.Bag-on-demandlever
5.Reardeector12.Cutting-heightlever(2)
6.Fuel-tankcap13.Recoil-starthandle
7.Washoutport(notshown)
Specications
ModelWeightLengthWidthHeight
2083639kg
(86lb)
152cm
(60
inches)
53cm
(21
inches)
109cm
(43
inches)
6

Operation
Note:Determinetheleftandrightsidesofthe
machinefromthenormaloperatingposition.
BeforeOperation
BeforeOperationSafety
GeneralSafety
•Becomefamiliarwiththesafeoperationofthe
equipment,operatorcontrols,andsafetysigns.
•Checkthatallguardsandsafetydevices,suchas
deectorsand/orgrasscatcher,areinplaceand
workingproperly.
•Alwaysinspectthemachinetoensurethatthe
blades,bladebolts,andcuttingassemblyarenot
wornordamaged.
•Inspecttheareawhereyouwillusethemachine,
andremoveallobjectsthatcouldinterferewith
theoperationofthemachineorthatthemachine
couldthrow.
•Adjustingthecuttingheightmaybringyouinto
contactwiththemovingblade,causingserious
injury.
–Shutofftheengine,removetheignitionkey
(electric-startmodelonly),andwaitforall
movingpartstostop.
–Donotputyourngersunderthehousing
whenadjustingthecuttingheight.
FuelSafety
•Fuelisextremelyammableandhighlyexplosive.
Areorexplosionfromfuelcanburnyouand
othersandcandamageproperty.
–Topreventastaticchargefromignitingthefuel,
placethecontainerand/ormachinedirectlyon
thegroundbeforelling,notinavehicleoron
anobject.
–Fillthefueltankoutdoors,inanopenarea,
whentheengineiscold.Wipeupanyfuelthat
spills.
–Donothandlefuelwhensmokingoraroundan
openameorsparks.
–Donotremovethefuelcaporaddfueltothe
tankwhiletheengineisrunningorhot.
–Ifyouspillfuel,donotattempttostartthe
engine.Avoidcreatingasourceofignitionuntil
thefuelvaporshavedissipated.
–Storefuelinanapprovedcontainerandkeep
itoutofthereachofchildren.
•Fuelisharmfulorfatalifswallowed.Long-term
exposuretovaporscancauseseriousinjuryand
illness.
–Avoidprolongedbreathingofvapors.
–Keepyourhandsandfaceawayfromthe
nozzleandthefuel-tankopening.
–Keepfuelawayfromyoureyesandskin.
FillingtheFuelTank
•Forbestresults,useonlyclean,fresh,unleaded
gasolinewithanoctaneratingof87orhigher
((R+M)/2ratingmethod).
•Oxygenatedfuelwithupto10%ethanolor15%
MTBEbyvolumeisacceptable.
•Donotuseethanolblendsofgasoline,such
asE15orE85,withmorethan10%ethanolby
volume.Performanceproblemsand/orengine
damagemayresult,whichmaynotbecovered
underwarranty.
•Donotusegasolinecontainingmethanol.
•Donotstorefueleitherinthefueltankorinfuel
containersoverthewinterunlessfuelstabilizer
hasbeenaddedtothefuel.
•Donotaddoiltogasoline.
Fillthefueltankwithfreshunleadedregulargasoline
fromamajorname-brandservicestation(Figure11).
Important:Toreducestartingproblems,add
fuelstabilizertothegasolineallseason.Mixthe
stabilizerwithgasolinelessthan30daysold.
g230458
Figure11
CheckingtheEngine-Oil
Level
ServiceInterval:Beforeeachuseordaily
1.Movethemachinetoalevelsurface.
2.Removethedipstickbyrotatingthecap
counterclockwiseandpullingitout(Figure12).
7

g012127
Figure12
1.Full3.Add
2.High
3.Wipethedipstickcleanwithacleancloth.
4.Insertthedipstickintotheoil-lltube,butdonot
screwitin,thenremovethedipstick.
5.Readtheoillevelonthedipstick(Figure12).
•Iftheoillevelonthedipstickistoolow
(Figure12),carefullypourasmallamount
ofSAE30orSAE10W-30detergentoilinto
theoil-lltube,wait3minutes,andrepeat
steps3through5untiltheoilonthedipstick
isatthecorrectlevel.
•Iftheoillevelonthedipstickistoohigh
(Figure12),draintheexcessoiluntiltheoil
onthedipstickisatthecorrectlevel;referto
ChangingtheEngineOil(page15).
Important:Iftheoillevelintheengineistoo
lowortoohighandyouruntheengine,you
maydamagetheengine.
6.Installthedipstickintotheoil-lltubesecurely.
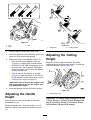
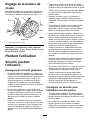
AdjustingtheHandle
Height
Youmayraiseorlowerthehandletoaposition
comfortableforyou.
Rotatethehandlelock,movethehandleto1of3
positions,andlockthehandleintoposition(Figure
13).
g007284
Figure13
1.Handlelock2.Handlepositions
AdjustingtheCutting
Height
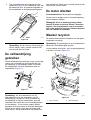
Adjustthecuttingheightasdesired.Setallthe
cutting-heightleverstothesameheight.T oraiseand
lowerthemachine,refertoFigure14.
g012130
Figure14
1.Cutting-heightlever
Important:Thecuttingheightsettingsare25mm
(1inch);38mm(1-1/2inch);51mm(2inches);64
mm(2-1/2inches);83mm(3-1/4inches);95mm
(3-3/4inches);108mm(4-1/4inches).
8

DuringOperation
DuringOperationSafety
GeneralSafety
•Wearappropriateclothing,includingeye
protection;longpants;slip-resistant,substantial
footwear;andhearingprotection.Tiebacklong
hair,securelooseclothing,anddonotwear
jewelry.
•Donotoperatethemachinewhileill,tired,or
undertheinuenceofalcoholordrugs.
•Thebladeissharp;contactingthebladecanresult
inseriouspersonalinjury.Shutofftheengine,
removetheignitionkey(electric-startmodelonly),
andwaitforallmovingpartstostopbeforeleaving
theoperatingposition.
•Whenyoureleasetheblade-controlbar,the
engineshouldshutoffandthebladeshouldstop
within3seconds.Ifnot,stopusingyourmachine
immediatelyandcontactanAuthorizedService
Dealer.
•Keepbystanders,especiallysmallchildren,outof
theoperatingarea.Stopthemachineifanyone
entersthearea.
•Alwayslookdownandbehindyoubeforemoving
themachineinreverse.
•Operatethemachineonlyingoodvisibilityand
appropriateweatherconditions.Donotoperate
themachinewhenthereistheriskoflighting.
•Wetgrassorleavescancauseseriousinjuryif
youslipandcontacttheblade.Avoidmowingin
wetconditions.
•Useextremecarewhenapproachingblind
corners,shrubs,trees,orotherobjectsthatmay
blockyourview.
•Watchforholes,ruts,bumps,rocks,orother
hiddenobjects.Uneventerraincouldcausethe
machinetooverturnorcauseyoutoloseyour
balanceorfooting.
•Stopthemachineandinspectthebladesafter
strikinganobjectorifthereisanabnormal
vibrationinthemachine.Makeallnecessary
repairsbeforeresumingoperation.
•Beforeleavingtheoperatingposition,shutoff
theengine,removetheignitionkey(electric-start
modelonly),andwaitforallmovingpartstostop.
•Iftheenginehasbeenrunningthemuferwillbe
hotandcanseverelyburnyou.Keepawayfrom
thehotmufer.
•Checkthegrasscatchercomponentsand
thedischargechutefrequentlyforanywear
ordeteriorationandreplacethemwiththe
manufacturer'srecommendedpartswhen
necessary.
•Useaccessoriesandattachmentsapprovedby
TheToro®Companyonly.
SlopeSafety
•Mowacrossthefaceofslopes;neverupand
down.Useextremecautionwhenchanging
directiononslopes.
•Donotmowonexcessivelysteepslopes.Poor
footingcouldcauseaslip-and-fallaccident.
•Mowwithcautionneardrop-offs,ditches,or
embankments.
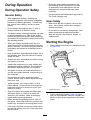
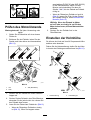
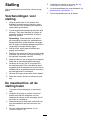
StartingtheEngine
1.Pulltheblade-controlbartothehandleandhold
it(Figure15).
g012132
Figure15
1.Blade-controlbar
2.Pulltherecoil-starthandle(Figure16)lightly
untilyoufeelresistance,thenpullitsharply,and
allowittoreturntotheropeguideonthehandle
slowly.
9

g012133
Figure16
Note:Ifthemachinedoesnotstartafterseveral
attempts,contactanAuthorizedServiceDealer.
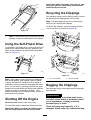
UsingtheSelf-PropelDrive
Tooperatetheself-propeldrive,simplywalkwithyour
handsontheupperhandleandyourelbowsatyour
sides,andthemachinewillautomaticallykeeppace
withyou(Figure17).
g003221
Figure17
Note:Ifthemachinedoesnotfreelyrollbackward
afterself-propelling,stopwalking,holdyourhands
inplace,andallowthemachinetorollacoupleof
centimeters(inches)forwardtodisengagethewheel
drive.Youcanalsotryreachingjustundertheupper
handletothemetalhandleandpushingthemachine
forwardacoupleofcentimeters(inches).Ifthe
machinestilldoesnotrollbackwardeasily,contactan
AuthorizedServiceDealer.
ShuttingOfftheEngine
ServiceInterval:Beforeeachuseordaily
Toshutofftheengine,releasetheblade-controlbar.
Important:Whenyoureleasetheblade-control
bar,theengineshouldshutoffandtheblade
shouldstopwithin3seconds.Iftheydonot,stop
usingyourmachineimmediatelyandcontactan
AuthorizedServiceDealer.
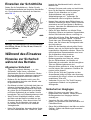
RecyclingtheClippings
Yourmachinecomesfromthefactoryreadytorecycle
thegrassandleafclippingsbackintothelawn.
Note:Thegrassbagmayremainonthemachine
whileyouarerecyclingtheclippings.
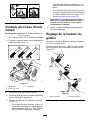
Torecycletheclippings,movethebag-on-demand
levertotheRECYCLINGposition(Figure18).
g012135
Figure18
1.RECYCLINGposition2.BAGGINGposition
BaggingtheClippings
Usethegrassbagtocollectgrassandleafclippings
fromthelawn.
WARNING
Aworngrassbagcouldallowsmallstones
andothersimilardebristobethrowntoward
youorbystanders,resultinginserious
personalinjuryordeath.
Checkthegrassbagfrequently.Ifitis
damaged,installanewTororeplacementbag.
10

WARNING
Thebladeissharp;contactingthebladecan
resultinseriouspersonalinjury.
Shutofftheengineandwaitforallmoving
partstostopbeforeleavingtheoperating
position.
1.Shutofftheengineandwaitforallmovingparts
tostop.
2.Installthegrassbag;refertoInstallingtheGrass
Bag(page11)andmovethebag-on-demand
levertotheBAGGINGpositionasshowninFigure
18.
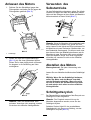
InstallingtheGrassBag
1.Shutofftheengineandwaitforallmovingparts
tostop.
2.Raiseandholdupthereardeector,installthe
baginthenotches,andlowerthereardeector
(Figure19).
g012136
Figure19
RemovingtheGrassBag
1.Shutofftheengineandwaitforallmovingparts
tostop.
2.Liftupthegrassbagupandawayfromthe
handle.
Note:Tiltthegrassbagslightlybackwardto
preventthecollectedgrassclippingsfromfalling
out.
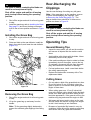
Rear-Dischargingthe
Clippings
Usethereardischargeforcuttingverytallgrass.
Note:Ifthegrassbagisonthemachine,remove
itbeforerear-dischargingtheclippings;refer
toRemovingtheGrassBag(page11).The
bag-on-demandlevershouldbeintheBAGGING
positionasshowninFigure18.
WARNING
Thebladeissharp;contactingthebladecan
resultinseriouspersonalinjury.
Shutofftheengineandwaitforallmoving
partstostopbeforeleavingtheoperating
position.
OperatingTips
GeneralMowingTips
•Inspecttheareawhereyouwillusethemachine
andremoveallobjectsthatthemachinecould
throw.
•Avoidstrikingsolidobjectswiththeblade.Never
deliberatelymowoveranyobject.
•Ifthemachinestrikesanobjectorstartstovibrate,
immediatelyshutofftheengine,removethekey
(ifequipped),disconnectthewirefromthespark
plug,andexaminethemachinefordamage.
•Forbestperformance,installanewbladebefore
thecuttingseasonbegins.
•ReplacethebladewhennecessarywithaT oro
replacementblade.
CuttingGrass
•Cutonlyaboutathirdofthegrassbladeatatime.
Donotcutbelow51mm(2inches)unlessthe
grassissparseoritislatefallwhengrassgrowth
beginstoslowdown.
•Whencuttinggrassover15cm(6inches)tall,
mowatthehighestcuttingheightsettingandwalk
slower;thenmowagainatalowersettingforthe
bestlawnappearance.Ifthegrassistoolong,the
machinemayplugandcausetheenginetostall.
•Wetgrassandleavestendtoclumpontheyard
andcancausethemachinetoplugortheengine
tostall.Avoidmowinginwetconditions.
•Beawareofapotentialrehazardinverydry
conditions,followalllocalrewarnings,andkeep
themachinefreeofdrygrassandleafdebris.
11

•Alternatethemowingdirection.Thishelps
dispersetheclippingsoverthelawnforeven
fertilization.
•Ifthenishedlawnappearanceisunsatisfactory,
try1ormoreofthefollowing:
–Replacethebladeorhaveitsharpened.
–Walkataslowerpacewhilemowing.
–Raisethecuttingheightonyourmachine.
–Cutthegrassmorefrequently.
–Overlapcuttingswathsinsteadofcuttingafull
swathwitheachpass.
CuttingLeaves
•Aftercuttingthelawn,ensurethathalfofthelawn
showsthroughthecutleafcover.Youmayneed
tomakemorethanasinglepassovertheleaves.
•Iftherearemorethan13cm(5inches)ofleaves
onthelawn,mowatahighercuttingheightand
thenagainatthedesiredcuttingheight.
•Slowdownyourmowingspeedifthemachine
doesnotcuttheleavesnelyenough.
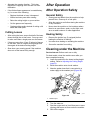
AfterOperation
AfterOperationSafety
GeneralSafety
•Cleangrassanddebrisfromthemachinetohelp
preventres.Cleanupoilorfuelspills.
•Allowtheenginetocoolbeforestoringthemachine
inanyenclosure.
•Neverstorethemachineorfuelcontainerwhere
thereisanopename,spark,orpilotlight,such
asonawaterheateroronotherappliances.
HaulingSafety
•Removetheignitionkey(ifequipped)before
loadingthemachineforhauling.
•Usecarewhenloadingorunloadingthemachine.
•Securethemachinefromrolling.
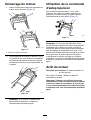
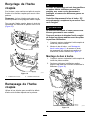
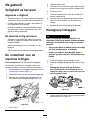
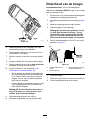
CleaningundertheMachine
ServiceInterval:Beforeeachuseordaily
Forbestresults,cleanthemachinesoonafteryou
havecompletedmowing.
1.Lowerthemachinetothelowestcutting-height
setting.RefertoAdjustingtheCuttingHeight
(page8).
2.Movethemachineontoalevelsurface.
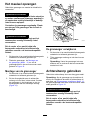
3.Attachagardenhosethatisconnectedtoa
watersupplytothewashoutport(Figure20).
g014538
Figure20
1.Washoutport
4.Turnthewateron.
5.Starttheengineandrunituntiltherearenomore
clippingsthatcomeoutfromunderthemachine.
6.Shutofftheengine.
12

7.Shutoffthewateranddisconnectthegarden
hosefromthemachine.
8.Starttheengineandrunitforafewminutesto
drytheundersideofthemachine.
9.Shutofftheengineandallowittocool.
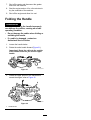
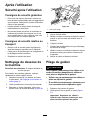
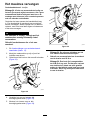
FoldingtheHandle
WARNING
Foldingorunfoldingthehandleimproperly
candamagethecables,causinganunsafe
operatingcondition.
•Donotdamagethecableswhenfoldingor
unfoldingthehandle.
•Ifacableisdamaged,contactan
AuthorizedServiceDealer.
1.Loosenthehandleknobs.
2.Rotatetheentirehandleforward(Figure21).
Important:Routethecablestotheoutside
ofthehandleknobsasyoufoldtheupper
handle.
g020722
Figure21
3.Rotatetheupperportionofthehandleback
towardtheengine;refertoFigure22.
g020721
Figure22
1.Handleknobs
13

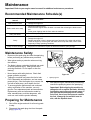
Maintenance
Important:Refertoyourengineowner’smanualforadditionalmaintenanceprocedures.
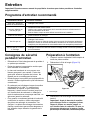
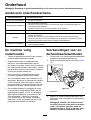
RecommendedMaintenanceSchedule(s)
MaintenanceService
Interval
MaintenanceProcedure
Aftertherst5hours
•Changetheengineoil.
Beforeeachuseordaily
•Checktheengine-oillevel.
•Ensurethattheengineshutsoffwithin3secondsafterreleasingtheblade-control
bar.
•Cleangrassclippingsanddirtfromunderthemachine.
Every100hours
•Servicethesparkplug.
Yearly
•Servicetheairlter.
•Changetheengineoil.
•Replacethebladeorhaveitsharpened(morefrequentlyiftheedgedullsquickly).
•Cleantheenginebyremovingdirtanddebrisfromitstopandsides;cleanitmore
frequentlyindustyoperatingconditions.
Yearlyorbeforestorage
•Emptythefueltankbeforerepairsasdirectedandbeforeyearlystorage.
MaintenanceSafety
•Disconnectthespark-plugwirefromthesparkplug
beforeperforminganymaintenanceprocedure.
•Wearglovesandeyeprotectionwhenservicing
themachine.
•Thebladeissharp;contactingthebladecanresult
inseriouspersonalinjury.Weargloveswhen
servicingtheblade.Donotrepairoralterthe
blade(s).
•Nevertamperwithsafetydevices.Checktheir
properoperationregularly.
•Tippingthemachinemaycausethefueltoleak.
Fuelisammableandexplosive,andcancause
personalinjury.Runtheenginedryorremovethe
fuelwithahandpump;neversiphonthefuel.
•Toensureoptimumperformanceandcontinued
safetycerticationofthemachine,useonly
genuineTororeplacementpartsandaccessories.
Replacementpartsandaccessoriesmadeby
othermanufacturerscouldbedangerous,and
suchusecouldvoidtheproductwarranty.
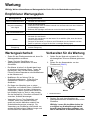
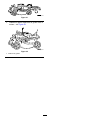
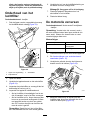
PreparingforMaintenance
1.Shutofftheengineandwaitforallmovingparts
tostop.
2.Disconnectthespark-plugwirefromthespark
plug(Figure23).
g236094
Figure23
1.Spark-plugwire
3.Afterperformingthemaintenanceprocedure(s),
connectthespark-plugwiretothesparkplug.
Important:Beforetippingthemachineto
changetheoilorreplacetheblade,allowthe
fueltanktorundrythroughnormalusage.If
youmusttipthemachinepriortorunning
outoffuel,useahandfuelpumptoremove
thefuel.Alwaystipthemachineontoits
side,withthedipstickdown.
14

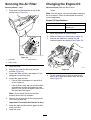
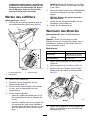
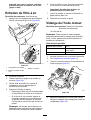
ServicingtheAirFilter
ServiceInterval:Yearly
1.Pressdownonthelatchtabsontopofthe
air-ltercover(Figure24).
g011722
Figure24
1.Latchtabs
3.Foampre-lter
2.Paperairlter
2.Openthecover.
3.Removethepaperairlterandthefoam
pre-lter(Figure24).
4.Inspectthefoampre-lter,andreplaceitifitis
damagedorexcessivelydirty.
5.Inspectthepaperairlter.
•Iftheairlterisdamagedoriswetwithoil
orfuel,replaceit.
•Iftheairlterisdirty,tapitonahardsurface
severaltimesorblowcompressedairless
than207kPa(30psi)throughthesideofthe
lterthatfacestheengine.
Note:Donotbrushthedirtoffthelter;
brushingforcesdirtintothebers.
6.Removethedirtfromtheair-lterbodyandthe
coverusingamoistrag.
Important:Donotwipedirtintotheairduct.
7.Installthefoampre-lterandthepaperairlter
intotheairlter.
8.Installthecover.
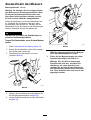
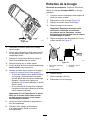
ChangingtheEngineOil
ServiceInterval:Aftertherst5hours
Yearly
Note:Runtheengineafewminutesbeforechanging
theoiltowarmit.Warmoilowsbetterandcarries
morecontaminants.
EngineOilSpecications
Engineoilcapacity
0.55L(18.6oz)
OilviscositySAE30orSAE10W-30
detergentoil
APIserviceclassicationSJorhigher
1.Movethemachinetoalevelsurface.
2.RefertoPreparingforMaintenance(page14).
3.Removethedipstickbyrotatingthecap
counterclockwiseandpullingitout(Figure25).
g235096
Figure25
4.Tipthemachineontoitsside(sothattheair
lterisup)todraintheusedoilfromtheoil-ll
tube(Figure25).
15

g012139
Figure26
5.Afterdrainingtheusedoil,returnthemachineto
theoperatingposition.
6.Carefullypourabout3/4oftheenginecapacity
ofoilintotheoil-lltube.
7.Wait3minutesfortheoiltosettleintheengine.
8.Wipethedipstickcleanwithacleancloth.
9.Insertthedipstickintotheoil-lltube,butdonot
screwitin,thenremovethedipstick.
10.Readtheoillevelonthedipstick(Checkingthe
Engine-OilLevel(page7)).
•Iftheoillevelonthedipstickistoolow,
carefullypourasmallamountofoilintothe
oil-lltube,wait3minutes,andrepeatsteps
8through10untiltheoillevelonthedipstick
iscorrect.
•Iftheoillevelonthedipstickistoohigh,
draintheexcessoiluntiltheoillevelonthe
dipstickiscorrect.
Important:Iftheoillevelintheengineistoo
lowortoohighandyouruntheengine,you
maydamagetheengine.
11.Installthedipstickintotheoil-lltubesecurely.
12.Recycletheusedoilproperly.
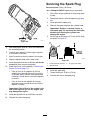
ServicingtheSparkPlug
ServiceInterval:Every100hours
UseaChampionRN9YCsparkplugorequivalent.
1.Shutofftheengineandwaitforallmovingparts
tostop.
2.Disconnectthewirefromthesparkplug(Figure
22).
3.Cleanaroundthesparkplug.
4.Removethesparkplugfromthecylinderhead.
Important:Replaceacracked,fouled,or
dirtysparkplug.Donotcleantheelectrodes
becausegritenteringthecylindercan
damagetheengine.
5.Setthegapontheplugto0.76mm(0.030inch)
asshowninFigure27.
g000533
Figure27
1.Centerelectrodeinsulator3.Airgap(nottoscale)
2.Sideelectrode
6.Installthesparkplug.
7.Torquetheplugto20N∙m(15ft-lb).
8.Connectthewiretothesparkplug.
16

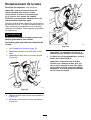
ReplacingtheBlade
ServiceInterval:Yearly
Important:Youwillneedatorquewrenchto
installthebladeproperly.Ifyoudonothavea
torquewrenchorareuncomfortableperforming
thisprocedure,contactanAuthorizedService
Dealer.
Examinethebladewheneveryourunoutoffuel.Ifthe
bladeisdamagedorcracked,replaceitimmediately.
Ifthebladeedgeisdullornicked,haveitsharpened
andbalanced,orreplaceit.
WARNING
Thebladeissharp;contactingthebladecan
resultinseriouspersonalinjury.
Weargloveswhenservicingtheblade.
1.RefertoPreparingforMaintenance(page14).
2.Tipthemachineontoitssidewiththeairlterup.
3.Useablockofwoodtoholdthebladesteady
(Figure28).
g231389
Figure28
4.Removetheblade,savingallmountinghardware
(Figure28).
5.Installthenewbladeandallmountinghardware
(Figure29).
g231390
Figure29
Important:Positionthecurvedendsofthe
bladetopointtowardthemachinehousing.
6.Useatorquewrenchtotightenthebladebolt
to82N∙m(60ft-lb).
Important:Abolttorquedto82N∙m(60
ft-lb)isverytight.Whileholdingtheblade
withablockofwood,putyourweight
behindtheratchetorwrenchandtightenthe
boltsecurely.Thisboltisverydifcultto
overtighten.
17

Storage
Storethemachineinacool,clean,dryplace.
PreparingtheMachinefor
Storage
1.Onthelastrefuelingoftheyear,addfuel
stabilizer(suchasToroPremiumFuel
Treatment)tothefuelasdirectedonthelabel.
2.Disposeofanyunusedfuelproperly.Recycle
itaccordingtolocalcodesoruseitinyour
automobile.
Note:Oldfuelinthefueltankistheleading
causeofhardstarting.Donotstorefuelwithout
fuelstabilizermorethan30days,anddonot
storestabilizedfuelmorethan90days.
3.Runthemachineuntiltheengineshutsofffrom
runningoutoffuel.
4.Starttheengineagainandallowittorununtil
itshutsoff.Whenyoucannolongerstartthe
engine,itissufcientlydry.
5.Disconnectthewirefromthesparkplugand
connectthewiretotheretainingpost(if
equipped).
6.Removethesparkplug,add30ml(1oz)of
engineoilthroughthespark-plughole,andpull
thestarterropeslowlyseveraltimestodistribute
oilthroughoutthecylindertopreventcylinder
corrosionduringtheoff-season.
7.Looselyinstallthesparkplug.
8.Tightenallnuts,bolts,andscrews.
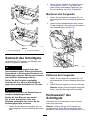
RemovingtheMachine
fromStorage
1.Checkandtightenallfasteners.
2.Removethesparkplugandspintheengine
rapidlybypullingtherecoil-starthandletoblow
theexcessoilfromthecylinder.
3.Installthesparkplugandtightenitwithatorque
wrenchto20N∙m(15ft-lb).
4.Performanymaintenanceprocedures;referto
Maintenance(page14).
5.Checktheengine-oillevel;refertoCheckingthe
Engine-OilLevel(page7).
6.Fillthefueltankwithfreshfuel;refertoFilling
theFuelT ank(page7).
7.Connectthewiretothesparkplug.
18

EuropeanPrivacyNotice
TheInformationT oroCollects
ToroWarrantyCompany(T oro)respectsyourprivacy.Inordertoprocessyourwarrantyclaimandcontactyouintheeventofaproductrecall,weaskyou
tosharecertainpersonalinformationwithus,eitherdirectlyorthroughyourlocalT orocompanyordealer.
TheT orowarrantysystemishostedonserverslocatedwithintheUnitedStateswhereprivacylawmaynotprovidethesameprotectionasapplies
inyourcountry.
BYSHARINGYOURPERSONALINFORMATIONWITHUS,YOUARECONSENTINGTOTHEPROCESSINGOFYOURPERSONALINFORMATION
ASDESCRIBEDINTHISPRIVACYNOTICE.
TheWayT oroUsesInformation
Toromayuseyourpersonalinformationtoprocesswarrantyclaims,tocontactyouintheeventofaproductrecallandforanyotherpurposewhichwetell
youabout.ToromayshareyourinformationwithT oro'safliates,dealersorotherbusinesspartnersinconnectionwithanyoftheseactivities.Wewillnot
sellyourpersonalinformationtoanyothercompany.Wereservetherighttodisclosepersonalinformationinordertocomplywithapplicablelawsand
withrequestsbytheappropriateauthorities,tooperateoursystemsproperlyorforourownprotectionorthatofotherusers.
RetentionofyourPersonalInformation
Wewillkeepyourpersonalinformationaslongasweneeditforthepurposesforwhichitwasoriginallycollectedorforotherlegitimatepurposes
(suchasregulatorycompliance),orasrequiredbyapplicablelaw.
Toro'sCommitmenttoSecurityofYourPersonalInformation
Wetakereasonableprecautionsinordertoprotectthesecurityofyourpersonalinformation.Wealsotakestepstomaintaintheaccuracyandcurrent
statusofpersonalinformation.
AccessandCorrectionofyourPersonalInformation
Ifyouwouldliketorevieworcorrectyourpersonalinformation,pleasecontactusbyemailat[email protected].
AustralianConsumerLaw
AustraliancustomerswillnddetailsrelatingtotheAustralianConsumerLaweitherinsidetheboxoratyourlocalToroDealer.
374-0282RevC
Seite laden ...
Seite laden ...
Seite laden ...
Seite laden ...
Seite laden ...
Seite laden ...
Seite laden ...
Seite laden ...
Seite laden ...
Seite laden ...
Seite laden ...
Seite laden ...
Seite laden ...
Seite laden ...
Seite laden ...
Seite laden ...
Seite laden ...
Seite laden ...
Seite laden ...
Seite laden ...
Seite laden ...
Seite laden ...
Seite laden ...
Seite laden ...
Seite laden ...
Seite laden ...
Seite laden ...
Seite laden ...
Seite laden ...
Seite laden ...
Seite laden ...
Seite laden ...
Seite laden ...
Seite laden ...
Seite laden ...
Seite laden ...
Seite laden ...
Seite laden ...
Seite laden ...
Seite laden ...
Seite laden ...
Seite laden ...
Seite laden ...
Seite laden ...
Seite laden ...
Seite laden ...
Seite laden ...
Seite laden ...
Seite laden ...
Seite laden ...
Seite laden ...
Seite laden ...
Seite laden ...
Seite laden ...
Seite laden ...
Seite laden ...
Seite laden ...
Seite laden ...
Seite laden ...
Seite laden ...
-
 1
1
-
 2
2
-
 3
3
-
 4
4
-
 5
5
-
 6
6
-
 7
7
-
 8
8
-
 9
9
-
 10
10
-
 11
11
-
 12
12
-
 13
13
-
 14
14
-
 15
15
-
 16
16
-
 17
17
-
 18
18
-
 19
19
-
 20
20
-
 21
21
-
 22
22
-
 23
23
-
 24
24
-
 25
25
-
 26
26
-
 27
27
-
 28
28
-
 29
29
-
 30
30
-
 31
31
-
 32
32
-
 33
33
-
 34
34
-
 35
35
-
 36
36
-
 37
37
-
 38
38
-
 39
39
-
 40
40
-
 41
41
-
 42
42
-
 43
43
-
 44
44
-
 45
45
-
 46
46
-
 47
47
-
 48
48
-
 49
49
-
 50
50
-
 51
51
-
 52
52
-
 53
53
-
 54
54
-
 55
55
-
 56
56
-
 57
57
-
 58
58
-
 59
59
-
 60
60
-
 61
61
-
 62
62
-
 63
63
-
 64
64
-
 65
65
-
 66
66
-
 67
67
-
 68
68
-
 69
69
-
 70
70
-
 71
71
-
 72
72
-
 73
73
-
 74
74
-
 75
75
-
 76
76
-
 77
77
-
 78
78
-
 79
79
-
 80
80


Toro 48cm Super Bagger Lawn Mower Benutzerhandbuch
- Kategorie
- Rasenmäher
- Typ
- Benutzerhandbuch
in anderen Sprachen
Verwandte Papiere
-
Toro 48cm Super Bagger Lawn Mower Benutzerhandbuch
-
Toro 48cm Super Recycler Lawn Mower Benutzerhandbuch
-
-
-
Toro 53cm Super Bagger Lawn Mower Benutzerhandbuch
-
-
Toro 55cm Recycler Lawn Mower Benutzerhandbuch
-
-
Toro 53cm Mulching/Rear Bagging/Side Discharging Lawn Mower Benutzerhandbuch
-
Toro 53cm Super Recycler Lawn Mower Benutzerhandbuch