Samsung LE-23R86BD Benutzerhandbuch
- Kategorie
- LCD-Fernseher
- Typ
- Benutzerhandbuch

LCD TV
LE23R8
LE26R8
Owner’s Instructions
Before operating the unit,
please read this manual thoroughly,
and retain it for future reference.
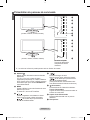
ON-SCREEN MENUS
PC DISPLAY
PICTURE IN PICTURE (PIP)
TELETEXT
Register your product at www.samsung.com/global/register
Record your Model and Serial number here for future reference.
▪ Model _______________ ▪ Serial No. _______________
BN68-01169F-01
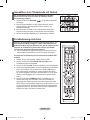
Contact SAMSUNG WORLD-WIDE
If you have any questions or comments relating to Samsung products,
please contact the SAMSUNG customer care centre.
Comment contacter Samsung dans le monde
Si vous avez des suggestions ou des questions concernant les produits Samsung, veuillez contacter le
Service Consommateurs Samsung.
Kontakt zu Samsung
Falls Sie Fragen oder Anregungen zu Samsung-Produkten haben, wenden Sie sich bitte an den
Samsung-Kundendienst.
Contact Samsung wereldwijd
Wanneer u suggesties of vragen heeft met betrekking tot Samsung producten, gelieve contact op te
nemen met de consumenten dienst van Samsung.
Contacte con SAMSUNG WORLD-WIDE
Si tiene alguna pregunta o comentario referente a nuestros productos,
por favor contacte con nuestro Servicio de Atención al Cliente
Contacte SAMSUNG GLOBAL
Se tem algumas dúvidas ou comentários sobre os produtos Samsung,
contacte por favor a nossa linha de apoio a clientes Samsung.
Contatta SAMSUNG WORLD-WIDE
Se avete commenti o domande sui prodotti Samsung, contattate il
Servizio Clienti Samsung.
SAMSUNGOVA ZASTOPNIŠTVA PO SVETU
Če imate kakršnokoli vprašanje ali komentar glede Samsungovih izdelkov,
se obrnite na SAMSUNGOV center za pomoč strankam.
Country
Customer Care Centre
Web Site
BELGIUM 02 201 2418 www.samsung.com/be
CZECH REPUBLIC 844 000 844 www.samsung.com/cz
“Distributor pro Českou republiku:
Samsung Zrt., česka organizační složka Vyskočilova 4, 14000 Praha 4”
DENMARK 70 70 19 70 www.samsung.com/dk
FINLAND 030-6227 515 www.samsung.com/
FRANCE 3260 SAMSUNG(7267864) (€ 0,15/min) www.samsung.com/fr
GERMANY 01805-121213 (€ 0,14/Min) www.samsung.de
HUNGARY 06-80-SAMSUNG (7267864) www.samsung.com/hu
ITALIA 800 SAMSUNG(7267864) www.samsung.com/it
LUXEMBURG 0032 (0)2 201 24 18 www.samsung.lu
NETHERLANDS 0900 20 200 88 (€ 0,10/Min) www.samsung.com/nl
NORWAY 815-56 480 www.samsung.com/no
POLAND 0 801 801 881 www.samsung.com/pl
PORTUGAL 80 8 200 128 www.samsung.com/pt
REPUBLIC OF IRELAND 0818 717 100 www.samsung.com/uk
SLOVAKIA 0800-SAMSUNG (7267864) www.samsung.com/sk
SPAIN 902 10 11 30 www.samsung.com/es
SWEDEN 0771-400 200 www.samsung.com/se
SWITZERLAND 0800-7267864 www.samsung.com/ch
U.K 0870 SAMSUNG (7267864) www.samsung.com/uk
ESTONIA 800-7267 www.samsung.ee
LATVIA 800-7267 www.samsung.com/lv
LITHUANIA 8-800-77777 www.samsung.lt
KAZAKHSTAN 8 800 080 1188 www.samsung.kz
RUSSIA 8-800-200-0400 www.samsung.ru
UKRAINE 8-800-502-0000 www.samsung.com/ur
UZBEKISTAN 140-1234 www.samsung.uz
BN68-01169F-01L08-Cover.indd 1 2007-03-13 �� 9:26:01
Seite wird geladen ...
Seite wird geladen ...
Seite wird geladen ...
Seite wird geladen ...
Seite wird geladen ...
Seite wird geladen ...
Seite wird geladen ...
Seite wird geladen ...
Seite wird geladen ...
Seite wird geladen ...
Seite wird geladen ...
Seite wird geladen ...
Seite wird geladen ...

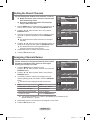
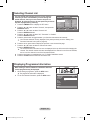
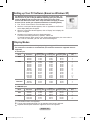
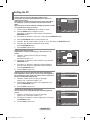
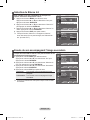
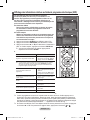
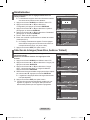
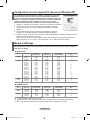
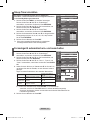
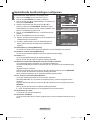
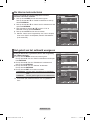
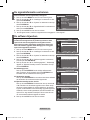
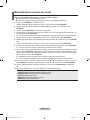
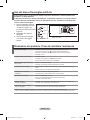
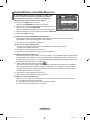
English - 13
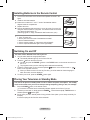
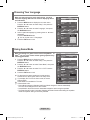
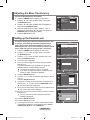
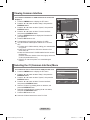
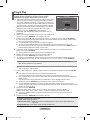
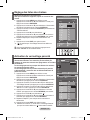
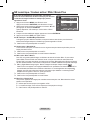
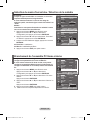
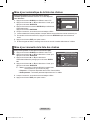
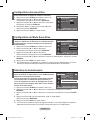
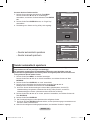
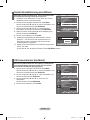
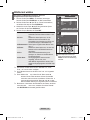
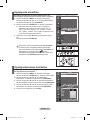
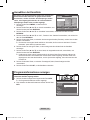
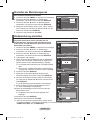
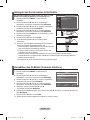
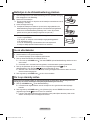
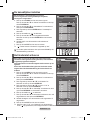
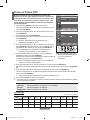
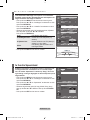
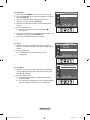
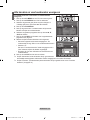
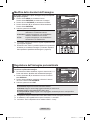
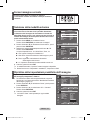
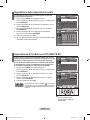
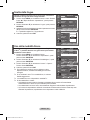
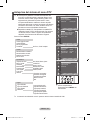
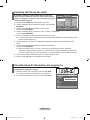
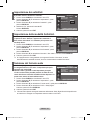
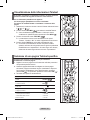
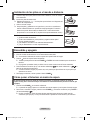
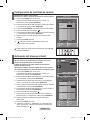
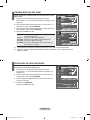
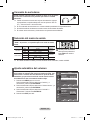
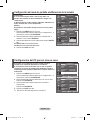
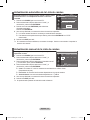
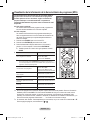
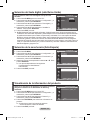
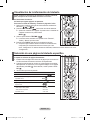
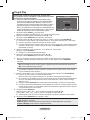
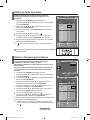
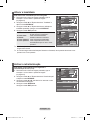
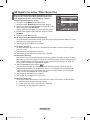
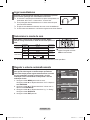
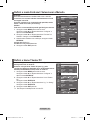
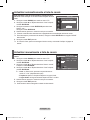
You can exchange the numbers of two channels, in order to:
Modify the numeric order in which the channels have
been automatically stored.
Give easily remembered numbers to the channels
that you watch most often.
1.
Press the MENU button to display the menu. Press the
▲
or
▼
button to select "Channel", then press the ENTER/OK button.
2. Press the
▲
or
▼
button to select "Sort", then press the
ENTER/OK button.
3. Select the channel number that you wish to change by press
ing the
▲
or
▼
button repeatedly. Press the ENTER/OK
button.
The selected channel number and name are moved to
right side.
4. Press the
▲
or
▼
button to move to the position in which you
would like to change and then press the ENTER/OK button.
The selected channel is exchanged with the one
previously stored to the chosen number.
5. Repeat steps 3 to 4 for another channel to be sorted.
6. Press the EXIT
button to exit.
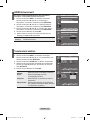
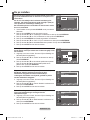
Sorting the Stored Channels
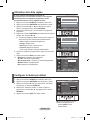
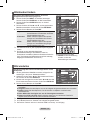
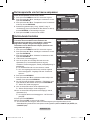
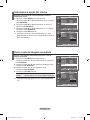
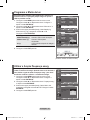
Assigning Channels Names
Channel names will be assigned automatically when channel
information is broadcast. These names can be changed,
allowing you to assign new names.
1. Press the MENU button to display the menu.
Press the
▲
or
▼
button to select "Channel", then press the
ENTER/OK button.
2. Press the
▲
or
▼
button to select "Name", then press the
ENTER/OK button.
3. If necessary, select the channel to be assigned to a new
name by pressing the
▲
or
▼
button. Press the ENTER/OK
button.
The selection bar is displayed around the name box.
4.
The characters available are : Letters of the alphabet (A~Z) / Numbers (0~9) /
Special characters ( -, space)
5. Repeat steps
3 to 4 for each channel to be assigned to a new name.
6. Press the EXIT
button to exit.
To...
Select a letter, number or symbol
Move on the next letter
Move back the previous letter
Confirm the name
Then...
Press the ▲ or ▼ button
Press the ► button
Press the ◄ button
Press the ENTER/OK button
Channel
Country : Belgium
Auto Store
Manual Store
Channel Manager
Sort
Name
Fine Tune
LNA : Off
TV
Move Enter Return
Sort
Prog. Ch. Name
0 C--
1 C23
2 C16
3 C3
4 S1
TV
Move Enter Return
Channel
Country : Belgium
Auto Store
Manual Store
Channel Manager
Sort
Name
Fine Tune
LNA : Off
Move Enter Return
TV
Name
Move Enter Return
Prog. Ch. Name
0 C-- -----
1 C23 -----
2 C16
-----
3 C3
-----
4 S1
-----
TV
BN68-01169F-Eng-0313.indd 13 2007-03-13 �� 7:48:31

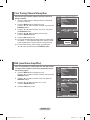
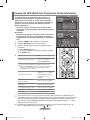
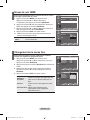
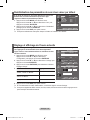
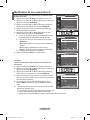
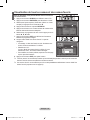
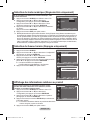
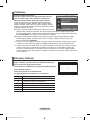
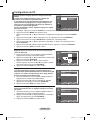
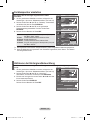
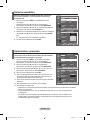
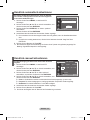
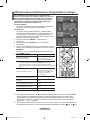
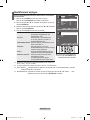
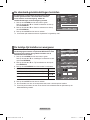
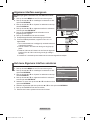
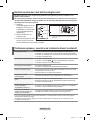
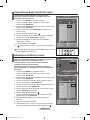
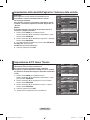
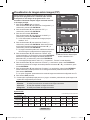
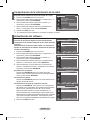
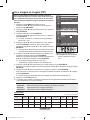
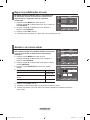
English - 14
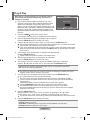
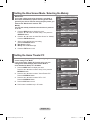
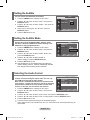
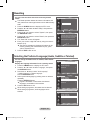
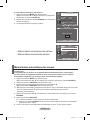
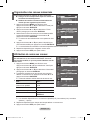
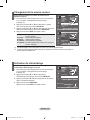
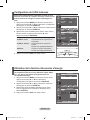
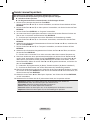
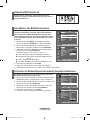
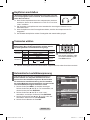
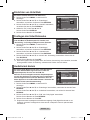
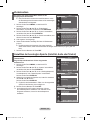
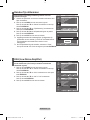
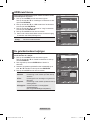
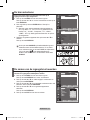
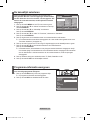
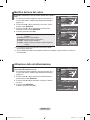
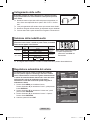
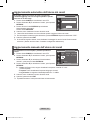
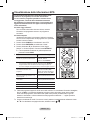
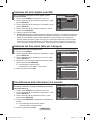
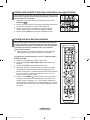
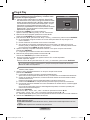
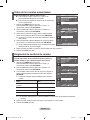
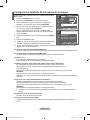
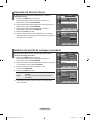
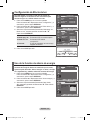
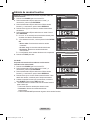
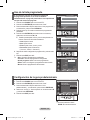
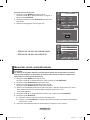
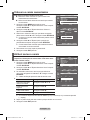
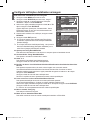
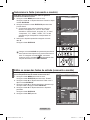
If the TV is operating in a weak-signal area, the LNA function
can improve the reception (a low-noise preamplifier boosts
the incoming signal).
1. Press the MENU button to display the menu.
Press the
▲
or
▼
button to select "Channel", then press the
ENTER/OK button.
2. Press the
▲
or
▼
button to select "LNA", then press the
ENTER/OK button.
3. Press the
▲
or
▼
button to select "On" or "Off".
Press the ENTER/OK button.
4. Press the EXIT
button to exit.
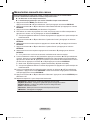
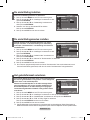
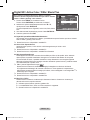
Use fine tuning to manually adjust a particular channel for
optimal reception.
1. Use the number buttons to directly select the channel that
you want to fine tune.
2. Press the MENU button to display the menu.
Press the
▲
or
▼
button to select "Channel", then press the
ENTER/OK button.
3. Press the
▲
or
▼
button to select "Fine Tune", then press
the ENTER/OK button.
4. Press the
◄
or
►
button to adjust the fine tuning.
Press the ENTER/OK button.
5. Press the EXIT
button to exit.
Fine tuned channels that have been saved are marked with
an asterisk "*" on the right-hand side of the channel number
in the channel banner. And the channel number turns red.
To reset the fine-tuning, select "Reset" by pressing the
▲
or
▼
button and then press the ENTER/OK button.
Fine Tuning Channel Reception
LNA (Low Noise Amplier)
Channel
Country : Belgium
Auto Store
Manual Store
Channel Manager
Sort
Name
Fine Tune
LNA : Off
Fine Tune
P 1
0
Reset
Channel
Country : Belgium
Auto Store
Manual Store
Channel Manager
Sort
Name
Fine Tune
LNA : Off
TV
Channel
Country : Belgium
Auto Store
Manual Store
Channel Manager
Sort
Name
Fine Tune
LNA :
Off
On
TV
TV
Move Enter Return
Adjust Save Return
Move Enter Return
Move Enter Return
BN68-01169F-Eng-0313.indd 14 2007-03-13 �� 7:48:34
Seite wird geladen ...
Seite wird geladen ...
Seite wird geladen ...
Seite wird geladen ...

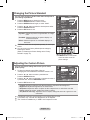
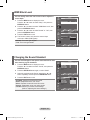
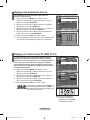
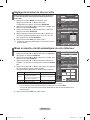
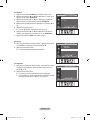
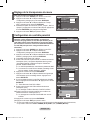
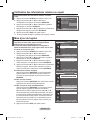
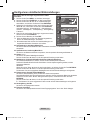
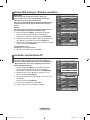
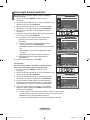
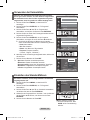
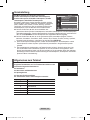
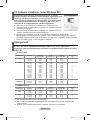
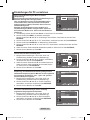
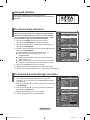
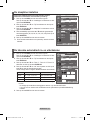
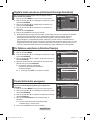
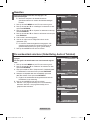
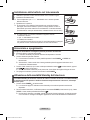
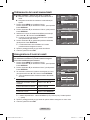
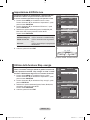
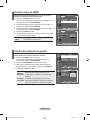
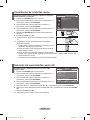
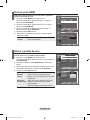
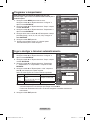
English - 19
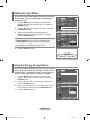
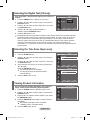
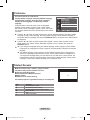
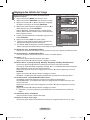
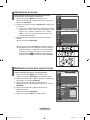
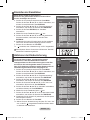
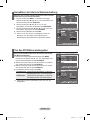
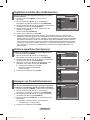
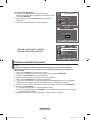
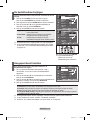
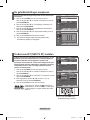
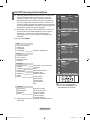
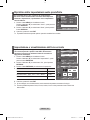
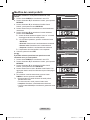
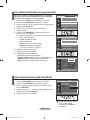
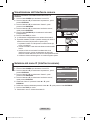
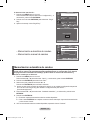
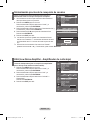
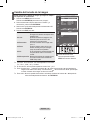
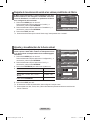
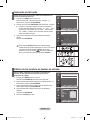
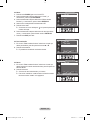
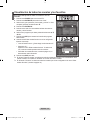
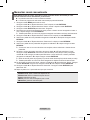
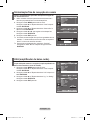
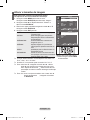
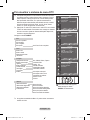
When setting the picture size to Auto Wide in a 16:9 wide TV,
you can determine the picture size you want to see the 4:3
WSS (Wide Screen Service) image or nothing. Each individual
European country requires different picture size so this
function is intended for users to select it.
1. Press the MENU button to display the menu.
Press the ENTER/OK button, to select “Picture”.
2. Press the
▲
or
▼
button to select "Screen Mode", then press
the ENTER/OK button.
3. Select the required option by pressing the
▲
or
▼
button.
Press the ENTER/OK button.
Available options: 16:9, Wide Zoom, Zoom, 4:3
16:9: Sets the picture to 16:9 wide mode.
Wide Zoom: Magnify the size of the picture more than 4:3.
Zoom: Magnify the size of the picture vertically on screen.
4:3: Sets the picture to 4:3 normal mode.
4. Press the EXIT button to exit.
Picture Size is available in Auto Wide mode
This function is not available in PC or Component, HDMI
mode.
Selecting the Screen Mode
Picture
Size : Auto Wide
Screen Mode : 16 : 9
Digital NR : Off
Active Colur : Off
DNle : Off
Movie Plus : Off
Reset : OK
rMore
16:9
Wide Zoom
Zoom
4:3
Press the STILL button to freeze a moving picture into a
still one. Press again to cancel.
Freezing the Current Picture
Move Enter Return
Picture
Size : Auto Wide
Screen Mode : 16 : 9
Digital NR : Off
Active Colour : Off
DNle : Off
Movie Plus : Off
Reset : OK
rMore
Move Enter Return
Move Enter Return
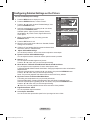
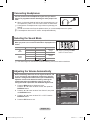
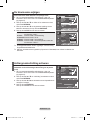
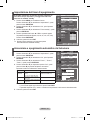
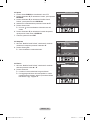
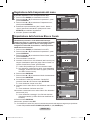
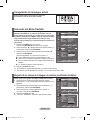
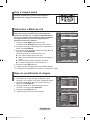
Resetting the Picture Settings to the Factory Defaults
You can return to the factory defaults picture settings.
1. To select the desired picture effect, follow the
"Changing the Picture Standard" instructions number 1 to 3
on page 15.
2. Press the
▲
or
▼
button to select "Reset", then press the
ENTER/OK button.
3. Press the
▲
or
▼
button to select "OK" or "Cancel".
Press the ENTER/OK button.
4. Press the EXIT button to exit.
The "Reset" will be set for each picture mode.
Picture
Size : Auto Wide
Screen Mode : 16 : 9
Digital NR : Off
Active Colour : Off
DNle : Off
Movie Plus : Off
Reset : OK
rMore
Move Enter Return
Picture
Size : Auto Wide
Screen Mode : 16 : 9
Digital NR : Off
Active Colour : Off
DNle : Off
Movie Plus : Off
Reset : OK
rMore
Move Enter Return
Cancel
OK
TV
TV
TV
TV
BN68-01169F-Eng-0313.indd 19 2007-03-13 �� 11:03:19

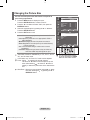
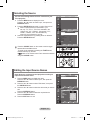
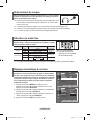
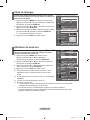
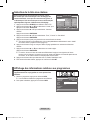
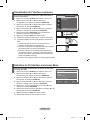
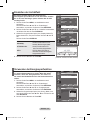
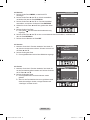
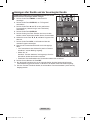
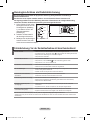
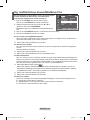
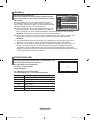
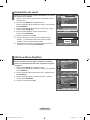
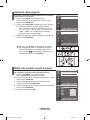
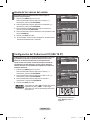
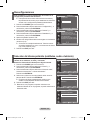
English - 20
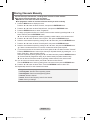
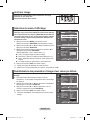
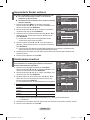
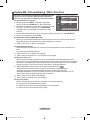
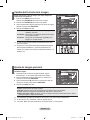
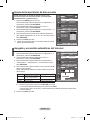
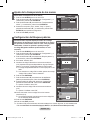
If the broadcast signal received by your TV is weak, you can
activate the Digital Noise Reduction feature to help reduce
any static and ghosting that may appear on the screen.
1. Press the MENU button to display the menu.
Press the ENTER/OK button, to select “Picture”.
2. Select the required option by pressing the ▲ or ▼ button,
then press the ENTER/OK button.
Available options: Digital NR, Active Colour, DNIe, Movie
Plus.
3. When you are satisfied with your setting, press the ENTER/OK button.
4. Press the EXIT button to exit.
Digital NR: Off/Low/Medium/High/Auto
If the signal received by the television is weak, you can activate this feature to reduce any static and
ghosting that may appear on the screen.
This function is not available in PC mode.
Active Colour: Off/On
If you turn on this option, the colors of the sky and grass will be stronger and clearer for a more
vivid on-screen picture.
This function is not available in PC mode.
This function is not available in Movie and Standard mode.
DNIe: Off/Demo/On
This TV includes the DNIe function so as to provide a high visual quality. If you set DNIe to on, you
can view the screen with the DNIe feature activated. If you set the DNIe to Demo, you can view the
applied DNIe and normal pictures on the screen, for demonstration purposes. Using this function,
you can view the difference in the visual quality.
DNIe
TM
(Digital Natural Image engine)
This feature brings you more detailed image with 3D noise reduction, detail enhancement, con-
trast enhancement and white enhancement. New image compensation Algorithm gives brighter,
clearer, more detailed image to you. DNIe
TM
technology will fit every signal into your eyes.
This function is not available in PC mode.
This function is not available in Movie mode
Movie Plus: Off/On
You can view more natural skin and clear text even in fast moving scenes.
Use this function when watching movies.
The Wide Zoom, Zoom and Just Scan mode is not supported.
This function is not available in PC mode.
Digital NR / Active Colour / DNIe / Movie Plus
Picture
Size : Auto Wide
Screen Mode : 16 : 9
Digital NR : Off
Active Colour : Off
DNle : Off
Movie Plus : Off
Reset : OK
rMore
Move Enter Return
TV
BN68-01169F-Eng-0313.indd 20 2007-03-13 �� 11:03:19

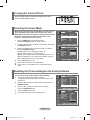
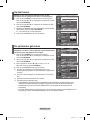
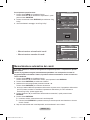
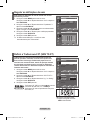
English - 21
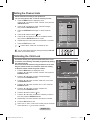
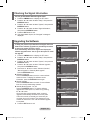
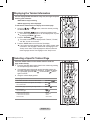
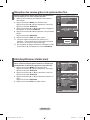
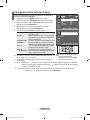
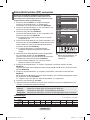
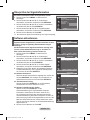
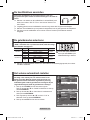
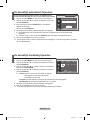
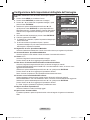
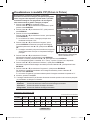
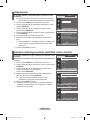
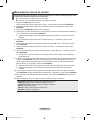
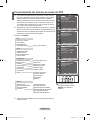
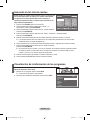
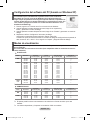
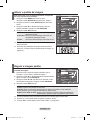
You can display a sub picture within the main picture of set
programme or video input. In this way, you can watch the
picture of set programme or video input from any connected
equipment while watching the main picture.
1. Press the MENU button to display the menu.
Press the ▲ or ▼ button to select "Setup", then press the
ENTER/OK button.
2. Press the
▲
or
▼
button to select "PIP", then press the
ENTER/OK button.
3. Press the ENTER/OK
button again.
Press the
▲
or
▼
button to select "On", then press
ENTER/OK button.
If the PIP is activated, the size of the main picture turns
to "16:9".
4. Press the
▲
or
▼
button to select "Source",then press
ENTER/OK button. Select a source of the sub picture by
pressing the
▲
or
▼
button and press the ENTER/OK
button.
The sub picture can serve different source selections
based on what the main picture is set to.
5. Press the
▲
or
▼
button to select "Size" of the sub picture
and then press the ENTER/OK button. Select a size of the
sub picture by pressing the
▲
or
▼
button and then press the
ENTER/OK button.
If main picture is in "PC" and "Component" mode, "Size" is
not available.
6. Press the
▲
or
▼
button to select "Position", then press the ENTER/OK button.
Select the position of the sub picture by pressing the
▲
or
▼
button and then press the
ENTER/OK button.
7. Press the
▲
or
▼
button to select "Programme" and then press the ENTER/OK button.
You can select the channel that you want to view through sub picture by pressing the
▲
or
▼
button. Press the ENTER/OK button.
The "Programme" can be active when the sub picture is set to TV.
8. Press the EXIT
button to exit.
You may notice that the picture in the PIP window becomes slightly unnatural when you use the
main screen to view a game or karaoke.
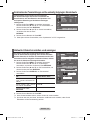
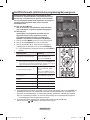
Viewing the Picture In Picture (PIP)
Source: Used to select a source of the sub picture.
Size: Used to select a size of the sub picture.
Position: Used to move the sub picture.
Programme: Used to Change the sub picture.
Press the PIP button on the
remote control repeatedly to acti-
vate or deactivate the "PIP".
Mode : Custom
Equalizer
SRS TS XT : Off
Auto Volume : Off
Internal Mute : Off
Reset
Move Enter Return
TV
Setup
More
Energy Saving : Off
HDMI Black Level : Low
PIP
Move Enter Return
Mode : Custom
Equalizer
SRS TS XT : Off
Auto Volume : Off
Internal Mute : Off
Reset
Move Enter Return
TV
PIP
PIP : On
Source : TV
Size :
Position :
Programme : P 1
Move Enter Return
O: PIP operates, X: PIP doesn’t operate
Component
HDMI
PC
TV analog
O
O
O
Ext.1
O
O
O
Ext.2
O
O
O
AV
O
O
O
S-Video
X
X
X
Component
X
X
X
HDMI
X
X
X
PC
X
X
X
TV digital
X
X
X
Sub
Main
PIP Settings
BN68-01169F-Eng-0313.indd 21 2007-03-13 �� 7:48:49

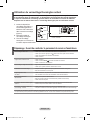
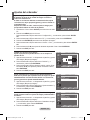
English - 22
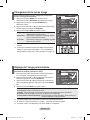
HDMI Black Level
You can directly select the level on the screen to adjust the
screen depth.
1. Press the MENU button to display the menu.
Press the ▲ or ▼ button to select "Setup", then press the
ENTER/OK button.
2. Press the
▲
or
▼
button to select "HDMI Black Level", then
press the ENTER/OK button.
3. Press the ▲ or ▼ button to select "Normal" or "Low", then
press the ENTER/OK
button.
4. Press the EXIT
button to exit.
This function is active only when the external input
connects to HDMI (RGB signals).
Mode : Custom
Equalizer
SRS TS XT : Off
Auto Volume : Off
Internal Mute : Off
Reset
Move Enter Return
TV
Setup
More
Energy Saving : Off
HDMI Black Level : Low
PIP
Move Enter Return
Mode : Custom
Equalizer
SRS TS XT : Off
Auto Volume : Off
Internal Mute : Off
Reset
Move Enter Return
TV
Setup
More
Energy Saving : Off
HDMI Black Level : Low
PIP
Move Enter Return
Normal
Low
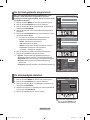
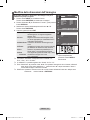
You can select the type of the special sound effect to be used
when watching a given broadcast.
1. Press the MENU button to display the menu.
Press the
▲
or
▼
button to select "Sound", then press the
ENTER/OK button.
2. Press the ENTER/OK button again, to select "Mode".
3. Select the required sound effect by pressing the
▲
or
▼
button repeatedly and then press the ENTER/OK button.
4. Press the EXIT
button to exit.
Standard: Selects the normal sound mode.
Music: Emphasizes music over voices.
Movie: Provides live and full sound for movies.
Speech: Emphasizes voices over other sounds.
Custom: Selects your custom sound settings.
(Refer to "Adjusting the Sound Settings")
Changing the Sound Standard
Sound
Mode : Custom
Equalizer
SRS TS XT : Off
Auto Volume : Off
Internal Mute : Off
Sound Select : Main
Reset
Move Enter Return
Sound
Mode : Custom
Equalizer
SRS TS XT : Off
Auto Volume : Off
Internal Mute : Off
Sound Select : Main
Reset
Standard
Music
Movie
Speech
Custom
Move Enter Return
TV
TV
Normal: The screen gets brighter.
Low: The screen gets darker.
BN68-01169F-Eng-0313.indd 22 2007-03-13 �� 7:48:52
Seite wird geladen ...

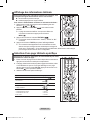
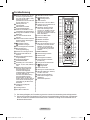
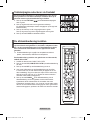
English - 24
You can set the sound mode by pressing the “DUAL” button.
When you press it, the current sound mode is displayed on the
screen.
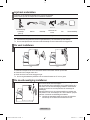
You can connect a set of headphones to your set if you wish to
watch a TV programme without disturbing the other people in the
room.
When you insert the head set jack into the corresponding port, you
can operate only "SRS TS XT" and "Auto Volume" in Sound menu.
Prolonged use of headphones at a high volume may damage your
hearing.
You will not receive sound from the speakers when you connect headphones to the system.
The headphone volume and TV volume are adjusted differently.
Connecting Headphones
Audio Type
Mono
Stereo
Dual
Mono
Stereo
Dual
DUAL 1/2
MONO
STEREO ↔ MONO
DUAL 1 ↔ DUAL 2
MONO
MONO ↔ STEREO
MONO ↔ DUAL 1
DUAL 2
Default
DUAL 1
DUAL 1
Automatic
change
Automatic
change
FM
Stereo
NICAM
Stereo
Selecting the Sound Mode
You can also set these options
simply by pressing the DUAL
button on remote control.
If the stereo signal is weak and an automatic switching occurs, then switch to the Mono.
Adjusting the Volume Automatically
Each broadcasting station has its own signal conditions, and
so it is not easy for you to adjust the volume every time the
channel is changed. This feature allows you to automatically
adjust the volume of the desired channel by lowering the
sound output when the modulation signal is high or by
raising the sound output when the modulation signal is low.
1. Press the MENU button to display the menu.
Press the ▲ or ▼ button to select "Sound", then press the
ENTER/OK button.
2. Press the ▲ or ▼ button to select "Auto Volume", then press
the ENTER/OK button.
3. Press the ▲ or ▼ button to select "On" or "Off". Press the
ENTER/OK button.
4. Press the EXIT
button to exit.
Sound
Mode : Custom
Equalizer
SRS TS XT : Off
Auto Volume : Off
Internal Mute : Off
Sound Select : Main
Reset
Move Enter Return
Sound
Mode : Custom
Equalizer
SRS TS XT : Off
Auto Volume : Off
Internal Mute : Off
Sound Select : Main
Reset
Off
On
Move Enter Return
TV
TV
BN68-01169F-Eng-0313.indd 24 2007-03-13 �� 7:48:58
Seite wird geladen ...

English - 26
Resetting the Sound Settings to the Factory Defaults
If Game Mode is On, the Reset Sound function is activated.
Selecting the Reset function after setting the equalizer resets
the equalizer setting to the factory defaults.
1. Press the MENU button to display the menu.
Press the ▲ or ▼ button to select "Sound", then press the
ENTER/OK button.
2. Press the ▲ or ▼ button to select "Reset", then press the
ENTER/OK button.
3. Press the EXIT
button to exit.
You can select this option when the "Game Mode" is set to "On".
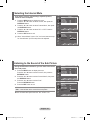
You can set the TV’s clock so that the current time is dis-
played when you press the INFO button. You must also set
the time if you wish to use the automatic On/Off timers.
1. Press the MENU button to display the menu.
Press the ▲ or ▼ button to select "Setup", then press the
ENTER/OK button.
2. Press the ▲ or ▼ button to select "Time", then press the
ENTER/OK button.
3. Press the ENTER/OK
button to select "Clock Set".
4.
5. Press the EXIT
button to exit.
If you disconnect the power cord, you have to set the clock
again.
You can also set Year, Month, Day, Hour and Minute by pressing the number buttons on the
remote control.
Setting and Displaying the Current Time
To...
Move to Month, Day, Year, Hour or Minute
Set the Month, Day, Year, Hour or Minute
Press the ENTER/OK button.
Press the...
or
button.
5
or
6
button.
Sound
Mode : Custom
Equalizer
SRS TS XT : Off
Auto Volume : Off
Internal Mute : Off
Sound Select : Main
Reset
Move Enter Return
Mode : Custom
Equalizer
SRS TS XT : Off
Auto Volume : Off
Internal Mute : Off
Reset
Move Enter Return
TV
Setup
Plug & Play
Language : English
Time
Game Mode : Off
Blue Screen : Off
Melody : Off
PC
Home Theater PC
: Off
Light Effect :
Watching Mode On
More
Move Enter Return
TV
Clock Set
Month
01
Day
p
q
01
2007
Year
00
Hour
00
Minute
Move Adjust Return
TV
BN68-01169F-Eng-0313.indd 26 2007-03-13 �� 7:49:03

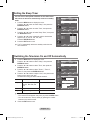
English - 27
You can select a time period of between 30 and 180 minutes
after which the television automatically switches to standby
mode.
1. Press the MENU button to display the menu.
Press the ▲ or ▼ button to select "Setup", then press the
ENTER/OK button.
2. Press the ▲ or ▼ button to select "Time", then press the
ENTER/OK button.
3. Press the ▲ or ▼ button to select "Sleep Timer", then press
the ENTER/OK
button.
4. Press the ▲ or ▼ button repeatedly until the desired time
appears (Off, 30, 60, 90, 120, 150, 180).
Press the ENTER/OK button.
5. Press the EXIT
button to exit.
The TV automatically switches to standby mode when the
timer reaches 0.
Setting the Sleep Timer
1. Press the MENU button to display the menu.
Press the ▲ or ▼ button to select "Setup", then press the
ENTER/OK button.
2. Press the ▲ or ▼ button to select "Time", then press the
ENTER/OK button.
3. Press the ▲ or ▼ button to select "Timer 1", "Timer 2",
"Timer 3", then press the ENTER/OK button.
4. Press the ▲ or ▼ buttons to adjust “Hour”, then press the ►
button to move to the next step.
Set other items using the same method as above.
Yes/ No Press the ▲or▼ button
Repeat Select a Once, Everyday,
Mon-Fri, Mon-Sat, Sat-
Sun
Press the ▲or▼ button
Volume Adjust a 0~100 Press the ▲or▼ button
Programme
Adjust a Programme Press the ▲or▼ button
When finished, press the RETURN button to return.
• The current time will appear every time you press the INFO button.
• You can set the hour, minute, directly by pressing the number
buttons on the remote control.
5. Press the EXIT
button to exit.
Switching the Television On and Off Automatically
Mode : Custom
Equalizer
SRS TS XT : Off
Auto Volume : Off
Internal Mute : Off
Reset
Move Enter Return
TV
Setup
Plug & Play
Language : English
Time
Game Mode : Off
Blue Screen : Off
Melody : Off
PC
Home Theater PC
: Off
Light Effect :
Watching Mode On
More
Move Enter Return
Time
Clock Set :
Sleep Timer :
Timer 1 :
Timer 2 :
Timer 3 :
Off
30
60
90
120
150
180
Move Enter Return
Mode : Custom
Equalizer
SRS TS XT : Off
Auto Volume : Off
Internal Mute : Off
Reset
Move Enter Return
TV
Setup
Plug & Play
Language : English
Time
Game Mode : Off
Blue Screen : Off
Melody : Off
PC
Home Theater PC
: Off
Light Effect :
Watching Mode On
More
Move Enter Return
TV
Timer 1
On Time
Repeat
Once
Volume
10
01
Programme
00
5
6
00
No
:
Off Time
00 00 No
:
►
Move Adjust Return
TV
BN68-01169F-Eng-0313.indd 27 2007-03-13 �� 7:49:06
Seite wird geladen ...
Seite wird geladen ...

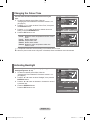
English - 30
This function adjusts the brightness of the TV so as to reduce
power consumption. When you watching TV at night, set the
"Energy Saving " mode option to "High" so as to reduce the
dazzling of your eyes as well as the power consumption.
1. Press the MENU button to display the on-screen menu.
Press the ▲ or ▼ button to select "Setup", then press the
ENTER/OK button.
2. Press the ▲ or ▼ button to select "Energy Saving", then
press the ENTER/OK button.
3. Select the required option (Off, Low, Medium, High, Auto) by
pressing the ▲ or ▼ button. Press the ENTER/OK
button.
4. Press the EXIT
button to exit.
Using the Energy Saving Feature
You can turn on/off the blue LED on the front of TV according
to the situation. Use it for saving power or when the LED
dazzles your eyes.
1. Press the MENU button to display the on-screen menu.
Press the ▲ or ▼ button to select "Setup", then press the
ENTER/OK button.
2. Press the ▲ or ▼ button to select "Light Effect", then press
the ENTER/OK button.
3. Select the required option (Off, Standby Mode On,
Watching Mode On, On) by pressing the ▲ or ▼ button.
Press the ENTER/OK button.
4. Press the EXIT
button to exit.
Setting the Light Effect
Mode : Custom
Equalizer
SRS TS XT : Off
Auto Volume : Off
Internal Mute : Off
Reset
Move Enter Return
TV
Setup
Plug & Play
Language : English
Time
Game Mode : Off
Blue Screen : Off
Melody : Off
PC
Home Theater PC
: Off
Light Effect :
Watching Mode On
More
Move Enter Return
Mode : Custom
Equalizer
SRS TS XT : Off
Auto Volume : Off
Internal Mute : Off
Reset
Move Enter Return
TV
Setup
Plug & Play
Language : English
Time
Game Mode : Off
Blue Screen : Off
Melody : Off
PC
Home Theater PC
: Off
Light Effect :
Watching Mode On
More
Move Enter Return
Off
Standby Mode On
Watching Mode On
On
Mode : Custom
Equalizer
SRS TS XT : Off
Auto Volume : Off
Internal Mute : Off
Reset
Move Enter Return
TV
Setup
More
Energy Saving : Off
HDMI Black Level
: Low
PIP
Move Enter Return
TV
Setup
More
Energy Saving : Off
HDMI Black Level
: Off
PIP
Off
Low
Medium
High
Auto
Move Enter Return
Off: LED will not come on.
Standby Mode On: Turns the LED on in standby mode.
Watching Mode On: Turns the LED on while watching
TV.
On: LED will come on after you turn the TV off.
[LE23R86, LE26R86, LE23R88,LE26R88]
BN68-01169F-Eng-0313.indd 30 2007-03-13 �� 7:49:15

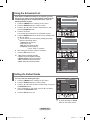
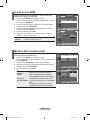
English - 31
Name the device connected to the input jacks to make your
input source selection easier.
1. Press the MENU button to display the menu.
Press the ▲ or ▼ button to select "Input", then press the
ENTER/OK button.
2. Press the ▲ or ▼ button to select "Edit Name", then press
the ENTER/OK button.
3. Press the
▲ or ▼ button to select the device that you wish to
edit.
Press the ENTER/OK button.
4. Press the ▲ or ▼ button to select the required device.
Press the ENTER/OK button.
5. Press the EXIT
button to exit.
Editing the Input Source Names
You can select among external sources connected to your
TV’s input jacks.
1. Press the MENU button to display the menu.
Press the ▲ or ▼ button to select "Input", then press the
ENTER/OK button.
2. Press the ENTER/OK button again, to select "Source List".
When no external device is connected to your
set, only "TV", "Ext.1", "Ext.2" are activated in the
"Source List". "AV", "S-Video", "Component", "PC",
"HDMI1", "HDMI2", "DTV" are activated only
when they are connected to your set.
3. Select the required device by pressing the ▲ or ▼ button.
Press the ENTER/OK button.
Press the SOURCE button on the remote control to toggel
between all the available source.
TV mode can be selected by pressing the TV/DTV button,
number buttons(0~9), and the
P / button on the remote control. But it cannot be selected
using the SOURCE button.
Selecting the Source
Mode : Custom
Equalizer
SRS TS XT : Off
Auto Volume : Off
Internal Mute : Off
Reset
Move Enter Return
TV
Input
Source List : TV
Edit Name
Move Enter Return
Mode : Custom
Equalizer
SRS TS XT : Off
Auto Volume : Off
Internal Mute : Off
Reset
Move Enter Return
TV
Source List
TV
Ext.1 : ----
Ext.2 : ----
AV : ----
S-Video : ----
Component : ----
PC : ----
HDMI1 : ----
HDMI2 : ----
DTV : ----
Move Enter Return
Mode : Custom
Equalizer
SRS TS XT : Off
Auto Volume : Off
Internal Mute : Off
Reset
Move Enter Return
TV
Input
Source List : TV
Edit Name
Move Enter Return
Mode : Custom
Equalizer
SRS TS XT : Off
Auto Volume : Off
Internal Mute : Off
Reset
Move Enter Return
TV
Edit Name
Ext.1 : ----
Ext.2 : ----
AV : ----
S-Video : ----
Component : ----
PC : ----
HDMI1 : ----
HDMI2 : --
----
VCR
DVD
D-VHS
Cable STB
HD STB
Satellite STB
q
Move Enter Return
BN68-01169F-Eng-0313.indd 31 2007-03-13 �� 7:49:19

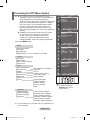
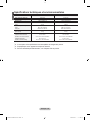
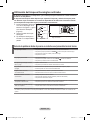
English - 32
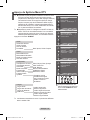
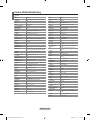
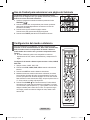
Previewing the DTV Menu System
The company does not guarantee the normal
operation of the DTV menu for countries other than
the 6 supported countries (United Kingdom,
Germany, France, Italy, Spain, Austria) because only
these country standards are supported. In addition,
when the country of the broadcast stream differs
from the country selected by the current user,
the string appearing in the channel banner, Info,
Guide, Channel Manager, etc. may not be displayed
properly.
Available in DTV mode. Preset to the DTV mode
by using the TV/DTV button on your remote
control. To help you navigate around the on-
screen menu system and adjust the various
settings available, refer to the following illustration.
Press the D.MENU button.
The sub-items of the CI Menu may vary depending on
the CAM model.
You can select these options
by simply pressing the
D.MENU button on the
remote control.
Mode : Custom
Equalizer
SRS TS XT : Off
Auto Volume : Off
Internal Mute : Off
Reset
Move Enter Return
Guide
Now & Next Guide
Full Guide
Scheduled List
Default Guide : Full Guide
Move Enter Return
Channel
Auto Store
Manual Store
Edit Favourite Channels
Channel List
Move Enter Return
Setup
Menu Transparency
: Medium
Parental Lock
Subtitle : On
Subtitle Mode : Normal
Audio Format : PCM
Move Enter Return
Language
Audio Language
Subtitle Language
Teletext Language
Preference
Move Enter Exit
Move Enter Exit
Move Enter Exit
Move Enter Exit
Language
Audio Language
Subtitle Language
Teletext Language
Preference
Now/Next, Full Guide
Guide
Now & Next Guide
Full Guide
Scheduled List
Default Guide
Channel
Auto Store
Manual Store
Edit Favourite Channels
Channel List
Setup
Menu Transparency
Parental Lock
Subtitle
Subtitle Mode
Audio Format
Digital Text
Time Zone
System
Product Information
Signal Information
Software Upgrade
Common Interface
Reset
High, Medium, Low, Opaque
Enter PIN
Off, On
Normal, Hard of hearing
Primary Audio Language
Secondary Audio Language
Primary Subtitle Language
Secondary Subtitle Language
Primary Teletext Language
Secondary Teletext Language
Disable, Enable
PCM, Dolby Digital
BN68-01169F-Eng-0313.indd 32 2007-03-13 �� 7:49:22
Seite wird geladen ...

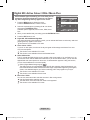
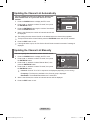
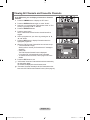
English - 34
You can edit your favourite channels using the four colour
buttons.
1.
Press the D.MENU button to display the DTV menu.
2. Press the ▲ or ▼ button to select "Channel", then press the
ENTER/OK button.
3.
Press the ▲ or ▼ button to select "Edit Favourite Channels",
then press the ENTER/OK button.
4.
Press the red button to display all currently stored channels.
5.
Press the ▲ or ▼ button to select a channel you want.
Press the ENTER/OK button.
A "
" icon is shown next to the selected channel and the
channel will be added to the favourite channel list.
•
To undo, press the ENTER/OK button again.
•
Select All
: Select all channels currently displayed.
•
Select None
: Deselect all selected channels.
•
Preview: Displays (a) currently selected channel(s).
The Favorite Channels settings have been completed.
6.
Press the EXIT button to exit.
Add
You can use this function when one or more favourite
channels have been selected.
1.
Press the D.MENU button to display the DTV menu.
2. Press the ▲ or ▼ button to select "Channel", then press the
ENTER/OK button.
3.
Press the ▲ or ▼ button to select "Edit Favourite Channels",
then press the ENTER/OK button.
4.
Press the red button in the "Edit Favourite Channels" menu.
To add more channels, refer to the step 5 on the previous
description.
5.
If you want to check the channel to be stored, press D.MENU
button.
Press the EXIT button to exit.
• To add all channels to the favourite channel list, press the
red button.
• To remove all channels, press the green button.
• Preview : Displays (a) currently selected channel(s).
• Press the CH LIST button to display the favourite channel
manager.
Editing Your Favourite Channels
Move Enter Return
Edit Favourite Channels
(no Channels)
Add Channels
Move Enter Return
Edit Favourite Channels
5
2 BBC TWO
5 Five
7 BBC THREE
15 abc1
16 QVC
6
Select All Select None Preview
Move Enter Return
Edit Favourite Channels
2 BBC TWO
★
7 BBC THREE
★
15 abc1
★
Add Move Prewiew Delete
Move Enter Return
Edit Favourite Channels
5
2 BBC TWO
★
5 Five
7 BBC THREE
★
15 abc1
★
16 QVC
6
Select All Select None Preview
Move Select Return
Return
Move Return
Move Select Return
BN68-01169F-Eng-0313.indd 34 2007-03-13 �� 7:49:27

English - 35
Move
1.
Press the D.MENU button to display the DTV menu.
2. Press the ▲ or ▼ button to select "Channel", then press the
ENTER/OK button.
3.
Press the ▲ or ▼ button to select "Edit Favourite Channels",
then press the ENTER/OK button.
4.
Select the required channel using the 5 or 6 button.
5.
Press the green button.
A " " icon is displayed on the left side of the channel
name.
6. Press the ▲ or ▼ button to select the channel that you want
to move, and press the green or ENTER/OK
button.
7.
Press the EXIT button to exit.
Preview
1.
In the "Edit Favourite Channels" menu,
select the channel to be previewed by pressing the ▲ or ▼
button.
2.
Press the yellow button.
The selected channel is displayed on the screen.
Delete
1. In the "Edit Favourite Channels" menu, select the channel to
be deleted from the favourite channels list by pressing the
▲ or ▼ button.
2.
Press the blue button.
The selected channel and number will be deleted.
To add a deleted channel back in to the favourite channel
list, see "Add" on page 34.
Move Enter Return
Edit Favourite Channels
2 BBC TWO ★
7 BBC THREE
★
15 abc1
★
Add Move Prewiew Delete
Move Enter Return
Edit Favourite Channels
2 BBC TWO ★
7 BBC THREE
★
15 abc1
★
Add Move Prewiew Delete
Move Enter Return
Edit Favourite Channels
2 BBC TWO
★
7 BBC THREE
★
Add Move Prewiew Delete
Move Select Return
Move Return
Move Return
BN68-01169F-Eng-0313.indd 35 2007-03-13 �� 7:49:30
Seite wird geladen ...
Seite wird geladen ...

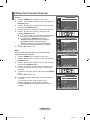
English - 38
If you make a scheduled viewing list of programs you may
like to see, the channel will be automatically switched to the
scheduled program at the scheduled time even if you are
watching another program.
1.
Press the D.MENU button to display the DTV menu.
2.
Press the ENTER/OK button, to select "Guide".
3.
Press the ▲ or ▼ button to select "Scheduled List", then
press the ENTER/OK button.
4.
Press the red button.
The channel will be switched to the scheduled program.
5.
Press the ENTER/OK button to select an item and adjust with
the ◄ or ► button .
You can also set hour and minute by pressing the number
buttons on the remote control.
•
Channel: Set the channel.
•
Time:
Set the time.
•
Date: Set Year, Month and Day.
•
Frequency: Set the frequency.
("Once", "Daily", or "Weekly")
6.
After setting the schedule, Press the red button.
7.
Press the EXIT button to exit.
•
Save: Save the adjusted schedule.
•
Cancel: Cancel the adjusted schedule.
•
Add Programme
: Add a new schedule.
•
Edit
: Re-adjust the selected schedule.
•
Delete: Delete the selected schedule.
You can preset the default guide style.
1.
Press the D.MENU button to display the DTV menu.
2.
Press the ENTER/OK button, to select "Guide".
3.
Press the ▲ or ▼ button to select "Default Guide", then press
the ENTER/OK button.
4.
Select "Now/Next" or "Full Guide" using the ▲ or ▼ button,
and press the ENTER/OK button.
5.
Press the EXIT button to exit.
Using the Scheduled List
Scheduled List
(No programmes)
Return
Scheduled List
Tuesday 22 Apr 15:30 ~ 16:00 Once
801 RaiTre
Move Return
Add Programme
Add Programme
Edit Delete
Scheduled List
Channel
Adjust Move Return
Save Cancel
Time
Date
Frequency
802 RaiUno
15 : 20 to -- : --
Tue 22 Apr 2007
Once
Setting the Default Guide
Move Enter Return
Guide
Now & Next Guide
Full Guide
Scheduled List
Default Guide : Full Guide
Now/Next
Full Guide
Move Enter Return
You can select these options
by simply pressing the GUIDE
button on the remote control.
BN68-01169F-Eng-0313.indd 38 2007-03-13 �� 7:49:36

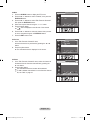
English - 39
In the EPG menu, you can display all channels or favourite
channels.
1.
Press the D.MENU button to display the DTV menu.
2.
Press the ENTER/OK button again, to select "Guide".
3. Select the your required guide ("Now & Next Guide" or "Full
Guide") by pressing the
▲ or ▼ button.
4.
Press the ENTER/OK button.
5.
Press the green button.
All the channel lists and the favorite channel lists will be
toggled.
6.
Select a programme of your choice by pressing the ▲, ▼,
◄, or ► button.
7.
Press the INFO button to display information about the
highlighted programme.
8.
When the Edit Favourite Channels list has not been set up:
•
"The favourites list is empty.
Would you like to choose your favourites now?" message is
displayed.
•
Select "Yes".
The "Edit Favourite Channels" menu is displayed.
If you select "No", all channels will remain unchanged.
• To edit the favourite channels, refer to page 34 for more
details.
9 .
Press the EXIT button to exit.
"
All Channels" is the list of channels that have been scanned by
the channel list update.
All channels are displayed in the all channel mode.
"
Favourites" (favourite channels) is the list of channels that has
been set in the "Edit Favourite Channels" menu (refer to page 34).
Viewing All Channels and Favourite Channels
All Channels
Now & Next Guide
13:28 Wed 16 Feb
Extreme Machines: Armoured Cars
INFO
Information
Watch ExitFull Guide Favourites
Now Next
Full Guide
13:28 Wed 16 Feb
Extreme Machines: Armoured Cars
INFO
Information
Watch ExitNow/Next Favourites
13:00 14:00Today
-24Hours +24Hours
The favourites list is empty.
Would you like to choose your
favourites now?
Yes No
BN68-01169F-Eng-0313.indd 39 2007-03-13 �� 7:49:38
Seite wird geladen ...
Seite wird geladen ...

English - 42
If the programme is broadcast with digital text, this feature is
enabled.
1.
Press the D.MENU button to display the DTV menu.
2.
Press the ▲ or ▼ button to select "Setup", then press the
ENTER/OK button.
3.
Press the ▲ or ▼ button to select "Digital Text", then press
the ENTER/OK button.
4.
Press the ▲ or ▼ button to select "Disable" or
"Enable". Press the ENTER/OK button.
5.
Press the EXIT button to exit.
MHEG(Multimedia and Hypermedia Information Coding Experts Group) An International standard
for data encoding systems used in multimedia and hypermedia. This is at a higher level than the
MPEG system which includes data-linking hypermedia such as still images, character service,
animation, graphic and video files as well as multimedia data. MHEG is user runtime interaction
technology and is being applied to various fields including VOD (Video-On-Demand), ITV
(Interactive TV), EC (Electronic Commerce), tele-education, tele-conferencing, digital libraries and
network games.
Selecting the Digital Text (UK only)
Setup
Digital Text : Enable
Time Zone
System
Move Enter Return
Disable
Enable
Select the time zone where locate
1.
Press the D.MENU button.
2. Press the ▲ or ▼ button to select "Setup", then press the
ENTER/OK button.
3.
Press the ▲ or ▼ button to select "Time Zone", then press
the ENTER/OK button.
4. Select the time zone where you locate by pressing the
▲ or ▼
button.
Press the ENTER/OK button.
The following options are available
The Iberian Peninsula and Balears Islands -
Canarian Islands
5. Press the EXIT button to exit.
Selecting the Time Zone (Spain only)
You can view your product information. For service or
repair, please contact a Samsung approved dealer.
1.
Press the D.MENU button to display the DTV menu.
2.
Press the ▲ or ▼ button to select "Setup", then press the
ENTER/OK button.
3. Press the
▲ or ▼
button to select "System", then press
the ENTER/OK button.
4.
Press the ENTER/OK button again, to select "Product
Information".
The Product Information menu is selected.
- Software Version, Firmware Version
5.
Press the EXIT button to exit.
Viewing Product Information
Product Information
Software Version: T_BDXPDEU00_0700
Firmware Version: T_STDEU7_102c
Return
Setup
Digital Text
Time Zone
System
Move Enter Return
Time Zone
Adjust Enter Return
The Iberian Peninsula and Balears Islands
Canarian Islands
BN68-01169F-Eng-0313.indd 42 2007-03-13 �� 7:49:46
Seite wird geladen ...
Seite wird geladen ...
Seite wird geladen ...
Seite wird geladen ...
Seite wird geladen ...
Seite wird geladen ...

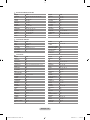
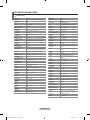
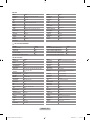
English - 49
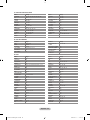
VCR
Brand Code
SAMSUNG 000 001 002 003 004 005 077 078 079
ADMIRAL 020
AIWA 025
AKAI 004 027 032
AUDIO DYNAMICS 007 026
BELL&HOWELL 018
BROKSONIC 022
CANDLE 002 003 006 008 015 055
CANON 021 056
CITIZEN 002 003 006 008 015 055
COLORTYME 007
CRAIG 002 024
CURTIS MATHES 002 007 008 017 021 025 056 064 066
DAEWOO 003 010 011 012 013 014 015 016
DB 007 026
DIMENSIA 017
DYNATECH 025
ELECTROHOME 034
EMERSON
001 003 006 021 022 025 030 032 034 040
047 050 052 060 063 065 066 067 069 073
FISHER 018 024 028 029 048 051 061
FUNAI 025
GENERAL ELECTRIC
002 005 017 021 056
GO VIDEO 002
HARMAN KARDON 007
HITACHI 019 025 041 042 074
INSTANT REPLAY 021
JC PENNEY
002 007 018 019 021 026 037 041 054 056
JCL 007 008 018 021 026 037
JVC 081 082 083
KENWOOD 007 008 018 021 026 037
KLH 070
KONIA 036
LG(Goldstar) 006 007 008 009 010
LIOYD 025
LOGIK 038
LXI 025
MAGNAVOX 021 056 059
MARANTZ 007 008 018 021 026 037 062
MARTA 006
MEI 021
MEMOREX 006 021 024 025
MGA 034
MIDLAND 005
MINOLTA 019 041 075
MITSUBISHI 019 034 041 046
Brand Code
MONTGOMERY WARD
020
MTC 002 025
MULTITECH 002 005 025 038
NEC 007 008 018 026 037 062 064
OPTIMUS 020
ORION 073 074 075 076
PANASONIC 021 056 071 072
PENTAX 019 041 075
PENTEX
RESEARCH+
008
PHILCO 021 056 059
PHILIPS 021 080
PIONEER 019 026 039 053
PORTLAND 015 049 055
PROSCAN 017
QUARTZ 018
QUASAR 021 056
RADIO SHACK/
REALISTIC
006 018 020 021 024 025 029 034 048 056
RCA
002 017 019 021 035 041 043 057 068 076
SANSUI 026
SANYO 018 024
SCOTT 003 047 052 067
SEARS 006 018 019 024 028 029 041 048 051
SHARP 020 034 045 015
SHIMTOM 027 033 038 058
SIGNATURE 025
SONY 027 033 044
SYLVANIA
021 025 056 059
SYMPHONIC 025
TANDY 018 025
TASHIKA 006
TATUNG 037
TEAC 025 037 068
TECHNICS 021
TEKNIKA 006 021 025 031
TMK 066
TOSHIBA 003 019 029 051 052
TOTEVISION 002 006
UNITECH 002
VECTOR RESEARCH
007 026
VICTOR 026
VIDEO CONCEPTS 007 026
VIDEOSONIC 002
WARDS
002 003 006 019 020 021 024 025 034 038 041
YAMAHA 007 008 018 026 037
ZENITH 023 027 033
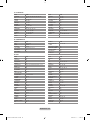
Remote Control Codes
BN68-01169F-Eng-0313.indd 49 2007-03-13 �� 7:49:57

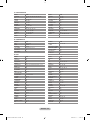
English - 50
CABLE BOX
Brand Code
SAMSUNG 000 001 002 003 004 005 006 007
GI 041
HAMLIN 003 024 031
HITACHI 025 030
JERROLD 038 039
MACOM 025 030
MAGNAVOX 019 023 028
OAK 026
PANASONIC 003 022 027 037 044
PHILIPS 019 021 023 028
PIONEER 004 018 020 044
RCA 014 022 040
REGAL 003
Brand Code
REGENCY 015 023
SA 042 043
SCIENTIFIC ATLAN 042 043
SPRUCER 022
STARGATE 2000 036
SYLVANIA 016
TEXSCAN 016
TOCOM 032
UNIVERSAL 033 034
VIEWSTAR 019 021 023 028
WAMER AMEX 046
ZENITH 017 029 035 037 045
SAMSUNG DVD
Product Code
DVD 000 001 002
DVDR 003 004
BD Record 005 006
VCR COMBO 007 008 009 010 011
VCR Record 012
DHR COMBO 013
Product Code
Home Theater VCR COMBO 014 015 016
HDD Recorder COMBO 017
TWIN TRAY COMBO 018
STB DVD COMBO 019
DVD Receiver 020
AV Receiver 021
DVD
Brand Code
ANAM 030
AUDIOVOX 075
AUDIOLOGIC 085
ANABA 072
APEX DIGITAL 070 071 074 086 083 084 088 111 112
AIWA 114
BROKSONIC 062
BLAUPUNKT 074
B&K 122 123
CURTIS MATHES 027
CYBER HOME 077 078 079 082
CLARION 080 125
CIRRUS 081
CYBER HOME 065
CINEVISION 095
DAEWOO 066
DENON 146
FARENHEIT 067 068
FISHER
090
GPX 060
GO VIDEO 061 089 133 135
GE
069 074
GREENHILL 074
HITACHI 064 113
HITEKER 071
HOYO 073
HARMAN / KARDON 091 110
IRT 089
Brand Code
INTEGRA 092
JBL 091
JVC 022 033 115 116
JATON 073
KENWOOD 051 108 109
KISS 073
KONKA 059 100 106 107
KLH 074 075
LG(Goldstar) 025 031
LOEWE 057
LASONIC 058
MOBILE
AUTHORITY
054
MEMOREX 055
MALATA 056
MAGNAVOX 076 093
MINTEK 074 094
MONYKA 073
NORCENT 048 049 050
NEXT BASE
052
NEC 053
NANTAUS 144
NESA
074
OPTOMEDIA
ELECTRONICS
105
OPTIVIEW 072
ONKYO 076 092 119
PHILCO 044 045
PRINCETON 046 047
PROSCAN 023
BN68-01169F-Eng-0313.indd 50 2007-03-13 �� 7:49:58
Seite wird geladen ...
Seite wird geladen ...
Seite wird geladen ...
Seite wird geladen ...
Seite wird geladen ...
Seite wird geladen ...
Seite wird geladen ...
Seite wird geladen ...
Seite wird geladen ...
Seite wird geladen ...
Seite wird geladen ...
Seite wird geladen ...
Seite wird geladen ...
Seite wird geladen ...
Seite wird geladen ...
Seite wird geladen ...
Seite wird geladen ...
Seite wird geladen ...
Seite wird geladen ...
Seite wird geladen ...
Seite wird geladen ...
Seite wird geladen ...
Seite wird geladen ...
Seite wird geladen ...
Seite wird geladen ...
Seite wird geladen ...
Seite wird geladen ...
Seite wird geladen ...
Seite wird geladen ...
Seite wird geladen ...
Seite wird geladen ...
Seite wird geladen ...
Seite wird geladen ...
Seite wird geladen ...
Seite wird geladen ...
Seite wird geladen ...
Seite wird geladen ...
Seite wird geladen ...
Seite wird geladen ...
Seite wird geladen ...
Seite wird geladen ...
Seite wird geladen ...
Seite wird geladen ...
Seite wird geladen ...
Seite wird geladen ...
Seite wird geladen ...
Seite wird geladen ...
Seite wird geladen ...
Seite wird geladen ...
Seite wird geladen ...
Seite wird geladen ...
Seite wird geladen ...
Seite wird geladen ...
Seite wird geladen ...
Seite wird geladen ...
Seite wird geladen ...
Seite wird geladen ...
Seite wird geladen ...
Seite wird geladen ...
Seite wird geladen ...
Seite wird geladen ...
Seite wird geladen ...
Seite wird geladen ...
Seite wird geladen ...
Seite wird geladen ...
Seite wird geladen ...
Seite wird geladen ...
Seite wird geladen ...
Seite wird geladen ...
Seite wird geladen ...
Seite wird geladen ...
Seite wird geladen ...
Seite wird geladen ...
Seite wird geladen ...
Seite wird geladen ...
Seite wird geladen ...
Seite wird geladen ...
Seite wird geladen ...
Seite wird geladen ...
Seite wird geladen ...
Seite wird geladen ...
Seite wird geladen ...
Seite wird geladen ...
Seite wird geladen ...
Seite wird geladen ...
Seite wird geladen ...
Seite wird geladen ...
Seite wird geladen ...
Seite wird geladen ...
Seite wird geladen ...
Seite wird geladen ...
Seite wird geladen ...
Seite wird geladen ...
Seite wird geladen ...
Seite wird geladen ...
Seite wird geladen ...
Seite wird geladen ...
Seite wird geladen ...
Seite wird geladen ...
Seite wird geladen ...
Seite wird geladen ...
Seite wird geladen ...
Seite wird geladen ...
Seite wird geladen ...
Seite wird geladen ...
Seite wird geladen ...
Seite wird geladen ...
Seite wird geladen ...
Seite wird geladen ...
Seite wird geladen ...
Seite wird geladen ...
Seite wird geladen ...
Seite wird geladen ...
Seite wird geladen ...
Seite wird geladen ...
Seite wird geladen ...
Seite wird geladen ...
Seite wird geladen ...
Seite wird geladen ...
Seite wird geladen ...
Seite wird geladen ...
Seite wird geladen ...
Seite wird geladen ...
Seite wird geladen ...
Seite wird geladen ...
Seite wird geladen ...
Seite wird geladen ...
Seite wird geladen ...
Seite wird geladen ...
Seite wird geladen ...
Seite wird geladen ...
Seite wird geladen ...
Seite wird geladen ...
Seite wird geladen ...
Seite wird geladen ...
Seite wird geladen ...
Seite wird geladen ...
Seite wird geladen ...
Seite wird geladen ...
Seite wird geladen ...
Seite wird geladen ...
Seite wird geladen ...
Seite wird geladen ...
Seite wird geladen ...
Seite wird geladen ...
Seite wird geladen ...
Seite wird geladen ...
Seite wird geladen ...
Seite wird geladen ...
Seite wird geladen ...
Seite wird geladen ...
Seite wird geladen ...
Seite wird geladen ...
Seite wird geladen ...
Seite wird geladen ...
Seite wird geladen ...
Seite wird geladen ...
Seite wird geladen ...
Seite wird geladen ...
Seite wird geladen ...
Seite wird geladen ...
Seite wird geladen ...
Seite wird geladen ...
Seite wird geladen ...
Seite wird geladen ...
Seite wird geladen ...
Seite wird geladen ...
Seite wird geladen ...
Seite wird geladen ...
Seite wird geladen ...
Seite wird geladen ...
Seite wird geladen ...
Seite wird geladen ...
Seite wird geladen ...
Seite wird geladen ...
Seite wird geladen ...
Seite wird geladen ...
Seite wird geladen ...
Seite wird geladen ...
Seite wird geladen ...
Seite wird geladen ...
Seite wird geladen ...
Seite wird geladen ...
Seite wird geladen ...
Seite wird geladen ...
Seite wird geladen ...
Seite wird geladen ...
Seite wird geladen ...
Seite wird geladen ...
Seite wird geladen ...
Seite wird geladen ...
Seite wird geladen ...
Seite wird geladen ...
Seite wird geladen ...
Seite wird geladen ...
Seite wird geladen ...
Seite wird geladen ...
Seite wird geladen ...
Seite wird geladen ...
Seite wird geladen ...
Seite wird geladen ...
Seite wird geladen ...
Seite wird geladen ...
Seite wird geladen ...
Seite wird geladen ...
Seite wird geladen ...
Seite wird geladen ...
Seite wird geladen ...
Seite wird geladen ...
Seite wird geladen ...
Seite wird geladen ...
Seite wird geladen ...
Seite wird geladen ...
Seite wird geladen ...
Seite wird geladen ...
Seite wird geladen ...
Seite wird geladen ...
Seite wird geladen ...
Seite wird geladen ...
Seite wird geladen ...
Seite wird geladen ...
Seite wird geladen ...
Seite wird geladen ...
Seite wird geladen ...
Seite wird geladen ...
Seite wird geladen ...
Seite wird geladen ...
Seite wird geladen ...
Seite wird geladen ...
Seite wird geladen ...
Seite wird geladen ...
Seite wird geladen ...
Seite wird geladen ...
Seite wird geladen ...
Seite wird geladen ...
Seite wird geladen ...
Seite wird geladen ...
Seite wird geladen ...
Seite wird geladen ...
Seite wird geladen ...
Seite wird geladen ...
Seite wird geladen ...
Seite wird geladen ...
Seite wird geladen ...
Seite wird geladen ...
Seite wird geladen ...
Seite wird geladen ...
Seite wird geladen ...
Seite wird geladen ...
Seite wird geladen ...
Seite wird geladen ...
Seite wird geladen ...
Seite wird geladen ...
Seite wird geladen ...
Seite wird geladen ...
Seite wird geladen ...
Seite wird geladen ...
Seite wird geladen ...
Seite wird geladen ...
Seite wird geladen ...
Seite wird geladen ...
Seite wird geladen ...
Seite wird geladen ...
Seite wird geladen ...
Seite wird geladen ...
Seite wird geladen ...
Seite wird geladen ...
Seite wird geladen ...
Seite wird geladen ...
Seite wird geladen ...
Seite wird geladen ...
Seite wird geladen ...
Seite wird geladen ...
Seite wird geladen ...
Seite wird geladen ...
Seite wird geladen ...
Seite wird geladen ...
Seite wird geladen ...
Seite wird geladen ...
Seite wird geladen ...
Seite wird geladen ...
Seite wird geladen ...
Seite wird geladen ...
Seite wird geladen ...
Seite wird geladen ...
Seite wird geladen ...
Seite wird geladen ...
Seite wird geladen ...
Seite wird geladen ...
Seite wird geladen ...
Seite wird geladen ...
Seite wird geladen ...
Seite wird geladen ...
Seite wird geladen ...
Seite wird geladen ...
Seite wird geladen ...
Seite wird geladen ...
Seite wird geladen ...
Seite wird geladen ...
Seite wird geladen ...
Seite wird geladen ...
Seite wird geladen ...
Seite wird geladen ...
Seite wird geladen ...
Seite wird geladen ...
Seite wird geladen ...
Seite wird geladen ...
Seite wird geladen ...
Seite wird geladen ...
Seite wird geladen ...
Seite wird geladen ...
Seite wird geladen ...
Seite wird geladen ...
Seite wird geladen ...
Seite wird geladen ...
Seite wird geladen ...
Seite wird geladen ...
Seite wird geladen ...
Seite wird geladen ...
Seite wird geladen ...
Seite wird geladen ...
Seite wird geladen ...
Seite wird geladen ...
Seite wird geladen ...
Seite wird geladen ...
Seite wird geladen ...
Seite wird geladen ...
Seite wird geladen ...
Seite wird geladen ...
Seite wird geladen ...
Seite wird geladen ...
Seite wird geladen ...
Seite wird geladen ...
Seite wird geladen ...
Seite wird geladen ...
Seite wird geladen ...
Seite wird geladen ...
Seite wird geladen ...
Seite wird geladen ...
Seite wird geladen ...
Seite wird geladen ...
Seite wird geladen ...
Seite wird geladen ...
Seite wird geladen ...
Seite wird geladen ...
Seite wird geladen ...
Seite wird geladen ...
Seite wird geladen ...
Seite wird geladen ...
Seite wird geladen ...
Seite wird geladen ...
Seite wird geladen ...
Seite wird geladen ...
Seite wird geladen ...
Seite wird geladen ...
Seite wird geladen ...
Seite wird geladen ...
Seite wird geladen ...
Seite wird geladen ...
Seite wird geladen ...
Seite wird geladen ...
Seite wird geladen ...
Seite wird geladen ...
Seite wird geladen ...
Seite wird geladen ...
Seite wird geladen ...
Seite wird geladen ...
Seite wird geladen ...
Seite wird geladen ...
Seite wird geladen ...
Seite wird geladen ...
Seite wird geladen ...
Seite wird geladen ...
Seite wird geladen ...
Seite wird geladen ...
Seite wird geladen ...
Seite wird geladen ...
Seite wird geladen ...
Seite wird geladen ...
Seite wird geladen ...
Seite wird geladen ...
Seite wird geladen ...
Seite wird geladen ...
Seite wird geladen ...
Seite wird geladen ...
Seite wird geladen ...
Seite wird geladen ...
Seite wird geladen ...
Seite wird geladen ...
Seite wird geladen ...
Seite wird geladen ...
Seite wird geladen ...
Seite wird geladen ...
Seite wird geladen ...
Seite wird geladen ...
Seite wird geladen ...
Seite wird geladen ...
Seite wird geladen ...
Seite wird geladen ...
-
 1
1
-
 2
2
-
 3
3
-
 4
4
-
 5
5
-
 6
6
-
 7
7
-
 8
8
-
 9
9
-
 10
10
-
 11
11
-
 12
12
-
 13
13
-
 14
14
-
 15
15
-
 16
16
-
 17
17
-
 18
18
-
 19
19
-
 20
20
-
 21
21
-
 22
22
-
 23
23
-
 24
24
-
 25
25
-
 26
26
-
 27
27
-
 28
28
-
 29
29
-
 30
30
-
 31
31
-
 32
32
-
 33
33
-
 34
34
-
 35
35
-
 36
36
-
 37
37
-
 38
38
-
 39
39
-
 40
40
-
 41
41
-
 42
42
-
 43
43
-
 44
44
-
 45
45
-
 46
46
-
 47
47
-
 48
48
-
 49
49
-
 50
50
-
 51
51
-
 52
52
-
 53
53
-
 54
54
-
 55
55
-
 56
56
-
 57
57
-
 58
58
-
 59
59
-
 60
60
-
 61
61
-
 62
62
-
 63
63
-
 64
64
-
 65
65
-
 66
66
-
 67
67
-
 68
68
-
 69
69
-
 70
70
-
 71
71
-
 72
72
-
 73
73
-
 74
74
-
 75
75
-
 76
76
-
 77
77
-
 78
78
-
 79
79
-
 80
80
-
 81
81
-
 82
82
-
 83
83
-
 84
84
-
 85
85
-
 86
86
-
 87
87
-
 88
88
-
 89
89
-
 90
90
-
 91
91
-
 92
92
-
 93
93
-
 94
94
-
 95
95
-
 96
96
-
 97
97
-
 98
98
-
 99
99
-
 100
100
-
 101
101
-
 102
102
-
 103
103
-
 104
104
-
 105
105
-
 106
106
-
 107
107
-
 108
108
-
 109
109
-
 110
110
-
 111
111
-
 112
112
-
 113
113
-
 114
114
-
 115
115
-
 116
116
-
 117
117
-
 118
118
-
 119
119
-
 120
120
-
 121
121
-
 122
122
-
 123
123
-
 124
124
-
 125
125
-
 126
126
-
 127
127
-
 128
128
-
 129
129
-
 130
130
-
 131
131
-
 132
132
-
 133
133
-
 134
134
-
 135
135
-
 136
136
-
 137
137
-
 138
138
-
 139
139
-
 140
140
-
 141
141
-
 142
142
-
 143
143
-
 144
144
-
 145
145
-
 146
146
-
 147
147
-
 148
148
-
 149
149
-
 150
150
-
 151
151
-
 152
152
-
 153
153
-
 154
154
-
 155
155
-
 156
156
-
 157
157
-
 158
158
-
 159
159
-
 160
160
-
 161
161
-
 162
162
-
 163
163
-
 164
164
-
 165
165
-
 166
166
-
 167
167
-
 168
168
-
 169
169
-
 170
170
-
 171
171
-
 172
172
-
 173
173
-
 174
174
-
 175
175
-
 176
176
-
 177
177
-
 178
178
-
 179
179
-
 180
180
-
 181
181
-
 182
182
-
 183
183
-
 184
184
-
 185
185
-
 186
186
-
 187
187
-
 188
188
-
 189
189
-
 190
190
-
 191
191
-
 192
192
-
 193
193
-
 194
194
-
 195
195
-
 196
196
-
 197
197
-
 198
198
-
 199
199
-
 200
200
-
 201
201
-
 202
202
-
 203
203
-
 204
204
-
 205
205
-
 206
206
-
 207
207
-
 208
208
-
 209
209
-
 210
210
-
 211
211
-
 212
212
-
 213
213
-
 214
214
-
 215
215
-
 216
216
-
 217
217
-
 218
218
-
 219
219
-
 220
220
-
 221
221
-
 222
222
-
 223
223
-
 224
224
-
 225
225
-
 226
226
-
 227
227
-
 228
228
-
 229
229
-
 230
230
-
 231
231
-
 232
232
-
 233
233
-
 234
234
-
 235
235
-
 236
236
-
 237
237
-
 238
238
-
 239
239
-
 240
240
-
 241
241
-
 242
242
-
 243
243
-
 244
244
-
 245
245
-
 246
246
-
 247
247
-
 248
248
-
 249
249
-
 250
250
-
 251
251
-
 252
252
-
 253
253
-
 254
254
-
 255
255
-
 256
256
-
 257
257
-
 258
258
-
 259
259
-
 260
260
-
 261
261
-
 262
262
-
 263
263
-
 264
264
-
 265
265
-
 266
266
-
 267
267
-
 268
268
-
 269
269
-
 270
270
-
 271
271
-
 272
272
-
 273
273
-
 274
274
-
 275
275
-
 276
276
-
 277
277
-
 278
278
-
 279
279
-
 280
280
-
 281
281
-
 282
282
-
 283
283
-
 284
284
-
 285
285
-
 286
286
-
 287
287
-
 288
288
-
 289
289
-
 290
290
-
 291
291
-
 292
292
-
 293
293
-
 294
294
-
 295
295
-
 296
296
-
 297
297
-
 298
298
-
 299
299
-
 300
300
-
 301
301
-
 302
302
-
 303
303
-
 304
304
-
 305
305
-
 306
306
-
 307
307
-
 308
308
-
 309
309
-
 310
310
-
 311
311
-
 312
312
-
 313
313
-
 314
314
-
 315
315
-
 316
316
-
 317
317
-
 318
318
-
 319
319
-
 320
320
-
 321
321
-
 322
322
-
 323
323
-
 324
324
-
 325
325
-
 326
326
-
 327
327
-
 328
328
-
 329
329
-
 330
330
-
 331
331
-
 332
332
-
 333
333
-
 334
334
-
 335
335
-
 336
336
-
 337
337
-
 338
338
-
 339
339
-
 340
340
-
 341
341
-
 342
342
-
 343
343
-
 344
344
-
 345
345
-
 346
346
-
 347
347
-
 348
348
-
 349
349
-
 350
350
-
 351
351
-
 352
352
-
 353
353
-
 354
354
-
 355
355
-
 356
356
-
 357
357
-
 358
358
-
 359
359
-
 360
360
-
 361
361
-
 362
362
-
 363
363
-
 364
364
-
 365
365
-
 366
366
-
 367
367
-
 368
368
-
 369
369
-
 370
370
-
 371
371
-
 372
372
-
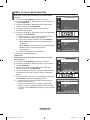 373
373
-
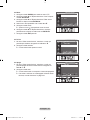 374
374
-
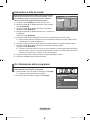 375
375
-
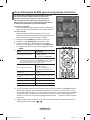 376
376
-
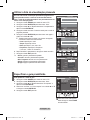 377
377
-
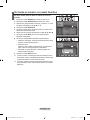 378
378
-
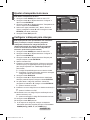 379
379
-
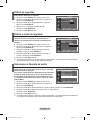 380
380
-
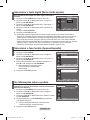 381
381
-
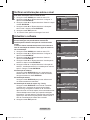 382
382
-
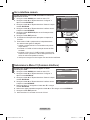 383
383
-
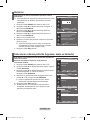 384
384
-
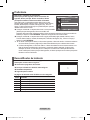 385
385
-
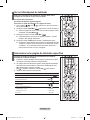 386
386
-
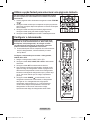 387
387
-
 388
388
-
 389
389
-
 390
390
-
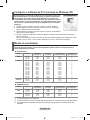 391
391
-
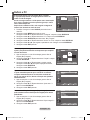 392
392
-
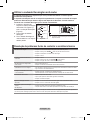 393
393
-
 394
394
-
 395
395
-
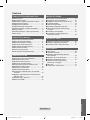 396
396
-
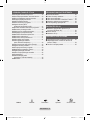 397
397
-
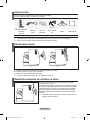 398
398
-
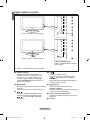 399
399
-
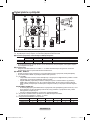 400
400
-
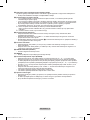 401
401
-
 402
402
-
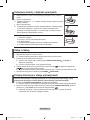 403
403
-
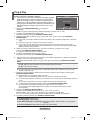 404
404
-
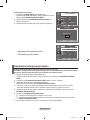 405
405
-
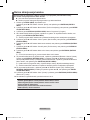 406
406
-
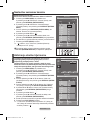 407
407
-
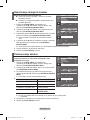 408
408
-
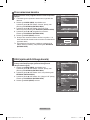 409
409
-
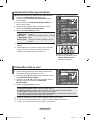 410
410
-
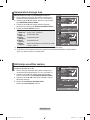 411
411
-
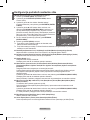 412
412
-
 413
413
-
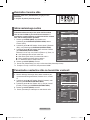 414
414
-
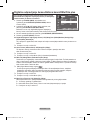 415
415
-
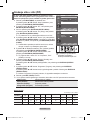 416
416
-
 417
417
-
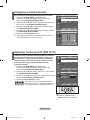 418
418
-
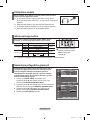 419
419
-
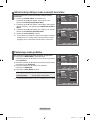 420
420
-
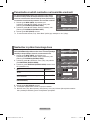 421
421
-
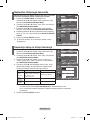 422
422
-
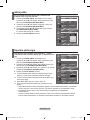 423
423
-
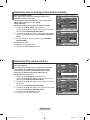 424
424
-
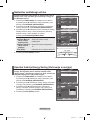 425
425
-
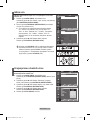 426
426
-
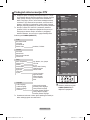 427
427
-
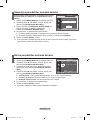 428
428
-
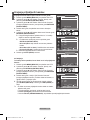 429
429
-
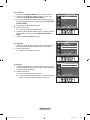 430
430
-
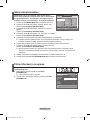 431
431
-
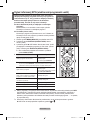 432
432
-
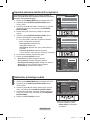 433
433
-
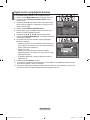 434
434
-
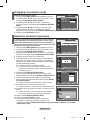 435
435
-
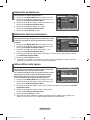 436
436
-
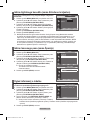 437
437
-
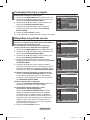 438
438
-
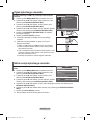 439
439
-
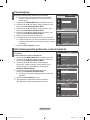 440
440
-
 441
441
-
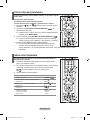 442
442
-
 443
443
-
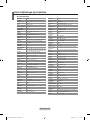 444
444
-
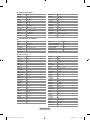 445
445
-
 446
446
-
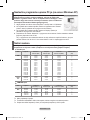 447
447
-
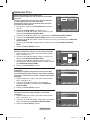 448
448
-
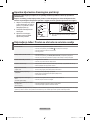 449
449
-
 450
450
-
 451
451


Samsung LE-23R86BD Benutzerhandbuch
- Kategorie
- LCD-Fernseher
- Typ
- Benutzerhandbuch
in anderen Sprachen
- English: Samsung LE-23R86BD User manual
- français: Samsung LE-23R86BD Manuel utilisateur
- español: Samsung LE-23R86BD Manual de usuario
- italiano: Samsung LE-23R86BD Manuale utente
- Nederlands: Samsung LE-23R86BD Handleiding
- português: Samsung LE-23R86BD Manual do usuário
Verwandte Artikel
-
Samsung LE32R86WDX Benutzerhandbuch
-
Samsung LE40B551 Benutzerhandbuch
-
Samsung LE46S86BD Benutzerhandbuch
-
Samsung LE40S62B Benutzerhandbuch
-
-
Samsung LE32B679T2S Benutzerhandbuch
-
Samsung LE-37M86BD Benutzerhandbuch
-
Samsung ue55b7090 Benutzerhandbuch
-
-